• Global community
    • Language:
      • Deutsch
      • English
      • Español
      • Français
      • Português
  • 日本語コミュニティ
    Dedicated community for Japanese speakers
  • 한국 커뮤니티
    Dedicated community for Korean speakers
Exit
0

How to apply a transparent border (I think the technical term is offset) along the perimeter.

Explorer ,
Dec 02, 2024 Dec 02, 2024

Copy link to clipboard

Copied

I am a beginner in using Illustrator and have no graphic design skills.

What I did
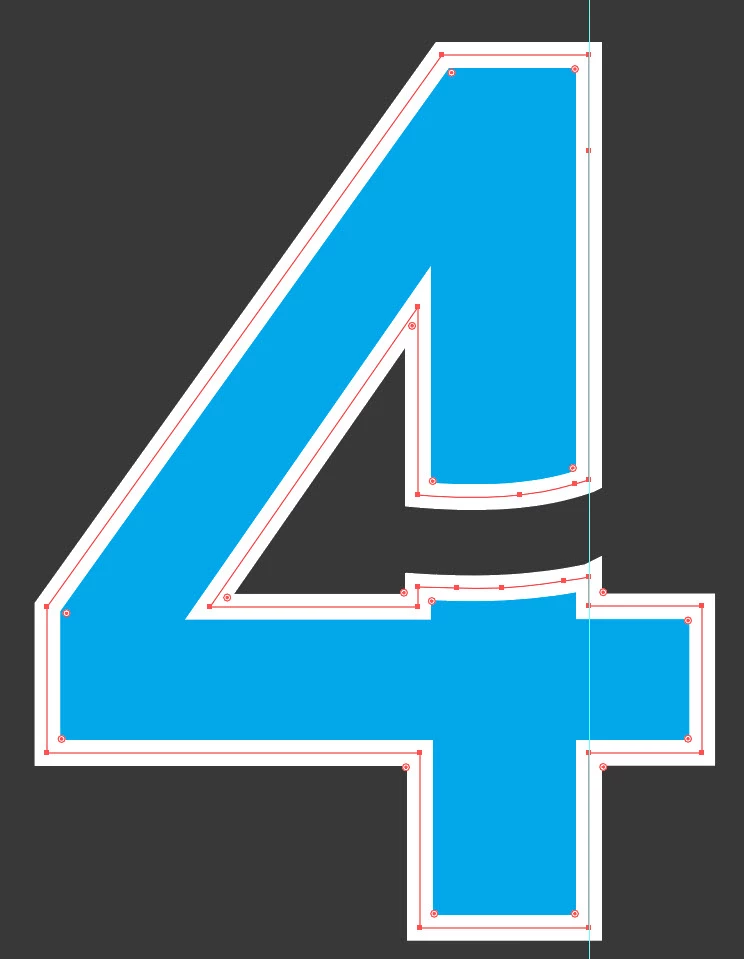
I chose a typeface, the number 4 and traced it using the pen tool.
I used the pen to create a second element.
I used the Patfinder tool to intersect the two elements.
Since I need to have a transparent space along the intersection path i.e. the two objects should have no contact points, I increased the thickness of the stroke to create the separation.
Unfortunately, despite research I have not figured out how to change the fill color of the stroke from white to transparent in order to create the gap space effect along the perimeter.

Can anyone point me to the steps or an online tutorial to achieve the goal


Many thanks


Arturo


Logo_font4.jpg

TOPICS
How-to

Views

196

Translate

Translate

Report

Report
Community guidelines
Be kind and respectful, give credit to the original source of content, and search for duplicates before posting. Learn more
community guidelines
Adobe
Community Expert ,
Dec 02, 2024 Dec 02, 2024

Copy link to clipboard

Copied

You might have to expand the Stroke panel to see this but you can position a stroke to be on the outside of a path. You can also use the Offset Path command (there are two) to expand the stroke by half its width.


If you do this in the Effect menu the offset is an editable effect and the path shape does not change, only its appearance does.

Screenshot 2024-12-02 at 8.09.03 AM.png

If you use Object > Path > Offset Path the path shape will change. This will make a duplicate of the original path.

Screenshot 2024-12-02 at 8.12.19 AM.png

Votes

Translate

Translate

Report

Report
Community guidelines
Be kind and respectful, give credit to the original source of content, and search for duplicates before posting. Learn more
community guidelines
Community Expert ,
Dec 02, 2024 Dec 02, 2024

Copy link to clipboard

Copied

Maybe I misunderstand it, but if you want a transparent space between the stroke and the compound path, just add a stroke in the Appearance panel and apply an Offset Path Effect to it.

Screenshot 2024-12-02 at 17.40.21.png

Votes

Translate

Translate

Report

Report
Community guidelines
Be kind and respectful, give credit to the original source of content, and search for duplicates before posting. Learn more
community guidelines
Advocate ,
Dec 02, 2024 Dec 02, 2024

Copy link to clipboard

Copied

Bonjour,

Peut être çà ?

Damier de transparence...

renl80416020_0-1733160193830.png

René

Votes

Translate

Translate

Report

Report
Community guidelines
Be kind and respectful, give credit to the original source of content, and search for duplicates before posting. Learn more
community guidelines
Explorer ,
Dec 02, 2024 Dec 02, 2024

Copy link to clipboard

Copied

Exact. Comment puis-je le faire ?

Votes

Translate

Translate

Report

Report
Community guidelines
Be kind and respectful, give credit to the original source of content, and search for duplicates before posting. Learn more
community guidelines
Advocate ,
Dec 02, 2024 Dec 02, 2024

Copy link to clipboard

Copied

Voilà,

Objet > Tracé >Décalage

Objet > Dissocier

Sélectionnez le carré noir et la partie décalée du chiffre 4

Objet > Tracé transparent > créer

René


Votes

Translate

Translate

Report

Report
Community guidelines
Be kind and respectful, give credit to the original source of content, and search for duplicates before posting. Learn more
community guidelines
Explorer ,
Dec 02, 2024 Dec 02, 2024

Copy link to clipboard

Copied


Sorry, but I think I failed to explain my use case. If I understood your instructions, I need a background to implement them, but in this case the graphic object, the number 4 and the green element that intersects with the main object do not have a background. What you see in the screenshots is a canvas space outside the artboard.
Look at the image below. It is similar to my composition. Look at the empty spaces at the intersection of the "p" and the number four. This is what I am trying to achieve.

Thanks for your time


Arturo


Expected result.jpg


Votes

Translate

Translate

Report

Report
Community guidelines
Be kind and respectful, give credit to the original source of content, and search for duplicates before posting. Learn more
community guidelines
Explorer ,
Dec 02, 2024 Dec 02, 2024

Copy link to clipboard

Copied

@Ton Frederiks@Scott Falkner 


Grazie per la tua risposta. Non credo di aver capito le tue risposte. Ecco cosa desidero ottenere.


Logo font 4_update.jpg

Votes

Translate

Translate

Report

Report
Community guidelines
Be kind and respectful, give credit to the original source of content, and search for duplicates before posting. Learn more
community guidelines
Community Expert ,
Dec 02, 2024 Dec 02, 2024

Copy link to clipboard

Copied

Arturo,


As I (mis)understand it, you can use the live Type (not outlined) or outline it, and:


0) Create the background;

1): Type the 4, then:

1A) In the Appearance palette Add New Stroke, give it another colour, and drag it down beneath Characters, set the Stroke Weight so you get the right gap (Stroke Weight = 2 x gap);

1B) Click the stroke in the Appearance palette to select only that, then in the Transparency palette set its Opacity to 0%; now it is invisible, but still there;

2) With the Pen Tool create a rough shape for the (green) element that fits the desired edge to the right (you can outline the 4 to snap to if you wish to have the element flush with the right edge of the 4; the element can extend to cover the part of the 4;

3) Select the 4 from 1) and move it on top of the element, you can hold Ctrl/Cmd and press X and then F, you can see it cover the unwanted parts of the element;

4) Select both the 4 from 1) and the element from 2) and group them; you can hold Ctrl/Cmd and press G;

5) In the Transparency palette options (you may need to click the right arrow to Show options) click the Knockout Group box until the element is knocked out by the transparent stroke of the 4.


This ought to give you the (accurate) desired appearance, and is fully editable/reversible.


Votes

Translate

Translate

Report

Report
Community guidelines
Be kind and respectful, give credit to the original source of content, and search for duplicates before posting. Learn more
community guidelines
Explorer ,
Dec 02, 2024 Dec 02, 2024

Copy link to clipboard

Copied

LATEST

Hi Jacob,
in point #1 you say to type the character 4. The character "4" of my use case was created by tracing a font with the pen tool. The same operation was done for the other font that intersects with the first. Then I used the patfinder tool to intersect the elements. In the end I obtained two distinct objects.

My level of familiarity with the pen tool, from 1 to 10 is 1.5, so please do not ask me to draw the elements again.

I attach a screenshot that shows a composition similar to the result I need to achieve. I'm sorry if I couldn't be more precise.

In previous posts I said that I want to assign the transparent color to the space highlighted also in the screenshot below because I want to be able to adapt the image to any background color.


Many thanks

Arturo

Expected result.jpg


Votes

Translate

Translate

Report

Report
Community guidelines
Be kind and respectful, give credit to the original source of content, and search for duplicates before posting. Learn more
community guidelines