


Copy link to clipboard
Copied
How can I get a 'HUD' type shape like the below picture, so it's shaped like a egg instead of the standard circle?


 1 Correct answer

To complete kdmemory explanation here's a quick video with one technique to build the HUD. 
https://drive.google.com/file/d/1k5fLbGqRJEiX4pQy0I0ivCCfCgywx3iu/view?usp=sharing
Explore related tutorials & articles
 23
Replies
23
23
Replies
23

Copy link to clipboard
Copied
Hi BenSCR
If you mean the basic egg shape, just use the Ellipse Tool (L), press Shift and draw a circle. Then use the Direct Selection Tool (A) and select the right anchor point of the circle object. Now can use the mouse or better the arrow keys of your keyboard to force the anchor point as far to the right as you want. (Of course you can do that basically to any side you like).
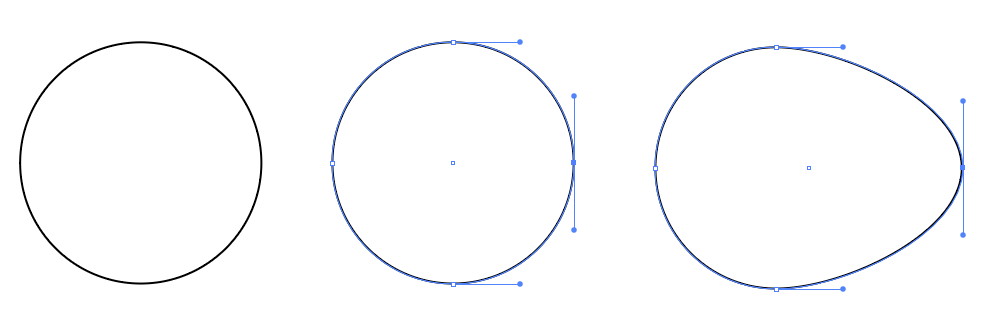
Too easy. But you probably mean how to get the stripes as in your graph, well that I don't know.
Klaus

Copy link to clipboard
Copied
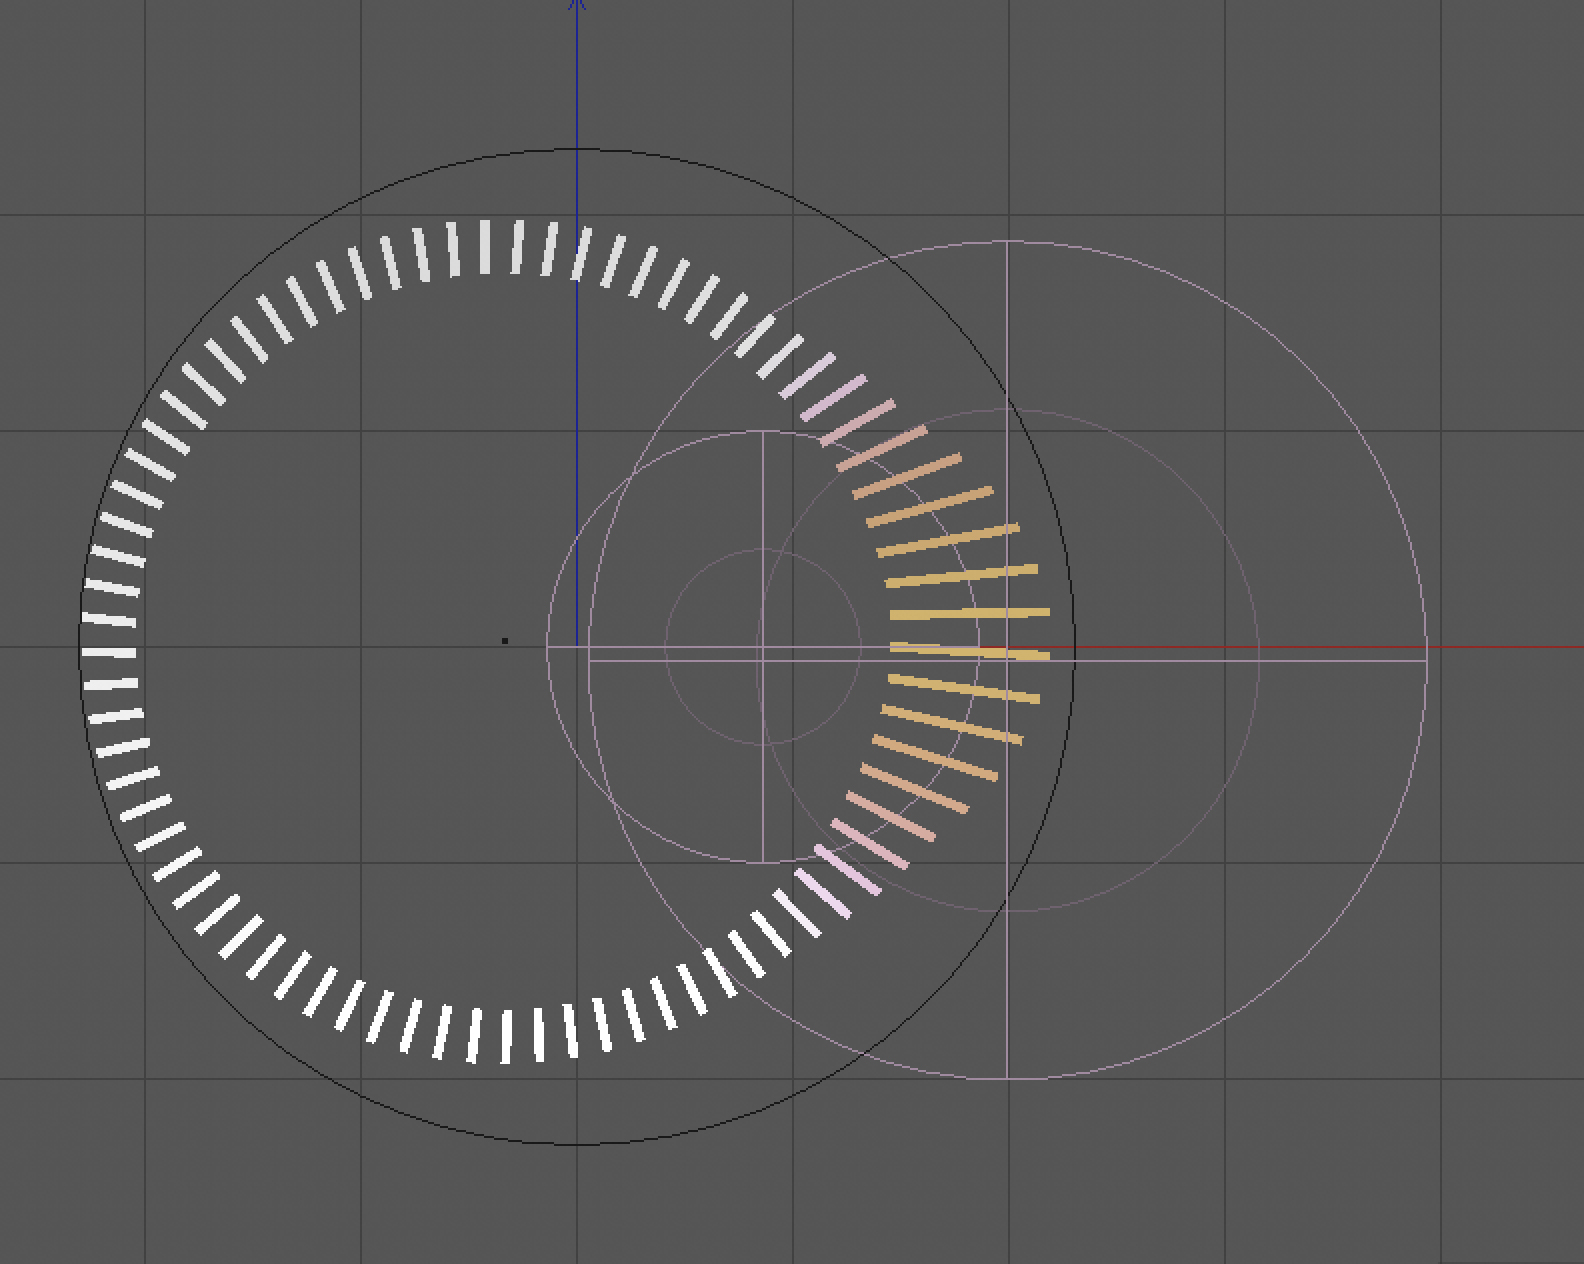
Using a blend between some objects that each have invisible "helper" objects.
Then swap the blend spine:

Copy link to clipboard
Copied
Monika, I've never seen the use of invisible helper objects in a blend! Based on the image you've posted, I assume they're no-stroke/no-fill objects. But I can tell neither what they're doing nor how exactly you use them. Are they included in the blend? Which objects are being blended exactly? And to the real point, I can see they're forcing some sort of curvature in the blend (without which there would be a "straight edge" ramping from the end objects to the middle one). But why and how?
Can you enlighten me? Either with a brief explanation or a link somewhere? Thank you.
Copy link to clipboard
Copied
Yes, please, Monika, enlighten us about the helper objects. I just tried it out, and it seemed to cause more problems than it solved, so I assume I'm missing something.
Thanks,
Peter
Copy link to clipboard
Copied
The helper objects are no fill/no stroke, all behind the visible objects and then each grouped with the visible object.
Then create the blend,
then replace the spine.
In my experiment it didn't work creating the blend with a custom spine in one step.
Example file: Dropbox - HUD - egg.ai
Copy link to clipboard
Copied
Definitely (and comically) doing something very wrong here, Moika!
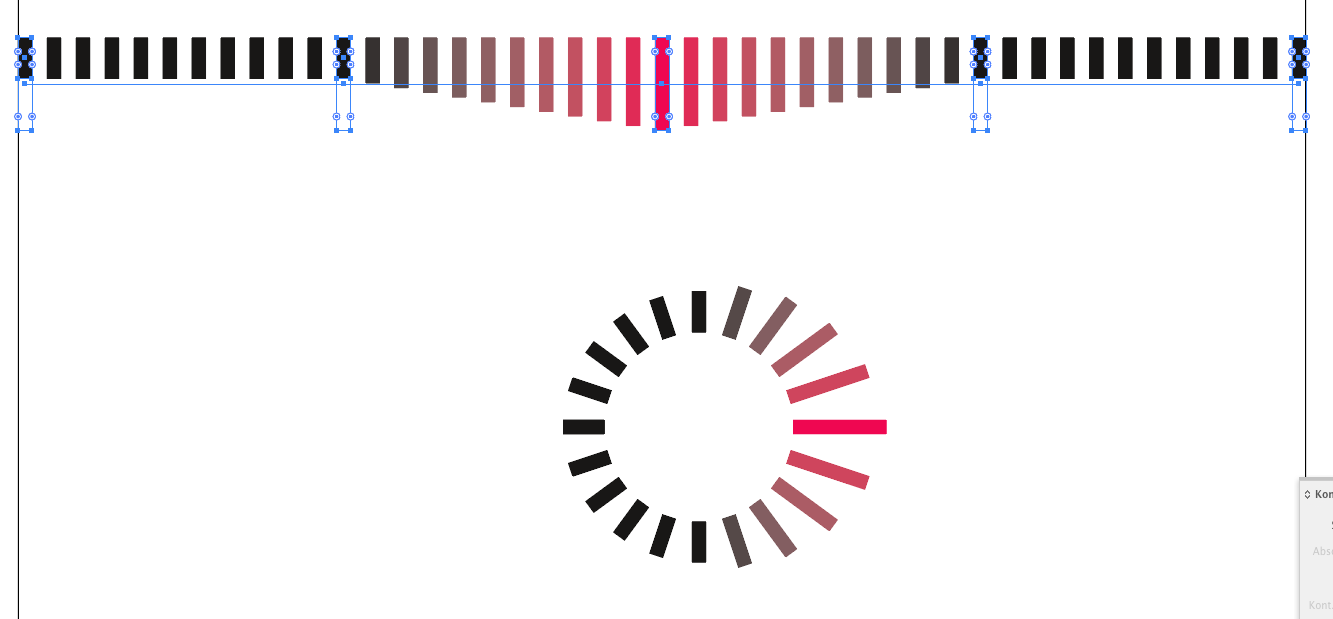
I've built five objects. Between Object 1 and 3 is grouped Object 2 (short, black rectangle in front of tall, invisible rectangle). Grouped Object 4 is identical to grouped Object 2. Why have I made such a mess?
Copy link to clipboard
Copied
The stacking order in each group must be identical (I put the invisible object below the visible one)
Then you need to have the groups either in the correct order or click them one by one with the blend tool.
Copy link to clipboard
Copied
Thanks, Monika. Still not making it happen so I returned to your version for a more critical look.
Are EACH OF YOUR FIVE visible rectangles grouped with invisible helper objects behind them? And are all the helper objects the height of the tallest rectangle in the center?
Copy link to clipboard
Copied
Exactly. Each group needs to contain the same amount of objects in corresponding places in the object stack.
Copy link to clipboard
Copied
After testing my own question, I have to assume the answer is 'yes'! Doing it that way replicated your example. Tell me if in fact you did it this way.
And can you also tell me: Where in the WORLD did you learn about "helper objects"?! How and where can I read about their purposes, their operations, and what they do that straight, "unhelped" blends do?
Thanks as always.
Copy link to clipboard
Copied
Maybe I read somewhere or just found out that for blends the bounding box matters a lot. So I need to get an appropriate bounding box and the invisible object does that in this case.
Copy link to clipboard
Copied
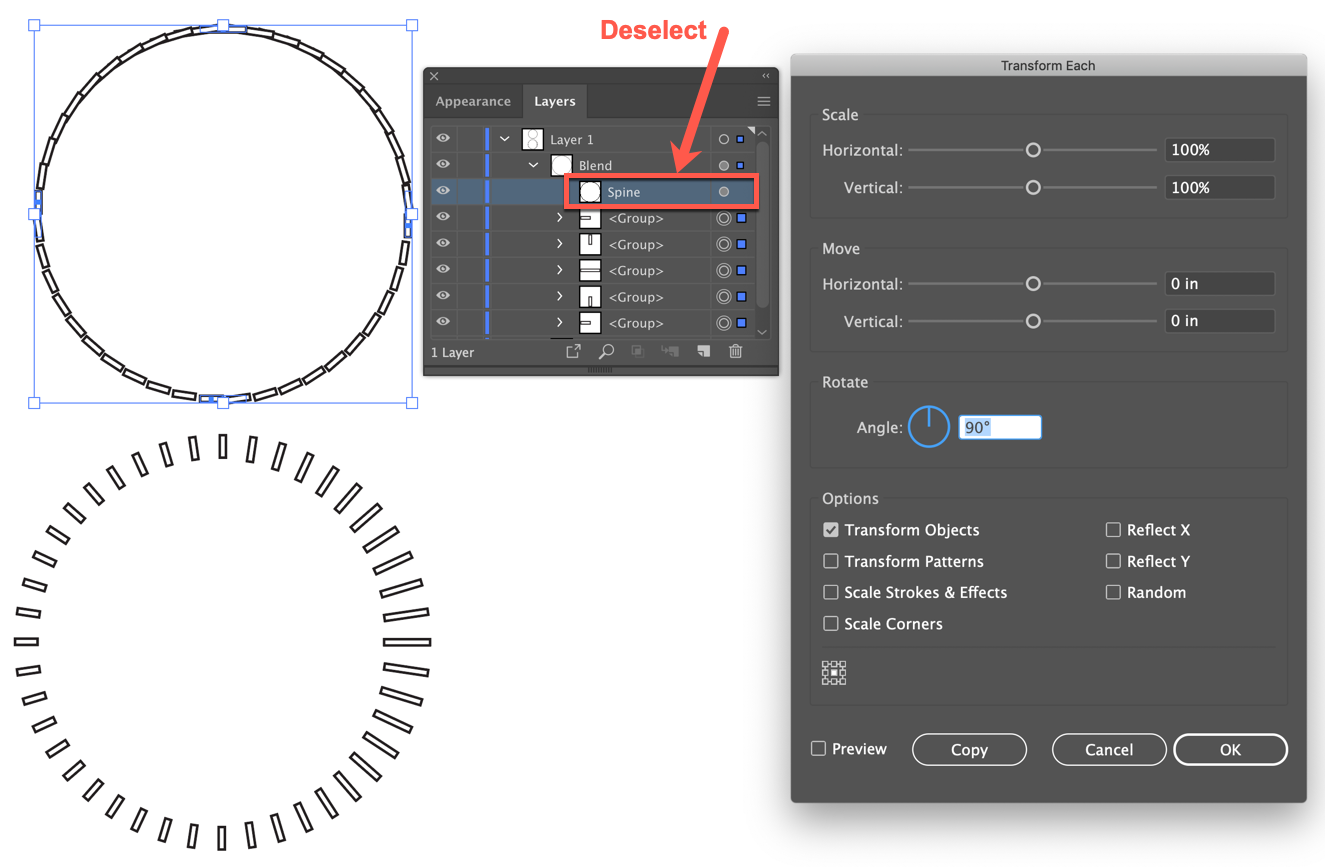
Thanks, Monika, I had it right except for grouping. I did run into the problem that upon replacing the spine the blend elements ran along the circumference rather than radially, which I think I've encountered before, but I fixed it by a Transform Each rotation. Replace Spine worked as expected on a semi-circle, but not on a three-quarter or full circle.
In any case, thank you.
Peter
Copy link to clipboard
Copied
Peter, how did you use Transform Each to properly align the blend to its new, egg-shaped spine? I ran into the same problem. Did you expand the blend first? What exactly did you select?
Copy link to clipboard
Copied
Doug, You can expand the blend, but be sure to ungroup before Transform > Transform Each.
I did not expand, in case I wanted to alter the blend later. I selected the blend, then in the Layers panel deselected the spine. Easier than fishing for it on the Artboard. Then Transform Each and rotate. I still sometimes get some weirdness happening, but can usually get what I want by clicking options on and off (or off and on). I've never found the Blend tool to be particularly stable. Hope this makes sense to you
Peter
Copy link to clipboard
Copied
Peter. I should have realized that you were applying Transform Each only to the blend's origin objects. Once you explained, it makes perfect sense. Thanks much.
Copy link to clipboard
Copied
You're welcome, Doug, glad to oblige.
Copy link to clipboard
Copied
To complete kdmemory explanation here's a quick video with one technique to build the HUD. 
https://drive.google.com/file/d/1k5fLbGqRJEiX4pQy0I0ivCCfCgywx3iu/view?usp=sharing
Copy link to clipboard
Copied
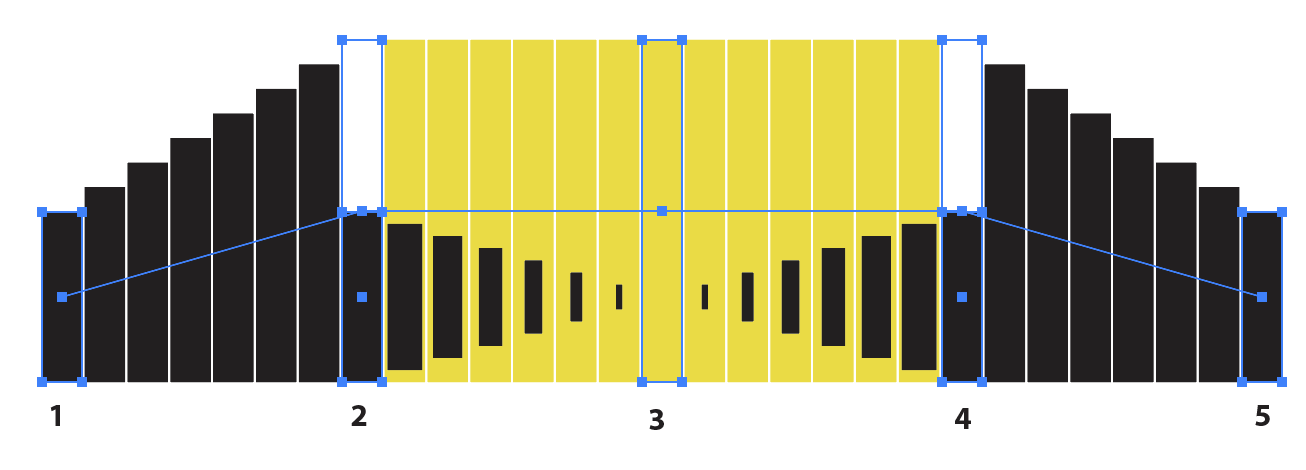
And yet another way is to
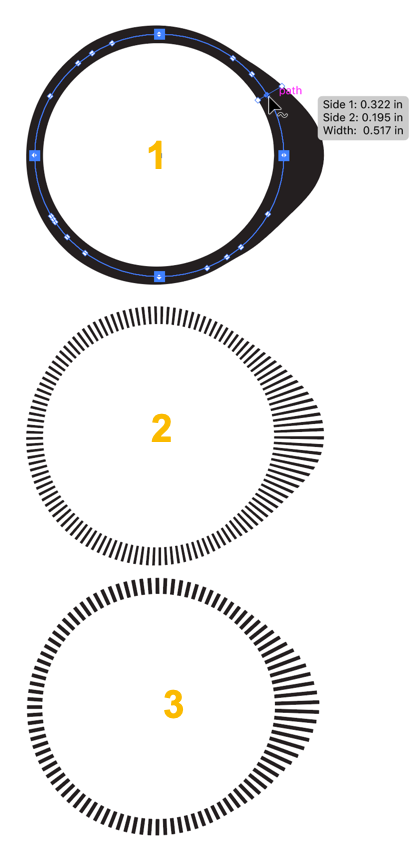
1) Build and save a stroke profile using the Width tool and the Stroke panel.
2) Draw a circle with a dashed stroke, then apply the stroke profile, or
3) Make a pattern brush from a vertical line segment, apply it to a circle, then apply the stroke profile.
Some adjustments to the brush or the dashed stroke definitions will probably be necessary
Peter

Copy link to clipboard
Copied
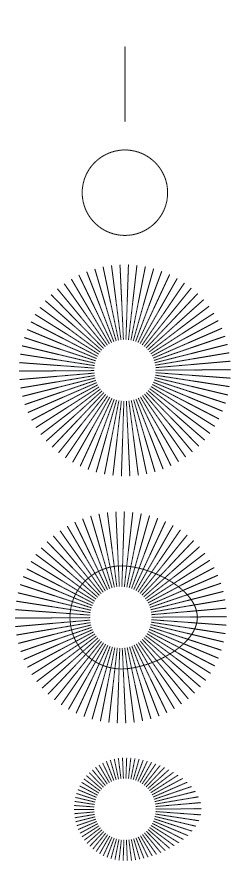
Similar to Peter's idea, you could
1. Make a single stroke to use for a Pattern brush (the one I made used a fixed scale and spacing at 500%)
2. Make a circle
3. Apply the brush to the circle
4. Make your egg shape like Klaus suggested then fill it
5. Use the egg as a Transparency mask (fill it with white with no stroke, select the egg shape and the stroked circle, go to the Transparency panel and select Make Mask)

Copy link to clipboard
Copied
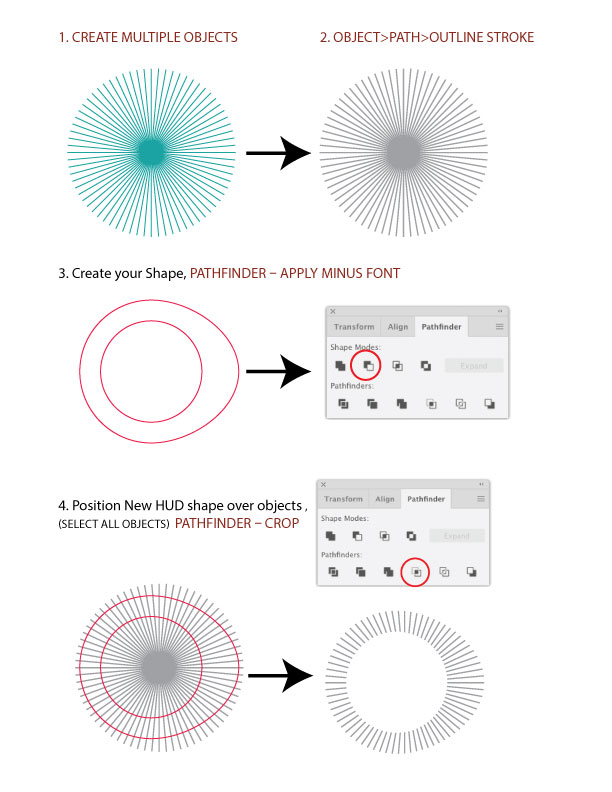
If you don't want any masks, try these steps.
Copy link to clipboard
Copied
 Now we can write a book about "How to Create a HUD with Adobe Illustrator!" LOL
Copy link to clipboard
Copied
I love it when we can find 65 ways to accomplish a task.

Copy link to clipboard
Copied
To sort of add another (cookbook) one, it is also possible to start with a Polar Grid of a suitable size and with 0 Concentric Dividers and a suitable number of Radial Dividers, then create the desired fried egg shape and subtract the yoke part, then using a Clipping/Opacity Mask or Pathfinder to just keep the (egg) white part with stripes.

Get ready! An upgraded Adobe Community experience is coming in January.
Learn more
 AdChoices