

- Home
- Illustrator
- Discussions
- Re: How to make curved arrows from circle?
- Re: How to make curved arrows from circle?

Copy link to clipboard
Copied
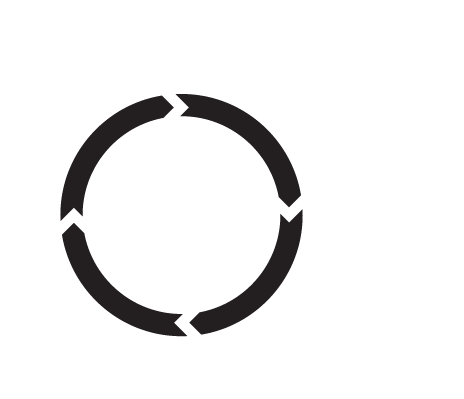
Hi, I want to make four curved arrows that lead into each other. Ideally, arrow head would just be a > shape at the end of the line that is the same width as the line (i.e., as if a straight line was cut at the end, so no tips or gaps.) I have drawn a circle with the ellipse tool, but I can't figure out how to cut it properly. An AI file that sort of shows what I mean is at https://www.onlinefilefolder.com/2swDvNSyBkcsXd
Thanks in advance for any help!


 1 Correct answer

You are welcome, Neil, and no need to apologize.
You may have a look at the link by Jeanette in post #4; it shows end results.
Here are the instructions in the first post with an extension of 3):
1) Create the circle with the desired width in the form of Stroke Weight;
2) Create a V shaped path with two segments on top of the circle where the first gap is to be, lengthwise extending outside the circle stroke, and with a Stroke Weight corresponding to the gap;
3) Copy and place so you have all V shape
...Explore related tutorials & articles
 14
Replies
14
14
Replies
14
Copy link to clipboard
Copied
Neil,
From what I can see when I open the file in 10 (there may be parts missing), it is just one quarter of a circle with an unbent arrowhead extending to both sides.
If the circle is unbroken, you may just create the shape of the arrowhead, copy it, and place them on top of the circle where desired. If you cut the circle and use Add Arrowhead on each of the former segment, (at least unless you have CS5) the arrowhead will point out along the tangent of the circle.
If you want something like V shaped gaps in the circle (which is what the question sounds like to me), you may:
1) Create the circle with the desired width in the form of Stroke Weight;
2) Create a V shaped path with two segments on top of the circle where the first gap is to be, lengthwise extending outside the circle stroke, and with a Stroke Weight corresponding to the gap;
3) Copy and place so you have all V shapes where you want the gaps;
4) Select all and Object>Path>Outline Stroke;
5) Pathfinder>Minus front (Subtract from shape ares in older versions, maybe pressing Alt/Option to expand).
If you use an Art Brush, the arrowheads/borders of the gaps will be curved (apart from the parts of the borders that are radial).

Copy link to clipboard
Copied
Both Mike and Jacob's answer are excellent however as Jacob explained it - I prefer the arrows not curved.
I tested both of their tutorials and they both work but Jacob's tutorial was what I was looking for.
Thanks for the fantastic feedback. I didn't know how to do this and now I do because of this great tutorial.
Thanks GUYS!
Here is a snap shot of both of their tutorials
http://img51.imageshack.us/img51/323/screenshot20111215at120.png
Copy link to clipboard
Copied
For my part you are welcome, Jeanette.
It is nice to see that threads and answers may live and grow long, and help others. Sometimes, as in this case, we shall never know whether the OP actually had any help, or even saw any of the posts.
Copy link to clipboard
Copied
Its great to know there are some people who are willing to help other people out.
Its hard to work these out when working as an independent freelancer.
Thanks for the lending hand.
Copy link to clipboard
Copied
My sincere apologies! For some reason, I was never notified of these responses until Ms. Kho posted earlier today. (I usually receive an email when someone posts a reply.) I just thought this question was never answered.
I just reveiewed the answers here, though, and they are all very helpful, although to be quite honest, I am not sure I fully understand them. I will have to play around with it I guess. Still, I am grateful to you and Mr. Gondek for your help, and to Ms. Kho for bringing this to my attention. Thank you again, and sorry for the delayed response.
And best wishes for happy holidays!
Copy link to clipboard
Copied
You are welcome, Neil, and no need to apologize.
You may have a look at the link by Jeanette in post #4; it shows end results.
Here are the instructions in the first post with an extension of 3):
1) Create the circle with the desired width in the form of Stroke Weight;
2) Create a V shaped path with two segments on top of the circle where the first gap is to be, lengthwise extending outside the circle stroke, and with a Stroke Weight corresponding to the gap;
3) Copy and place so you have all V shapes where you want the gaps; you may do that by rotating copies round the centre of the circle 1), this may be done in different ways, one being to create an auxliary concentric circle extending past the V shape and rotating copies of that and the V shape using the Object>Transform>Rotate and inserting the desired value(s), then deleting the auxiliary circles;
4) Select all and Object>Path>Outline Stroke;
5) Pathfinder>Minus front (Subtract from shape ares in older versions, maybe pressing Alt/Option to expand).
Copy link to clipboard
Copied
Hi Jacob,
Thank you for the additional detail! I just spent some time with this, and I am made it to step 5 before running into trouble. (Thanks for the extended explanation of step 3; that made placing the arrows much easier!)
At step 5, I discovered I don't have a "Minus front" option, only a "Minus back" option. I am using CS5 on I tried putting the arrows in front of the circle, and then selecting Minus back, but nothing seemed to happen (that is, the arrows and circle still remained the same as before). However, I did get a pop-up message that said "Pathfinder effects should usually be applied to groups, layers or type objects. This may not have any effect on the current selection."
I then put the arrows behind the circle and selected Minus back with the same result.
By chance, would you have any guesses as to what I might have done wrong? I understand it might be hard to troubleshoot, though, and I plan to keep playing with it. In any event, very much appreciate the help!
Edited to add pop-up message
Copy link to clipboard
Copied
Update:
Hooray! I just got it to work by using the Pathfinder panel and Divide. Here is the result:
Thank you!
Copy link to clipboard
Copied
You are welcome, Neil.
I am still with Illy in her youth, using the Pathfinder>Subtract from shape area, which lets everything on top of the bottom path bites chunks out of it, no need to Group or anything. It was replaced by Minus Front, and I thought that command still applied.
I presume you had some bits and pieces to delete.
Copy link to clipboard
Copied
Hi Jacob,
Aah, that explains it. And your presumption is correct--I had to delete some of the overlapping arrows, but nothing too tedious.
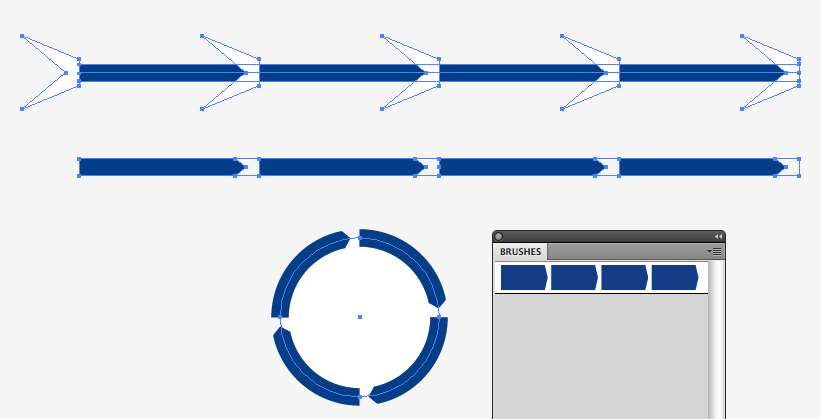
You may be interested to know, also, that I have been using the Pathfinder panel in other ways now. For example, I wanted to create some pie pieces, so I just created a circle, the created a series of paths, and followed your other steps to arrive at the following:
It's so nice to learn new techniques that can be applied in multiple ways. Thanks again for teaching me about this!
Copy link to clipboard
Copied
Nice to see, Neil.
Copy link to clipboard
Copied
Like Jacob described for:
Point 3: That is how I managed to get my 8 segments. Basically, if you centered you cursor in the middle of the circle and set the rotation of the arrows (in my instance 40 degrees) - Command D and then it duplicates the arrows all around the circle accurately.
You are welcome, Neil, and no need to apologize.
You may have a look at the link by Jeanette in post #4; it shows end results.
Here are the instructions in the first post with an extension of 3):
1) Create the circle with the desired width in the form of Stroke Weight;
2) Create a V shaped path with two segments on top of the circle where the first gap is to be, lengthwise extending outside the circle stroke, and with a Stroke Weight corresponding to the gap;
3) Copy and place so you have all V shapes where you want the gaps; you may do that by rotating copies round the centre of the circle 1), this may be done in different ways, one being to create an auxliary concentric circle extending past the V shape and rotating copies of that and the V shape using the Object>Transform>Rotate and inserting the desired value(s), then deleting the auxiliary circles;
4) Select all and Object>Path>Outline Stroke;
5) Pathfinder>Minus front (Subtract from shape ares in older versions, maybe pressing Alt/Option to expand).

Copy link to clipboard
Copied
Draw it as a straight lines, and use pathfinder to subtract objects.
Then create an d apply an art brush.

Copy link to clipboard
Copied
Make a custom arrowhead.

Find more inspiration, events, and resources on the new Adobe Community
Explore Now
 AdChoices