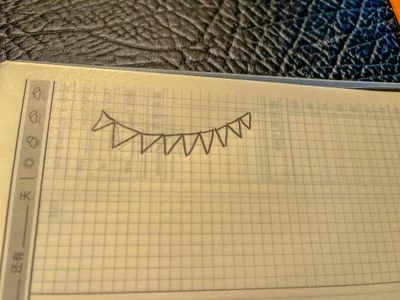
Based on my probably sillily interpreting your question literally in connexion with the drawing which could show the string moving in the wind, and equally sillily assuming that you wish to have the top of the triangles/flags follow the curve of the string and the lower sides kept straight, you can, Smart Guides (View dropdown) being your friends:
1) Create the string with the Pen Tool to have the exact shape and length you wish (you have to mean it), then lock it;
2) Create a triangle (starting with the Polygon Tool or just using the Pen Tool) with the size and shape of the (first) flag (and rotate it by 180 degrees to have it closer to the final angle);
3) Deselect the flag, then
With the normal Selection Tool (black asrrow) ClickDrag the flag by its upper left corner to snap to the string (Smart Guides say path when you are within snapping distance, unless you come across an Anchor Point in which case Smart Guides say anchor, and
Switch to the Rotation Tool and Click the newly snapped corner to make it the centre of rotation, then ClickDrag the upper right corner to snap the the string further right;
4) For each following flag, hold Alt/Option and ClickDrag the flag to the right to create a copy ready for almost repeating 3), then deselect and
With the normal Selection Tool (black arrow) ClickDrag the flag by its upper left corner to snap to the former flag (Smart Guides say anchor when you are within snapping sistance), and
Switch to the Rotation Tool and Click the newly snapped corner (to make it the centre of rotation, then ClickDrag the upper right corner to snap the the string further right;
If you wish to change the shape/sixe you can
Deselect and with the Direct Selection Tool ClickDrag the newly snapped upper right Anchor Point along the string (while Smart Guides keep saying path, unless you come across an Anchor Point in which case Smart Guides say anchor) until you have the desired width, and if you wish to change the overall shape,
With the Direct Selection Tool ClickDrag the bottom Anchor Point of the flag until you have the desired shape;
With this, you have the basic/lower parts of all the flags.
Caution in what follows: Avoid any changes to the string. You will know why if you try.
To equally importantly make the tops of the flags really follow the string:
5) Unlock the string from 1) and hold Ctrl/Cmd and then press C then F then X then F to bring the copy to the very front, then lock the original string (at the bottom of the Expanded Layer in the Layers panel);
6) Select the string (copy) and apply Divide Objects Below (under Path in the Object dropdown), to cut all the flags along the curve of the string;
7) ShiftClick each of the top parts of all the flags on the Artboard/WorkspaceDelete and press Delete (or take them out in the expanded Layer).
Now you have the flags with curved tops and straight lower sides.
You can give them all a fill, each its own or all the same.
Another approach is to create your flags in a straight linear manner, then use Object > Envelope Distort > make With Warp, using either Arc or Flag as your method (or a combination of)
The quickest is by creating a large circle (like if your "arc" was a small portion of it) with an overlaying star shape, and then deleting the parts you don't need.
In my example, I created a circle 200 pt x 200 pt
On top of that, I created a star shape with Radius 1= 100 pt Radius 2= 112 pt, with 40 points.
I used Pathfinder to subtract the circle from the filled star to leave just triangles (keep a copy of the circle to paste back to use as the string)