- Home
- Illustrator
- Discussions
- Re: How to recreate this squiggly rectangle
- Re: How to recreate this squiggly rectangle
Copy link to clipboard
Copied
Hey, I have this source image that I'd like to recreate neatly using Illustrator. I'm having a hard time getting the curves similar to this via the Zig Zag effect. Any ideas?
Thank you
 1 Correct answer
There are 2 more ways that might get you close.
First is to draw a rectangle and apply the Zig Zag effect. Effect > Distort & Transform > Zig Zag
It will require a bit of playing around as the size of the object and scale of the effects are all variables. You can leave it as a live effect or expand the appearance if you want regular outlines. You can also appy this to a single straight line if you want a wavy line.
The other way is to create a pattern path.
Draw the repeating shape similar to what
...Explore related tutorials & articles
Copy link to clipboard
Copied
You may just use the Pen tool or the Curvature tool to draw it.
Copy link to clipboard
Copied
Copy link to clipboard
Copied
Hello @James Reina,
Thanks for reaching out. I hope the suggestions shared by Kurt helped resolve the problem. If not, kindly try the steps shared in this tutorial and check if it helps: https://www.youtube.com/watch?v=Q4Olmm0d-R8.
Looking forward to hearing from you.
Thanks,
Anubhav
Copy link to clipboard
Copied
I have seen these videos, thank you for sharing them too. I have used these techniques but they don't address the 3-dimensionality of my source image. I need a squiggled rectangle to be nearly identical to the source image, but in .ai.
Copy link to clipboard
Copied
I think your best bet will be to place the source image in illustrator, then with the image selected, click the drop down arrow beside "IMAGE TRACE" and select the "16 colors" option. (See attached image Step1_trace.png). Open the Image Trace window from the Window menu to edit the options as shown in step2_options.png attached. Then click the Expand button in the top toolbar that I circled in step3_expand.png.
This will convert your image into a vector, giving you all those little grungy details around the lines like you want.
Copy link to clipboard
Copied
Ah sorry my mistake, I specifically don't want the grungy bits around the lines.
I want to recreate it as a vector so that I have a clean, and exact version of this—without the noise.
Copy link to clipboard
Copied
There are 2 more ways that might get you close.
First is to draw a rectangle and apply the Zig Zag effect. Effect > Distort & Transform > Zig Zag
It will require a bit of playing around as the size of the object and scale of the effects are all variables. You can leave it as a live effect or expand the appearance if you want regular outlines. You can also appy this to a single straight line if you want a wavy line.
The other way is to create a pattern path.
Draw the repeating shape similar to what is shwn below. Open Window > Brushes and with the object selected click on the + at the bottom righr corner. This will bring up a list of options - choose Pattern Brush. This will bring up the panel below. You'll see from my example the corners don't match your image but it gets you closer.
Again Expand Appearence of the object if you want to play with the vector handles.
Copy link to clipboard
Copied
These two options are the closest so far, but still issues, specifically with the corners of the rectangle.
Another issue is with the Zig Zag effect is it automatically creates an even amount of bulges on all four edges of the rectangle, whereas my source image has only 3 bulges on the top/bottom and 5 on the left/right.
Copy link to clipboard
Copied
Hi James. Yes it's not perfect. There may be a better solution out there somewhere.
You can ZigZag a long and a short path then expand and join together. Still a bit manual but should be quicker.
If you add an anchor to the path for each bump then only have one ridge per segment you will get some more control. I did't know this but if you add points along an path you can select them with the direct selection tool and use the Align palette to spread them evenly along the path.
Copy link to clipboard
Copied
James,
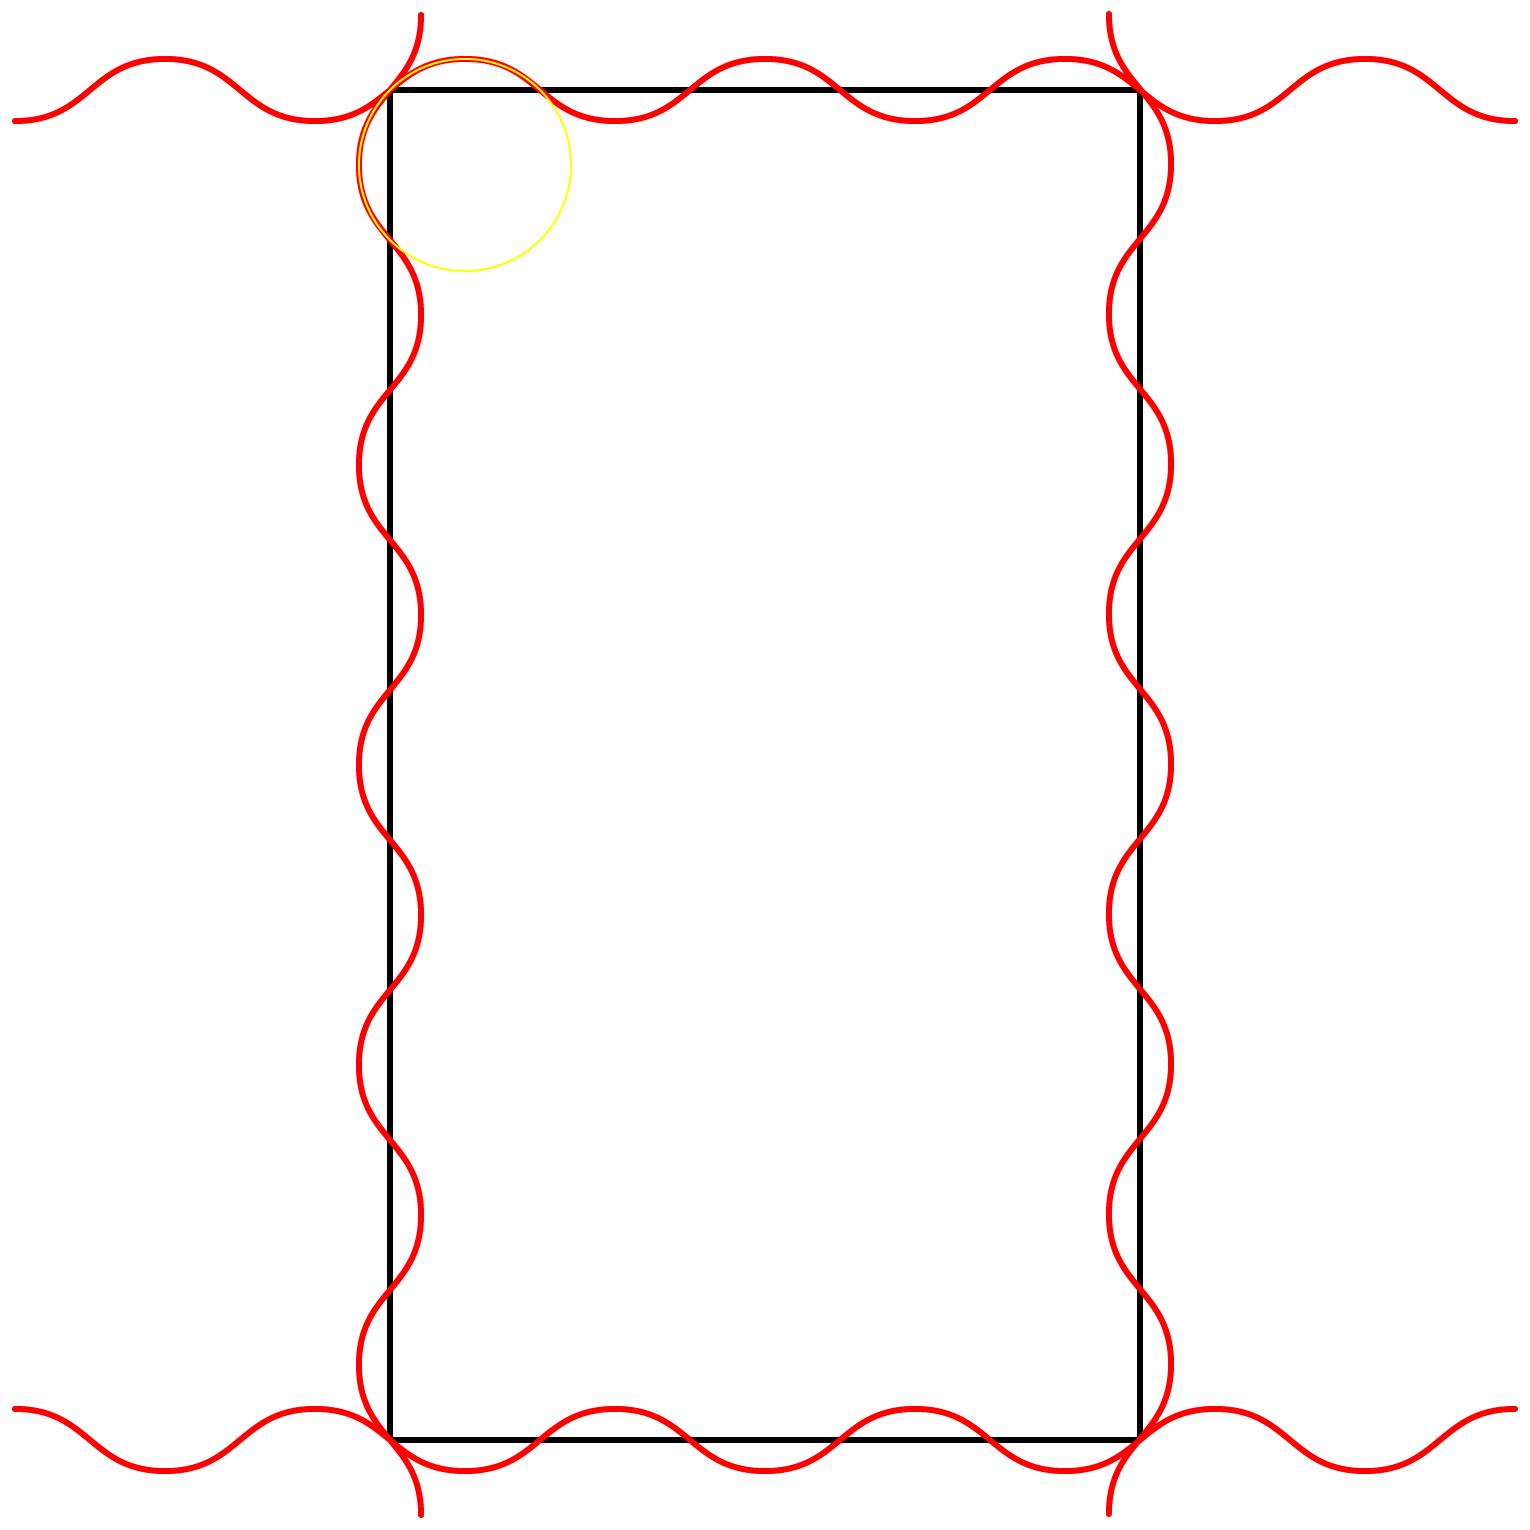
It is possible to get quite close with the Zig Zag (see circle at the top left corner).
Click/RightClick to see in full, Click again to get close, Click Here to see in Chrome
Copy link to clipboard
Copied
James,
But it is more accurate and about as easy to start with a circle (see upper left corner and left side).
In either case, the inner squiggly can be made by downscaling a copy and move it down.
Click/RightClick to see in full, Click again to get closer, Click Here to see in Chrome
Copy link to clipboard
Copied
Is this possible on Photoshop?
Copy link to clipboard
Copied
Hello @cesay,
Thanks for reaching out. Would you mind trying the suggestions shared in this community post (https://adobe.ly/3NuV4lv) and checking if it helps?
Looking forward to hearing from you.
Thanks,
Anubhav
Get ready! An upgraded Adobe Community experience is coming in January.
Learn more


