 Adobe Community
Copy link to clipboard
Copied
Hi everyone,
can anyone help me figure out how to run a gradient following this shape? I want it to run from dark blue in the centre up and round to a bright green at the top point.
Thankyou 🙂

 1 Correct answer
Louise,
If the filled path was created as a stroked path with variable width, you can just go back to the original and apply the gradient along the stroke (always keep (a copy of) the original artwork when you start destroying it).
If you only have the path as filled and closed, in order to easily and accurately create a middle path that fits the shape, you can use a 1 step blend (can be used for varying width) as follows (Smart Guides are your friends):
1) Object>Blend>Blend Options, set Spacing t
...Explore related tutorials & articles
Copy link to clipboard
Copied
You could draw a path that follows the shape.
Apply a thick stroke
Apply a gradient to the stroke that follows along the path
Apply your shape as a clipping mask to the stroke.
Copy link to clipboard
Copied
Thank you so much! ill give it a go ![]()
Copy link to clipboard
Copied
Louise,
If the filled path was created as a stroked path with variable width, you can just go back to the original and apply the gradient along the stroke (always keep (a copy of) the original artwork when you start destroying it).
If you only have the path as filled and closed, in order to easily and accurately create a middle path that fits the shape, you can use a 1 step blend (can be used for varying width) as follows (Smart Guides are your friends):
1) Object>Blend>Blend Options, set Spacing to Specified Step with 1 step (that will prepare the right blend);
2) Copy the closed path and save the original path elsewhere or lock/hide it (always keep a copy of artwork you are going to destroy);
3) Select everything and switch from Fill to Stroke in the Toolbox (that will give you stroked paths (and you can see what you are doing));
4) First deselect by Clicking an empty spot and then with the Pen Tool Click one end Anchor Point (it will be the path on top), in order to reverse its direction, you may have to redo at the other end, see below;
6) Select everything and Object>Blend>Make;
If no middle path appears:
7) Ctrl/Cmd+Z to Undo 6), then redo 5) clicking at the other end, then redo 6), now the middle path should appear;
If the middle path fails to fit midway between the two parts:
8) Ctrl/Cmd+Z to Undo 6), then add one or more Anchor Points on either or both paths to get the best possible fit, then redo 6):
9) Object>Blend>Expand, then Ctrl/Cmd+Shift+G to Ungroup, then hide or delete both the original paths (that will give you the stroked path midway between the paths), then set the Stroke Weight as desired (you may use variable width).
You can see an older 1 step blend case here with screenshots (see especially post #7):
Copy link to clipboard
Copied
Thank you so much!
Copy link to clipboard
Copied
Your questions has been answered already. Here's a visual.
Assign a stroke "Profile" to a simple stroke, then assign a gradient to the "Stroke" appearance. Choose middle Stroke option in the Gradient Panel to make the gradient follow the length of the stroke.

Copy link to clipboard
Copied
Thank you thats great!
Copy link to clipboard
Copied
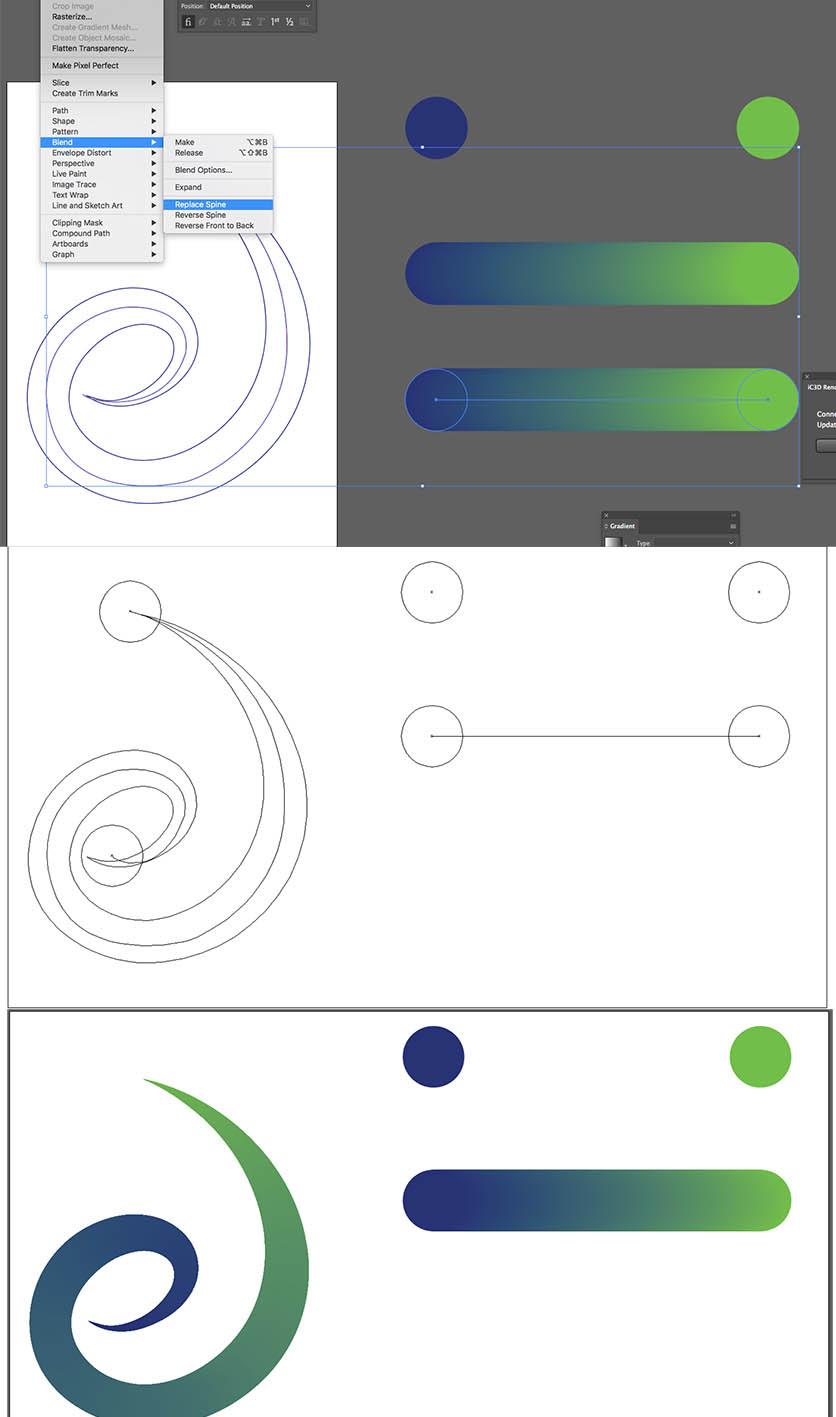
I used "BLEND" as an alternative solution.
I applied the blend between two objects.
I applied the blend path to the sprial line I draw with the command "Replace Spline".
Maskeledim with Cliping Mask.

Copy link to clipboard
Copied
Thank you this is a really good way of doing it!
Copy link to clipboard
Copied
I'm not going to suggest that you won't be able to tell which of these is the one I downloaded from the OP and which is my reconstruction of it, but I'd say that it's a simple left-to-right, 0° gradient applied to the fill.


