 Adobe Community
- Home
- Illustrator
- Discussions
- Intertwine: Overlap and intersect shapes and text ...
- Intertwine: Overlap and intersect shapes and text ...
Intertwine: Overlap and intersect shapes and text in 3 simple steps

Copy link to clipboard
Copied
Want to create overlapping designs with ease and in a non-destructive way? With the latest MAX update 27.0, you can now intertwine your artwork and objects in Illustrator using Intertwine in Illustrator.
See this article for information on installing the latest update.
For detailed information on using Intertwine in Illustrator, see this help article: Intertwine objects.
Check out this quick tutorial by Tony Harmer, AKA Design Ninja, to know more about this feature.

Tony Harmer Chief Enchantments Officer at Wizardry Ltd. Tony Harmer (a.k.a The Design Ninja) is a creative Swiss-army-knife and learning-content author with a three-plus-decade career that has given him a broad experience base to draw upon, including some time as a press operator, several years as a concept artist in IP development, several more as an instructor in many applications, delivering graphic production training worldwide, and a few more as a specialist solutions consultant for Adobe. He is the author of several video tutorials on LinkedIn Learning and running a growing YouTube channel. Tony is a popular speaker/presenter. His often-off-the-wall sessions always provide a ton of tips, techniques, insights, and inspirations delivered with humor and enthusiasm that is totally infectious.
This feature makes interlocking letters and objects super easy and non-destructive.

- Select the objects to be overlapped.
- Select Object > Intertwine > Make.
- Draw an enclosed path around the sections of the artwork that you want to intertwine. To make a rectangular selection, press the Shift key while you draw.
If there are more than two objects, you can simply right-click the line segment you want to move and rearrange the position.
Pressing the modifier 'shift' and then dragging gives you a rectangular marquee.
Frequently asked questions related to this feature:
- Will the objects retain their original shape?
Yes, this is a totally non-destructive workflow.
- Will the objects get grouped in the Layers Panel?
Yes, objects will be grouped but will retain their original shape.
- Can we release the intertwined objects?
Yes, you can easily restore the order of the objects to their original state.- Select the set of intertwined objects.
- Select Object > Intertwine > Release. Alternatively, select Release in the Properties panel or the Control bar.
Limitations:
- Objects with fill may end up with some weird artifacts like this.
- This feature's effect is only valid until the boundaries of freeform selection bounds you create. If the stroke of the objects goes beyond the boundaries you created, the objects will appear in their original order.
- If you export Ai files to PDF, Intertwined objects will appear as Raster images. The team is aware of it and is working towards resolving the issue in a future update. Till the time it is fixed, please upvote this request on this UserVoice page and stay tuned for updates.


We would love to hear from you about how you found this feature and what you created. Reply to this post to share your observations with us.
Please feel free to share your suggestions and feedback related to this feature on this UserVoice Page.
Regards,
Srishti


Explore related tutorials & articles
 5
Replies
5
5
Replies
5

Copy link to clipboard
Copied
Hi,
This is an amazing feature that I have wanted for use with online editors for about 3 years now. Surely, it is a complex undertaking to achieve this for AI, let alone an online feature that could be adopted for website use. I would love to have this tool built into my website to attract professionals to purchase my letters and intertwine them DIY, right on my site.
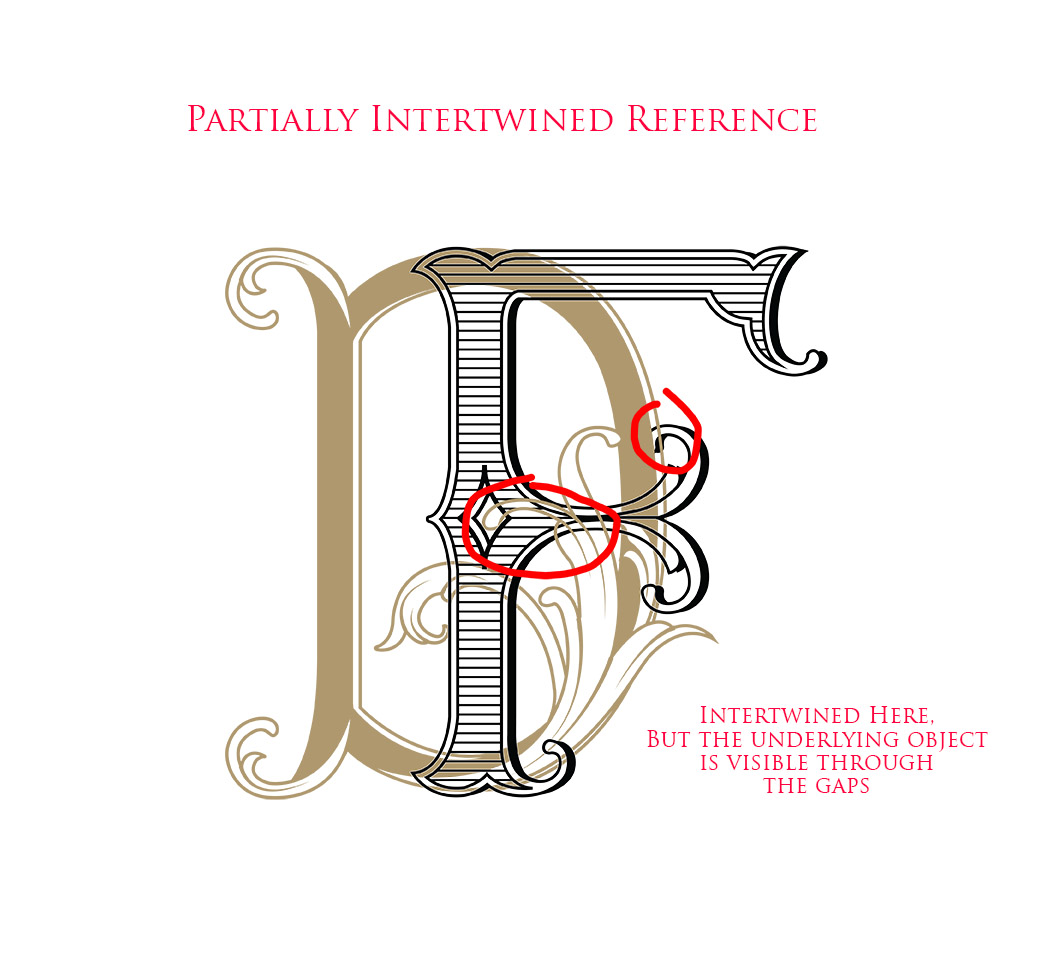
But I am also wondering if there is a workaround for non-solid objects. For example, I create monograms from my letter designs. My letters are line drawn, meaning 'no fill'. So, when a letter contains stripes, their is negative space between the stripes. Using intertwine does not select the negative space that is contained by the boundary (outline) of the letter. So when I use intertwine, it only works on the contours and the letter and the bottom layer is still visible through the gaps on the letter in the top layer position.
Would be amazing if the tool could 'outline' the shapes in a way that the underlying elements are not visible once the intertwine is created. Attached is an image containing 2 of my letters. I placed them both in AI and used intertwine on 2 sections. The result clearly shows that the underlying/overlying elements are still visible in the gaps of the lines.
Am wondering if having an extra, fully solid, layer of the letter 'hidden' behind each letter might somehow fix the issue as a workaround. But am falling short of understanding how the mask/intertwine might be applied to the appropriate layer once completed.

Copy link to clipboard
Copied
Depending on the exact nature of the artwork there could be a solution using additional fills on the group in the Appearance panel.

Copy link to clipboard
Copied
One way to create overlapping designs in Illustrator is by using layers. You can create a new layer for each design element and then rearrange the layers to overlap them as desired. Keeping each element on a separate layer allows you to easily change individual elements without affecting the others.
Another option is to use the transparency settings in Illustrator. You can adjust the opacity of each design element to create overlapping effects. For example, you can create a solid shape and then adjust its opacity to allow underlying elements to show through.
You can also use blending modes to create overlapping designs in Illustrator. Blending modes allow you to control how different design elements interact with each other. For example, you can use the Multiply blending mode to create a darkened effect where two elements overlap.
Finally, you can use masking techniques to create overlapping designs in Illustrator. Masks allow you to reveal or hide parts of a design element, which can be useful for creating intricate overlapping designs.
Overall, there are many ways to create overlapping designs in Illustrator, and the best method will depend on the specific design you are trying to create.

Copy link to clipboard
Copied

intertwine seems to be not working if the design has some 'screen' opacity element when exported. or im not using it correctly?
Copy link to clipboard
Copied
Can you please share a sample file? Dropbox or the like.

 AdChoices