Met1
Legend
December 1, 2021
Question

Knocking out strokes

  • December 1, 2021
  • 2 replies
  • 683 views

Hey, I have an applique plotting job to do on an old Mimaki plotter.

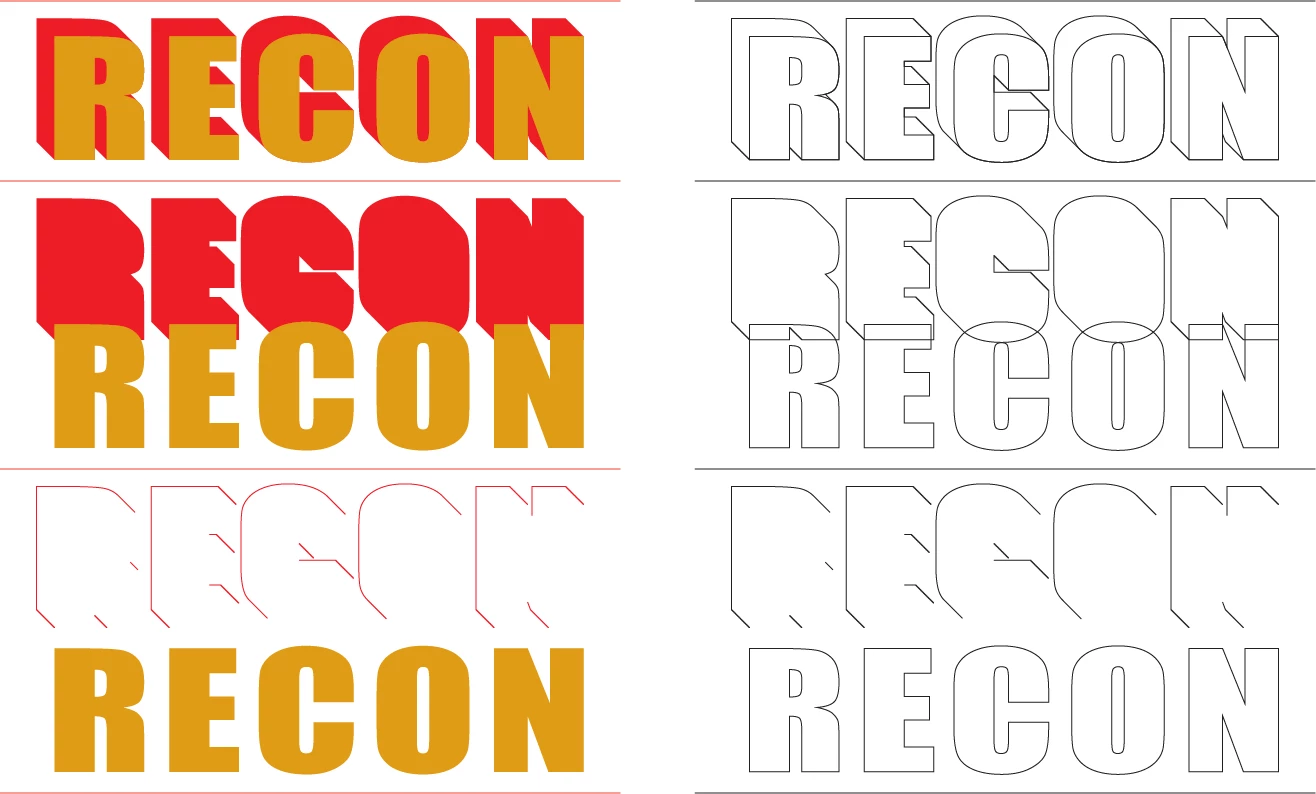
I used to be able to get away with plotting two shapes with the same overlapping outline on top of each other without it affecting the final line thickness, but my plotter is old and temperamental, so to get around the imprecision I can't have two outlines overlapping, the sewers don't know which one to follow, so I need to knockout the red stroke area from the gold.

Top is how it looks now, second is how that is made up, but I need it to look like the bottom. (Yes I know with the imprecision it won't look as good as this but it's better than what I'm getting with the double offset line, which is too confusing for them.)

I thought this would be easy with a combination of pathfinder and shape builder tool, but the clean-up after is taking longer than if I just did this by hand, and I'm just confusing myself with what needs deleting or not!

Let me know if this needs a better explanation.

Thanks.

This topic has been closed for replies.

2 replies

Jacob Bugge
Community Expert
Community Expert
December 1, 2021

Met,


After pondering long over the (hidden) meaning, I have once more returned to the (mis)understanding that you can (it is much simpler to do than the detailed suggestion may seem to imply, and much of the safeguarding can be omitted):


1) Start out with the red RECON at the back and the golden RECON in front, both as Groups or individual letter shapes (outlined Type as you seem to have), both with Fill and no Stroke (so you can see clearly what you are doing);

2) Select the red Group/set and Ctrl/Cmd+8 to turn it into a Compound path, and do the same to the golden Group/set, copy both to the front and hide the originals (so you have them to fall back on);

3) Select the copies from 2) and Pathfinder>Minus front, then reapply the red Fill to the remainder of the red RECON;

4) Show the golden Group from 2) and copy to the front and hide the original (so you have it to fall back on);

5) Switch back and forth between hiding the red and the golden Group from 2) and 3) so you can make sure that they consist of what you want/need;

6) Copy both Groups to the front and hide the originals (so you have them to fall back on), then switch from Fill to Stroke (with properties as desired and switch back and forth again to make sure; preferably lock the full (formerly golden) Group.


If the closed paths of the red cut up Group is what the sewers and you really need (and which makes immediate sense), that ought to get you there with neat separable Groups, in a safe and simple way, where you let Illy show the way and just follow her.


But if yous (all) really need the open paths as shown at the bottom in your screenshot, you can finish as follows:


7) Copy the cut up (formerly red) Group in the background and hide the original (so you have it to fall back on);

😎 Switch back and forth between hiding and showing the full (formerly golden) Group and Direct Select the individual path segments within the cut up (formerly red) Group that coincide with corresponding path segments the full (formerly golden) Group and delete them, while the full (formerly golden) Group is hidden; you can select and delete them one by one and/or some/many/all together.


I believe that ought to get you there (still) with neat separable Groups, in a safe and simple way, where you let Illy show the way and just follow her.


Met1
Met1Author
Legend
December 2, 2021

Hi Jacob, wow, I appreciate the detailed post, but I'm sorry I got lost somewhere in 5.

I have to get this out this a.m. so it's going to have to be done by hand, but I'm going to come back to your post later and see if I can sort through the procedure.

Thanks again.

Met1
Met1Author
Legend
December 2, 2021

You are welcome, Met.


5 is one of the steps that are only to make you certain that you have the right things cut away from the red part: when you switch back and forth between showing and hiding the golden full text, you can see that the red parts abutt exactly with no gap and no overlap.


You can skip step 5 and the corresponding part of step 8.


I hope you will report your findings.


I ran through this again, and I'm still ending up with fills.

I think I'm not explaining what I need precisely, maybe this new pic will help.

I can get the outlines of both the text and the 3d shadow easily in a variety of ways, but it always results in paths overlapping each other. I need ALL paths NOT to overlap.

In reality both lines are the same thickness (actually .1pt, anything thicker my plotters tries to print both sides of the line!) but for illustrative porpoises the gold over the top of the red is thinner so you can see the red underneath. I hope this makes more sense of the desired outcome.


Monika Gause
Community Expert
Community Expert
December 1, 2021

Apply Live Paint and then Expand it does help?


Paths stacked onto each other will throw off Pathfinder functions as well as Shapebuilder tool. Live paint might solve it.

Met1
Met1Author
Legend
December 2, 2021

Let me play with that, but I'm thinking I'll still have fills and not paths...

Monika Gause
Community Expert
Community Expert
December 2, 2021

Yes, probably.


But maybe you can explain that problem again, because then I really don't get it.