• Global community
    • Language:
      • Deutsch
      • English
      • Español
      • Français
      • Português
  • 日本語コミュニティ
    Dedicated community for Japanese speakers
  • 한국 커뮤니티
    Dedicated community for Korean speakers
Exit
0

Mirror and reflect text

New Here ,
Nov 16, 2021 Nov 16, 2021

Copy link to clipboard

Copied

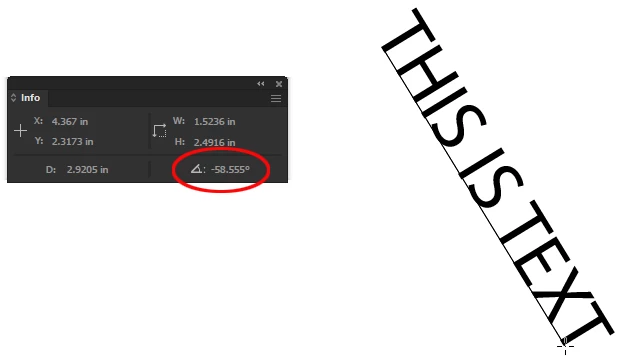
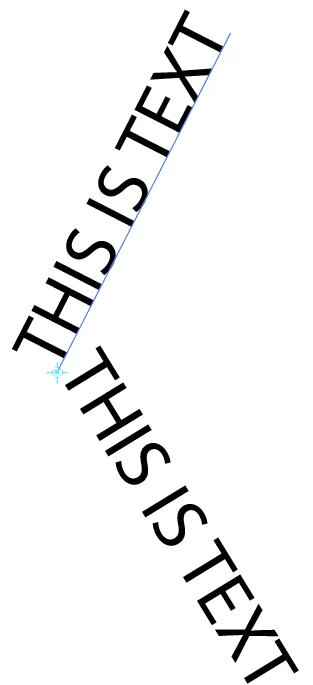
Good morning everyone, I have a silly problem but I can't find the solution. I need to reflect a text on the y-axis of an image while maintaining the readability of the text. I can reflect the text without any problem but after that I get stuck because I should reflect it again to make it readable. I know that the description is not easy to understand I leave you three images to explain better.


P.s. I could do it by hand but these are graphics that need to be printed for a motorcycle and I would like to be as accurate as possible.


Thank you very much.

TOPICS
Draw and design , Tools

Views

1.3K

Translate

Translate

Report

Report
Community guidelines
Be kind and respectful, give credit to the original source of content, and search for duplicates before posting. Learn more
community guidelines

correct answers 1 Correct answer

Community Expert , Nov 16, 2021 Nov 16, 2021

The fact that the text is diagonal is what makes this less than straightforward. The trick will be making the angle known, if you don't already know it. For that you can use the measure tool:

JohnMensinger_0-1637080108362.png

Next, make a copy of the text and rotate it, rather than reflect it. (I would still reflect a copy as you did in your example, then use it as a "helper object" on which to align the properly-rotated text, then delete.)

The amount of rotation should be 180° minus the angle measured (or known).

In my example

...

Votes

Translate

Translate
Adobe
Community Expert ,
Nov 16, 2021 Nov 16, 2021

Copy link to clipboard

Copied

Roby,


You can reflect the text with an axis that is perpendicular to the text direction, so the key part is to establish the angle of that.


Presuming that the text is aligned with (along) a part of the drawing, such as the violet line under it, you can:


1) With the Line Segment Tool ClickDrag from on end of the straight segment to the other, then rotate by 90 degrees, then Click with the Line Segment Tool somewhere on the Artboard/Workspace, then copy the Angle from the dialogue box;

2) Reflect the text with that angle as the axis.


If there is no such alignment, you can select the text and ClickDrag with the Line Tool along the baseline from the end to the beginning and use that (as a good approximation).


Or you might consider such an alignment to have (both instances of) the text accurately aligned.


Votes

Translate

Translate

Report

Report
Community guidelines
Be kind and respectful, give credit to the original source of content, and search for duplicates before posting. Learn more
community guidelines
Community Expert ,
Nov 16, 2021 Nov 16, 2021

Copy link to clipboard

Copied

The fact that the text is diagonal is what makes this less than straightforward. The trick will be making the angle known, if you don't already know it. For that you can use the measure tool:

JohnMensinger_0-1637080108362.png

Next, make a copy of the text and rotate it, rather than reflect it. (I would still reflect a copy as you did in your example, then use it as a "helper object" on which to align the properly-rotated text, then delete.)

The amount of rotation should be 180° minus the angle measured (or known).

In my example, I measured 58.555°

180° - 58.555° =  121.445°

With the text selected, double-click the Rotate tool and enter 121.445. Click the Copy button. The new copy will be rotated the correct amount, around the baseline anchor.

JohnMensinger_1-1637080756918.png


Votes

Translate

Translate

Report

Report
Community guidelines
Be kind and respectful, give credit to the original source of content, and search for duplicates before posting. Learn more
community guidelines
New Here ,
Nov 18, 2021 Nov 18, 2021

Copy link to clipboard

Copied

Thanks, this is definitely the simplest and most correct solution.

Votes

Translate

Translate

Report

Report
Community guidelines
Be kind and respectful, give credit to the original source of content, and search for duplicates before posting. Learn more
community guidelines
Community Expert ,
Nov 18, 2021 Nov 18, 2021

Copy link to clipboard

Copied

LATEST

I know I'm late to the party and John has given you an absolutely fine answer, but in the interest of Why Not? here's a method that involves no measurement nor arithmetic, and assuming the lettering on the left side is properly rotated and located:


1) With the Line Segment tool draw a line segment along the full length (plus a bit, to be on the safe side) of the type's baseline, starting at the beginning of the text.

2) Reflect the line segment across the vertical centerline of the artwork.

3) Reverse Path Direction either with the Pen tool or Object menu > Path > Reverse Path Direction.

4) Select and copy the type (not the type object).

5) Click the line segment with the Type on a Path tool and paste type.

6) With one of the selection tools adjust the position of the type brackets toward the upper end to just before the point where the overset text icon (red square with + sign) appears and the ending word disappears.


If you draw the line segment from the end of the test toward the beginning, again you may want to overshoot the length a tiny bit, but you would not reverse path direction and you would adjust the brackets downward.


Have fun!


Peter

Votes

Translate

Translate

Report

Report
Community guidelines
Be kind and respectful, give credit to the original source of content, and search for duplicates before posting. Learn more
community guidelines