Exit
  • Global community
    • Language:
      • Deutsch
      • English
      • Español
      • Français
      • Português
  • 日本語コミュニティ
  • 한국 커뮤니티
0

Need Help Cutting Lines With Circles for Clock Face

New Here ,
Jan 21, 2022 Jan 21, 2022

I am trying to create a clock face in Illustrator (CC 2022 on a PC) that has tick marks indicating minutes (thick lines) and seconds (thin lines). I'm struggling to cut the 30 individual lines into short tick marks using circles. Does anyone have any suggestions?


To explain: each "tick mark" is a long straight line that goes through the center of the clock from one side to the other ( a total of 30 lines; for keeping organized I currently have the thin lines in one group and the thick lines in another group). 

Illustrator Lines Only.jpg

The final design should look like the one below where the tick marks have been cut into short little lines going around the outer edge of the inner most circle. I created the mock-up below by using a white fill on the inner circle (essentially covering over the lines).

Illustrator Final Design.jpg

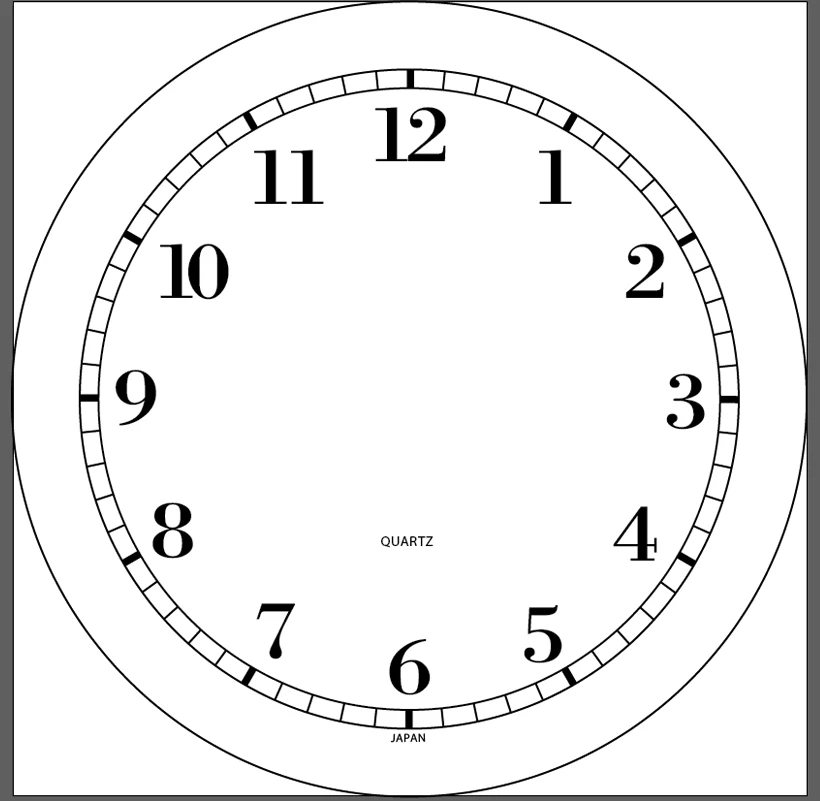
Because I will be placing a photo in the background, I can't have the inner circle be filled with white which is why I want to cut the lines into shorter tick marks.


I also need the circles to be kept separate from the lines, so dividing everything using the pathfinder tool won't work (that just created odd shapes that had the tick marks connected to portions of the circles).


TOPICS
Draw and design , Tools
455
Translate
Report
Community guidelines
Be kind and respectful, give credit to the original source of content, and search for duplicates before posting. Learn more
community guidelines

correct answers 1 Correct answer

Community Expert , Jan 21, 2022 Jan 21, 2022

Create two guides to mark the dead center of the clock.

Create a new layer; lock the others for ease of working.

Create an hour line at the top (actual size) using the vertical guide. 

AI makes the line go from the center out, so it will be centered on the guide.

Keep line selected and switch to the Rotate tool.

Alt click on the dead center guidelines with the tool.

In the dialog box, type in 30 degrees and click Make a Copy.

Use the Transform Again keyboard command to repeat (Cntl-D). 

Do this

...
Translate
Adobe
Community Expert ,
Jan 21, 2022 Jan 21, 2022

Create two guides to mark the dead center of the clock.

Create a new layer; lock the others for ease of working.

Create an hour line at the top (actual size) using the vertical guide. 

AI makes the line go from the center out, so it will be centered on the guide.

Keep line selected and switch to the Rotate tool.

Alt click on the dead center guidelines with the tool.

In the dialog box, type in 30 degrees and click Make a Copy.

Use the Transform Again keyboard command to repeat (Cntl-D). 

Do this 11 times.


Create a new layer and lock all the others.

Create the minute line on top of the hour mark (it won't be visible, so keep it selected).

Repeat the steps above--except you would use 6 degrees instead of 30.

Tip: Hold down the Control key and then hold down the D key--it will rapidly repeat so you don't have to tap it 59 times. 


David Creamer: Community Expert (ACI and ACE 1995-2023)
Translate
Report
Community guidelines
Be kind and respectful, give credit to the original source of content, and search for duplicates before posting. Learn more
community guidelines
New Here ,
Jan 21, 2022 Jan 21, 2022
LATEST

Thank you! That helped a lot!

Translate
Report
Community guidelines
Be kind and respectful, give credit to the original source of content, and search for duplicates before posting. Learn more
community guidelines