Copy link to clipboard
Copied
Hi,
I need to use patterns with live paint for my pixel art projects. But I need your advice to achieve this goal by different way(s) if it is possible. Even %1 probability of success can make me happy.
We can draw a 20-15 size grid. To paint this grid with live paint, we can call patterns from swatches panel and use patterns like colors or gradients. But patterns are repetitive on Illustrator. May be symbols can be used there. But it is difficult to work with symbols on huge pixel art projects (100-100 grids, 200-200 grids, etc.).
The pattern option is very useful. But how can we change pattern options from repetitive to non-repetitive?
 1 Correct answer
You can paint with patterns like that in Live Paint as long as your pattern tiles are the same size as your grid tiles:
Explore related tutorials & articles
Copy link to clipboard
Copied
Not quite sure what you want there. A non repetitive pattern? Would just be a gradient in that case?
Copy link to clipboard
Copied
Hi Monika,
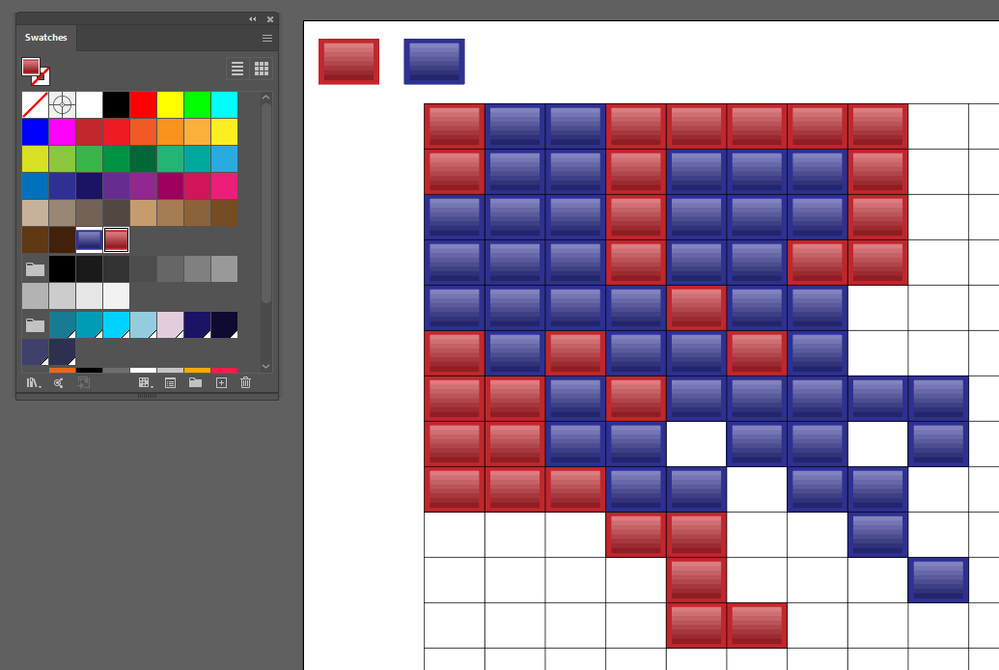
Thanks for answering. I want to use this little blue square as a pattern and paint the grid with it. I want to get results like the first 5 rows on the screenshot.
Copy link to clipboard
Copied
Then you couldjust apply gradients to all those squares.
Copy link to clipboard
Copied
There's not a whole lot of hope but in some ways you may be able to utilize this technique which uses different pattern brushes to hold some limited forms of artwork. https://graphicdesign.stackexchange.com/questions/114144/looking-for-illustrator-script-to-swap-all-...
The technique is mostly usable in cases where it's just a few items, but in your case it's a whole wall of pixel art where Live Paint is used as an intuitive way of changing the color by clicking where it should go - a much more hands-on process.
Still, with some power-user help you may be able to use the pattern brushes. This would require some specialized way of providing your input and also choosing a proper brush all at the same time. It could be a modification of a stylus pen to not only click, but also set a brush shortly thereafter. Some pens and tablets, advanced computer-mice and non-traditional keyboards offer the ability to run some other action when doing a click.
However, you can change a multitude of selected items to the look you want by choosing them all first and then setting the brush. There is one more little work-around on top of a work-around which brings it closer to the intuitive Live Paint's point-and-click: it's to have color swatch or pattern-swatch representations of your brush art and color your pixel art normally, and at the end or at a stopping point you can select the same fill color and replace the fill with the stroke containing the brush.
If you are open to using scripts to help with this, the same can be done all in one step automatically. In fact, you can forego the brushes and use Symbols - they can contain more types of artwork anyways. So you'd have to use colors or patterns to paint your picture and then run a script which replaces each square with one of your proper symbols! Such a script would be easy to write, but it would all depend on how much such a work-around fits your needs.
Copy link to clipboard
Copied
Thank you for sharing this brush technique. I didn't know that. Much appreciated.
Copy link to clipboard
Copied
You can paint with patterns like that in Live Paint as long as your pattern tiles are the same size as your grid tiles:
Copy link to clipboard
Copied
It definitely works when grid pieces size and pattern size are the same, as your said! I'm very surprised. 🙂
I edited Keyboard Increment value as 0,01 mm from Preferences window. Then I moved the grid with tilde key (~) after first paint, until pattern gets the correct position. Now it doesn't repeat anymore. Thank you very much. 🙂
Copy link to clipboard
Copied
Coldbby, Hi.
Here is another method.
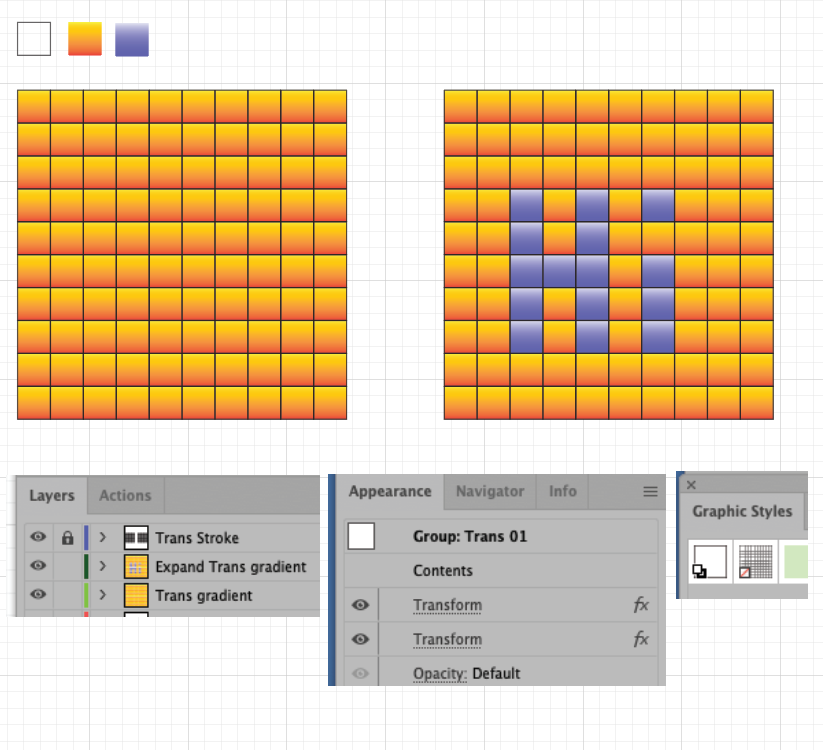
I used Effects>Transform.
Create your Swatches.
On one layer, here I put the yellow gradient. Grouped
One the upper layer, I put that black stroke square. Grouped. This is your grid.
I applied 2 Effect>Transform. (on Group level, Saved as a Graphic Style.
Do this for the yellow gradient. Then again for the black stroke.
Dup the Trans yellow gradient. Expand Appearance.
Lock the Black Stroke layer.
Now you can change the Swatch gradient as you wish.
To go one step further, you can save a copy of your file as a template.
This way you can create many different files without going through all these steps.
K
Copy link to clipboard
Copied
Hi kphotopage,
Thank you for sharing. Much appreciated.
Get ready! An upgraded Adobe Community experience is coming in January.
Learn more


