- Home
- Illustrator
- Discussions
- Re: Offset path does not respect shape
- Re: Offset path does not respect shape
Copy link to clipboard
Copied
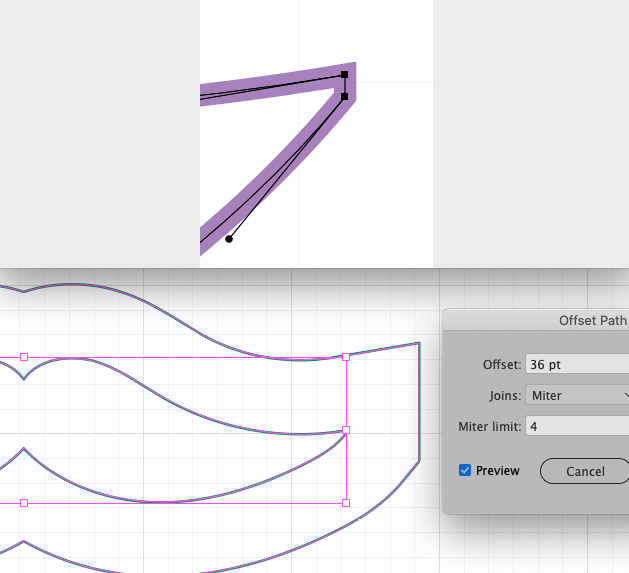
So, I'm creating a mustache and when I use the offset path option it looks like the image below. How do I get the path to end like the original shape? The shape is closed and there are no extra anchor points.
 1 Correct answer
Just change your settings for Joins (and/or Miter Limit > 4)
Explore related tutorials & articles
Copy link to clipboard
Copied
Just change your settings for Joins (and/or Miter Limit > 4)
Copy link to clipboard
Copied
Piter, Hi.
I was able to duplicate your problem.
Zoom way in, select your mustache using Direction tool (white arrow)
Betcha you have 2 anchors not one.
With that very large offset, you do get that square offset shape.
To Fix, delete one anchor one each side using Pen minus tool.
K
Copy link to clipboard
Copied
Both options mentioned are right, but maybe lowering the Miter Limit might cause huge corner ends in this case... If this happens it might be a solution to make the corners less angular in combination with lowering the Miter Limit.
Copy link to clipboard
Copied
Or to draw the outer shape at first. Then use Offset Path with negativ offset for creating the inner part of Santa Claus beard.
---
Or use a very bold outward facing contour on the inner shape.
---
Or …
Copy link to clipboard
Copied
Lot's of options, haha!
Copy link to clipboard
Copied
Totally agree Rob. So many options.
Offset, Interesting topic, none the less. 😃
If we only we had OP's Illustrator file that would lessen this conversation.
K
Copy link to clipboard
Copied
Piter,
I believe this exquisitely simple suggestion from Hans-Jürgen will get you there, with a sufficient(ly high) Miter Limit as he also suggested:
"Or use a very bold outward facing contour on the inner shape."
Copy link to clipboard
Copied
Yes! The first answer was the correct one. The funny thing is that I did move the number up and down but only a bit, so I didn't see any change until moving the number to 10!
Thanks for all your useful responses and happy new year!!!
Copy link to clipboard
Copied
For my small part you are welcome, Peter; and a happy new year to you, too.
The Miter Limit can be rather high for very sharp angles, and those angles obviously lead to correspondingly long spikes, sometimes even too long so they seem disproportionate or stick out of the (rest of the) artwork. In such cases the only (other) options are to let it default to the Bevel Join (as you have already seen with an insufficient Miter Limit) or to switch to Round Join which can be (even) less satisfactory; it can (sometimes) be used for a mouth or similar, but hardly for a moustache.
For that reason I have suggested a new feature, with the choice of a shortened spike as chosen by the user, either symmetrical (Obelisk) or one sided (Chisel); you can see it here (with a link to a rather long winded post with some crude imagery to show the concepts), and support it if you (ever) find it relevant.
Get ready! An upgraded Adobe Community experience is coming in January.
Learn more


