Exit
  • Global community
    • Language:
      • Deutsch
      • English
      • Español
      • Français
      • Português
  • 日本語コミュニティ
  • 한국 커뮤니티
0

Overlap one object over another without them looking like separate pieces?

New Here ,
Jun 01, 2025 Jun 01, 2025

Screenshot 2025-06-01 at 2.18.12 PM.png

Hello, TIA for any help I can get with this!

I am working on a logo where I am trying to get the bar of the A to extend across the right side and using drop shadow to create depth. Right now, I have the bar as a separate object, and while it looks fine, because I am using a gradient on the letters themselves you can see the line where they're not connected. I would like it to look like the bar is coming out of the left side of the A, but no matter how I adjust the gradient, you can still see they're separate pieces, and I can't seem to figure out which tool to use to get it to look right. Is there a way to join them and have the bar still look like it's going across the right side of the A? Any assistance would be so helpful!

TOPICS
How-to
478
Translate
Report
Community guidelines
Be kind and respectful, give credit to the original source of content, and search for duplicates before posting. Learn more
community guidelines
Adobe
Community Expert ,
Jun 01, 2025 Jun 01, 2025

That depends on how exactly this lettering is built. Creating a compound path may work.


Can you share this sample file for inspection?

Translate
Report
Community guidelines
Be kind and respectful, give credit to the original source of content, and search for duplicates before posting. Learn more
community guidelines
New Here ,
Jun 01, 2025 Jun 01, 2025
Translate
Report
Community guidelines
Be kind and respectful, give credit to the original source of content, and search for duplicates before posting. Learn more
community guidelines
Community Expert ,
Jun 02, 2025 Jun 02, 2025

As far as I can see, the download link you provided is not public.


Can you change that, so one can get the file straightforwardly?

Translate
Report
Community guidelines
Be kind and respectful, give credit to the original source of content, and search for duplicates before posting. Learn more
community guidelines
New Here ,
Jun 08, 2025 Jun 08, 2025

I am so sorry, I have been working hard at my day job all week and haven't had time to look into this! I think I got it figured out, try this link now:

https://assets.adobe.com/id/urn:aaid:sc:US:c1d8d68d-67fb-4e8e-bac2-fdbb2e080fb7?view=difile

Translate
Report
Community guidelines
Be kind and respectful, give credit to the original source of content, and search for duplicates before posting. Learn more
community guidelines
Community Expert ,
Jun 01, 2025 Jun 01, 2025

Kyndra,


Can you show a screenshot including the whole letter A along with the extended bar, and with both of them selected and visible in the expanded Layers palette?


Edit: Kurt wrote the first post while I was working on mine; I also wondered about the viability of a Compound Path.


Translate
Report
Community guidelines
Be kind and respectful, give credit to the original source of content, and search for duplicates before posting. Learn more
community guidelines
New Here ,
Jun 01, 2025 Jun 01, 2025

I hope this is what you meant; I responded to Kurt's reply with a URL to the file itself.


Screenshot 2025-06-01 at 5.26.17 PM.pngScreenshot 2025-06-01 at 5.25.21 PM.pngScreenshot 2025-06-01 at 5.24.52 PM.png

Translate
Report
Community guidelines
Be kind and respectful, give credit to the original source of content, and search for duplicates before posting. Learn more
community guidelines
Community Expert ,
Jun 02, 2025 Jun 02, 2025

Kyndra,


I am sure Kurt will come up with a less dubious solution, but:


The bottom screenshot of yours gave the basis of this Overlap-Compound-Path-Cheat suggestion, which I hope can work regardless of the build, and ensure that the drop shadow only applies to the gradient bar path.


As I see it, you have a vertical gradient, maybe applied to a Compound Path to include the T for uniformity, but in any case covering the total height of the lettering containing the A, and you try to apply the same gradient to the bar, which fails to work because the whole gradient is contained in the shorter height of the bar.


The Cheat suggestion consist of working with a copy of the gradient path of the bar, on top of the actual bar (which can still serve as the basis for the drop shadow), and include it in a Compound Path with the same height and vertical position as the lettering containing the A and masking out the unwanted parts.


Below is a simple representation of the Cheat suggestion, 1) corresponding to the failing original gradient bar path along with the path containing the A, and 6) corresponding to the final gradient bar path along with the path containing the A (on the wrong side), with the Cheat in between.


Click to get closer, Click again to get closer still


I have added a version of 6) where the gradient path bar has been moved to touch the full gradient (still on the wrong side).


Translate
Report
Community guidelines
Be kind and respectful, give credit to the original source of content, and search for duplicates before posting. Learn more
community guidelines
New Here ,
Jun 08, 2025 Jun 08, 2025

So sorry for my delayed response, I've been working hard at my day job all week and haven't had time to come back to this yet.


First off, thank you for such a detailed description/guide! However, I think I am just too much a novice with compound paths to even begin to accomplish what you're describing; from your photos I have no idea how to do any of that 😞 The A is connected to one of the Gs, the E, and the D if that wasn't apparent in my original screenshots.

Screenshot 2025-06-08 at 4.15.44 PM.png

Translate
Report
Community guidelines
Be kind and respectful, give credit to the original source of content, and search for duplicates before posting. Learn more
community guidelines
Community Expert ,
Jun 09, 2025 Jun 09, 2025

You are welcome, Kyndra.


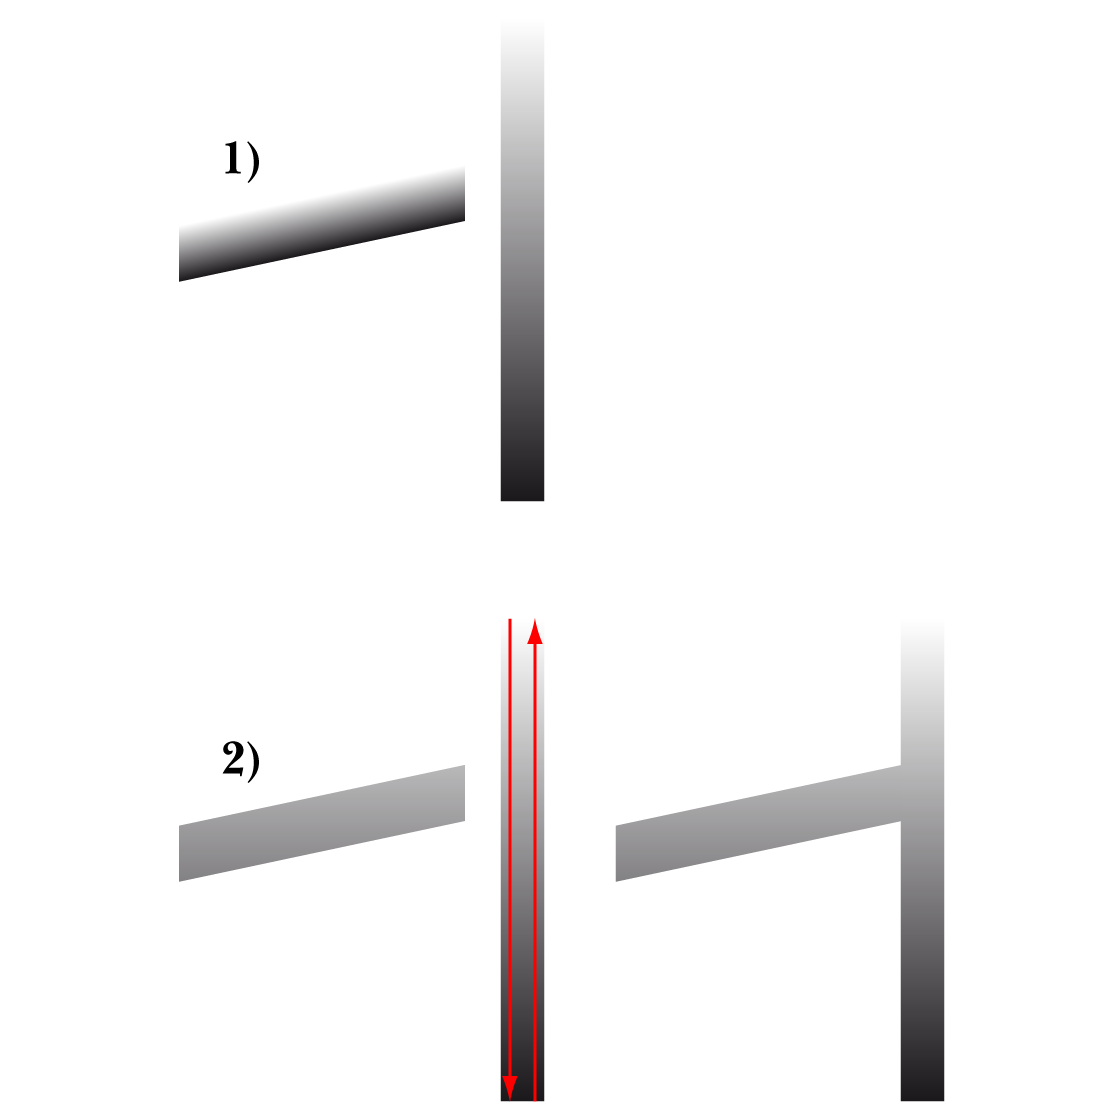
Here is a much simpler way, with no cheat, only a gradient adaptation, again shown with a simple sample as a representation, Amardt Guides being your friends:


1) This is the initial set shown beside each other corresponding to what you have, with the same vertical gradient applied to both;

2) This is what you get when you select the bar part and then ShiftClickDrag vertically with the Gradient Tool, either from top to bottom or from bottom to top of the multiple letter path containing the A as shown with the red arrows; beside 2) is shown the match with the bar abutted to the letter path.


Whether to ShiftClickDrag from top to bottom or from bottom to top depends on the direction of the gradient; you can try either and use the other instead if needed.


In this way the right portion of the full gradient is applied to the bar.


Click to get closer, Click again to get closer still


In the actual artwork, in order to ShiftClickDrag vertically, you need to establish the the height between the top of the full gradient.


For the multiple letter path containing the A, this is between the top of the G and the bottom of the dripping under the D (highest and lowest).


You can do this by ShiftClickDragging with the Line Segment Tool or Clicking twice with the Pen Tool, in both cases starting with the top of the G going right past the dripping under the D, and with the dripping under the D going left past the top of the G.


This corresponds to ShiftClickDragging between top and bottom of the Bounding Box in your latest screenshot.


Smart Guides will guide you, you can Set Smart Guides preferences here,
https://helpx.adobe.com/illustrator/using/rulers-grids-guides-crop-marks.html


I regularly post under the assumption that it is more preferable/convenient/managable for the asker to continue using the artwork as it is including its structure, especially if it is complex and/or is one of the early works.


I agree with Bobby about drop shadows for logos, with the addition that your artwork in its entirety is far more complex than usual and maybe best suited for limited use, as on websites/screens and in normal print context.


In my first post there was no actual description/guide, only a few screenshots to show the (main) steps from 1) to 6), which show the sample bar before and after.


It was clear from your screenshots that the letters you mentioned were all part of one path.


Translate
Report
Community guidelines
Be kind and respectful, give credit to the original source of content, and search for duplicates before posting. Learn more
community guidelines
New Here ,
Jun 10, 2025 Jun 10, 2025

This was very helpful! I think I was able to do what you described; I also tried a version like Bobby suggested where I just outlined the bar of the A with black so I can offer the option to the client. Are you still able to see the line between the two pieces? I think I've looked at it so long I can't tell LOL

Screenshot 2025-06-10 at 3.51.49 PM.pngScreenshot 2025-06-10 at 3.51.25 PM.png

Translate
Report
Community guidelines
Be kind and respectful, give credit to the original source of content, and search for duplicates before posting. Learn more
community guidelines
Community Expert ,
Jun 11, 2025 Jun 11, 2025
LATEST

Thank you very much for sharing, Kyndra.


Both ways work fine for the gradient, also at the full size screenshot.


If you wish to have the same gradient appearance across all letters, you can treat the T and the G in the same way with the vertical gradient ShiftClickDragging; the bottom ends of the dripping of the T will just have the end colour extending further down.


With regard to the drop shadow, obviously there is a difference between the effect and the solid black, more noticeable the larger the size, where the shadow appearing drawn rather than cast, (the simplicity of) which can also be a design choice.


Translate
Report
Community guidelines
Be kind and respectful, give credit to the original source of content, and search for duplicates before posting. Learn more
community guidelines
Community Expert ,
Jun 02, 2025 Jun 02, 2025

I'll ask what may seem like a dumb question: is it necessary for the cross bar on the "A" to have a drop shadow effect applied to it? I would probably use a combination of the Offset Path effect and Pathfinder operations to create a flat, partial outline around the cross bar of the "A" and then Unite the cross bar to the rest of the A. That would solve the issue with the gradient fill.

For something like logos, I'm very hesistant to include live raster-based effects such as drop shadows in the artwork. Such effects may not port well to other graphics applications.

Translate
Report
Community guidelines
Be kind and respectful, give credit to the original source of content, and search for duplicates before posting. Learn more
community guidelines
New Here ,
Jun 08, 2025 Jun 08, 2025

I am trying a version this way, thank you for the idea!

Translate
Report
Community guidelines
Be kind and respectful, give credit to the original source of content, and search for duplicates before posting. Learn more
community guidelines