Exit
  • Global community
    • Language:
      • Deutsch
      • English
      • Español
      • Français
      • Português
  • 日本語コミュニティ
  • 한국 커뮤니티
1

Pattern - Minimum Tile Size?

Community Beginner ,
Sep 22, 2021 Sep 22, 2021

I'm making pattern swatches of very small objects.  If I make the tile size too small I can't get the spacing close enough.


For instance, these dots are Ø0.1mm and the desired tile size is 0.4 x 0.4mm.  However, the pattern wizard won't let me size the tile any less than 0.7056mm. 


defaultqrn60zyr9ztw_1-1632346096981.png


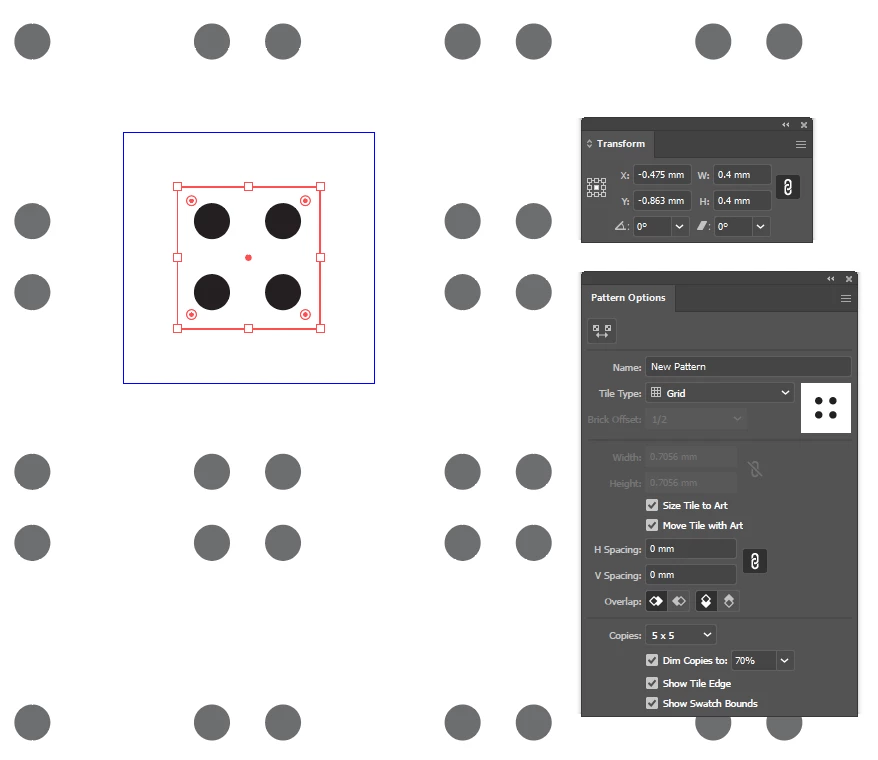
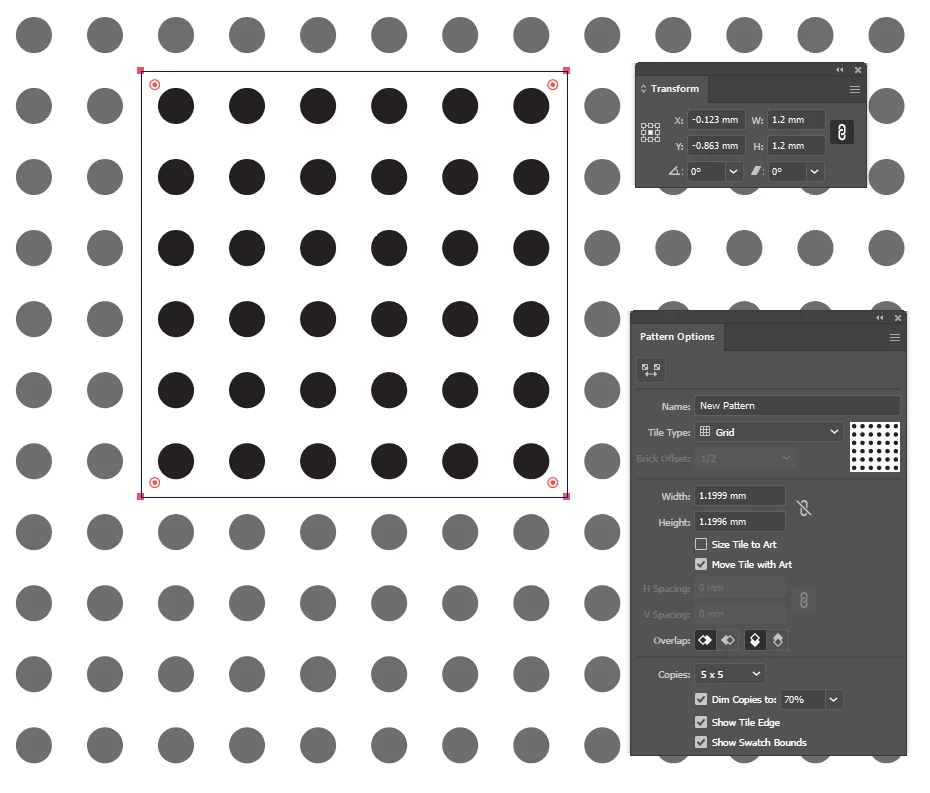
I realize that I can achieve what I want if I start with more opjects and a larger tile size.  I'm wondering why there's a minimum tile size and if there are any other rules to consider.


defaultqrn60zyr9ztw_2-1632346547811.png


Thanks


TOPICS
Tools
1.6K
Translate
Report
Community guidelines
Be kind and respectful, give credit to the original source of content, and search for duplicates before posting. Learn more
community guidelines

correct answers 2 Correct answers

Community Expert , Sep 22, 2021 Sep 22, 2021

Looks like a limitation of the pattern maker.

If you create a 0.4 x 0.4mm rectangle with dots that are Ø0.1mm and drag it into the swatches panel it will create a pattern swatch of that size that works just fine.

But if you double click that swatch to open the pattern maker you will see the minimum tile size of 2 pixels/points (or 0,7056 mm).

To work around the limitation you could use the Drag and Drop method or create the pattern at 200% and scale them when used to fill an object with the opti

...
Translate
Community Expert , Sep 23, 2021 Sep 23, 2021

Good to hear that helped.

You can also try this to take advantage of the Pattern Maker options.

Create a pattern with the Pattern Maker at 200% using options like hex or brick.

When done, drag the pattern swatch from the Swatches panel onto the artboard.

Scale 50% and drag it back to the Swatches panel. 

If you hold down the Alt key and drag the scaled pattern on top of the old one it will replace it.


Translate
Adobe
Adobe Employee ,
Sep 22, 2021 Sep 22, 2021

Hi there,


Thank you for reaching out. If you select "Size Tile to Art" and input 0.4 x 0.4 in spacing. You should be able to get the desired result. Please correct me if I misunderstood the query.

Anshul_Saini_1-1632349370892.png


Regards,

Anshul Saini

Translate
Report
Community guidelines
Be kind and respectful, give credit to the original source of content, and search for duplicates before posting. Learn more
community guidelines
Community Expert ,
Sep 22, 2021 Sep 22, 2021

Looks like a limitation of the pattern maker.

If you create a 0.4 x 0.4mm rectangle with dots that are Ø0.1mm and drag it into the swatches panel it will create a pattern swatch of that size that works just fine.

But if you double click that swatch to open the pattern maker you will see the minimum tile size of 2 pixels/points (or 0,7056 mm).

To work around the limitation you could use the Drag and Drop method or create the pattern at 200% and scale them when used to fill an object with the option Transform Patterns.

Translate
Report
Community guidelines
Be kind and respectful, give credit to the original source of content, and search for duplicates before posting. Learn more
community guidelines
Community Beginner ,
Sep 23, 2021 Sep 23, 2021

That's interesting about the drag-and-drop into the swatch panel.  You're correct.  I just tried and it produced the desired result.


However, this only seems to work if the tile shape is rectiliner and using the default grid pattern.  I won't be able to adjust to the brick pattern, or use a hexagonal tile shape, or be able to overlap tile shapes. 


  • For instance, here's another small pattern I'm working on.  The red edges are the desired tile size, and the black background is slightly larger so that the tiles will overlap and hide any tile witness lines:
  • Screenshot_1.jpg


Scaling these patterns is a good suggestion, and is already part of my work flow.  I've been setting up these patterns to serve as the smallest instance, which could then be scaled larger; however, starting large and scaling smaller might just have to do.


Many thanks!

Translate
Report
Community guidelines
Be kind and respectful, give credit to the original source of content, and search for duplicates before posting. Learn more
community guidelines
Community Expert ,
Sep 23, 2021 Sep 23, 2021

Good to hear that helped.

You can also try this to take advantage of the Pattern Maker options.

Create a pattern with the Pattern Maker at 200% using options like hex or brick.

When done, drag the pattern swatch from the Swatches panel onto the artboard.

Scale 50% and drag it back to the Swatches panel. 

If you hold down the Alt key and drag the scaled pattern on top of the old one it will replace it.


Translate
Report
Community guidelines
Be kind and respectful, give credit to the original source of content, and search for duplicates before posting. Learn more
community guidelines
Community Beginner ,
Sep 23, 2021 Sep 23, 2021

Great suggestion!  I've confirmed that this achives my desired results.  I will have to save some explanatory notes with my control artwork, but I think this is a superior method than working with more objects in a larger tile size.  Thanks again!!!

Translate
Report
Community guidelines
Be kind and respectful, give credit to the original source of content, and search for duplicates before posting. Learn more
community guidelines
Community Expert ,
Sep 23, 2021 Sep 23, 2021
LATEST

Good to hear that helped.

But you made me curious, why do you want these patterns so tiny?

Translate
Report
Community guidelines
Be kind and respectful, give credit to the original source of content, and search for duplicates before posting. Learn more
community guidelines