

Problems with Offset Path

Copy link to clipboard
Copied
So I have used offset path in order to overlap and cut out text before, but the past couple of times, its been giving me problems. No matter how big I make my offset, it turns it into a big blob. I will post a picture of what I am trying to do and then whathappens when I try to use the offset path function.
So I made outlines and ungrouped this text, then I smushed the A and the AR together.

I want to do the cut outs pictured below but its not working! (I just use procreate of my ipad to quickly show what I want the end result to be.)

When I choose offset path, it just turns it into a big blog. Ive used this technique before with no problems! What am I doing wrong???


Explore related tutorials & articles
 14
Replies
14
14
Replies
14

Copy link to clipboard
Copied
If a 4px offset is that large your artboard and text is probably very small. What happens if you scale the text up to a much larger size, then try a 4px offset?
Copy link to clipboard
Copied
yes! This worked. Thank you! I was working with too small of an artboard. Is there a better way to to do this though? There are still certain parts that I want to cut out that arent popping up in the off set. The erase tool doesnt end up being precise enough.

Copy link to clipboard
Copied
You want to use the Shape Builder tool for this, not the eraser.
Copy link to clipboard
Copied
Oh yeah, I am. I'm saying that even with the shape builder, it's not giving me the option to delete the certain parts I want to. Or the area it's allowing me to delete it too large or not the right shape.

Copy link to clipboard
Copied
1. Select all the points you are having trouble deleting, ungroup.
2.Lock only the points you wish to keep using lasso and holding shift.
3.Delete all other points.
Worth a shot!
Copy link to clipboard
Copied
.png")
Is this what you are going for ?
I encountered the same thing as you when I tried to use offset , I obtained this by overlapping with a white stroke,using 2 layers and then rasterizing . Because its a vector you can just shrink it down later. Let me know if this works.
T
Copy link to clipboard
Copied
Oh and of course trace at the end
Copy link to clipboard
Copied
Seperate each letter in a layer and offset individually.
Copy link to clipboard
Copied
Also try grouping them first .

Copy link to clipboard
Copied
Hannah,
I agree with Theresa that the letters must by wee, and it will be better to work at a much larger size.
Apart from that, the offset is far too large to avoid the big blob.
To look like the image with the desired appearance, the offset must be about 1/40 of the (approximate) letter height.
However, as I (mis)understand it, offsetting is never going to work as desired because it will give unwanted cutouts: the bar of the A will also make apparent cutouts from the stem of the R, and the (right) stroke of the A will give a cutout from the leg of the R.
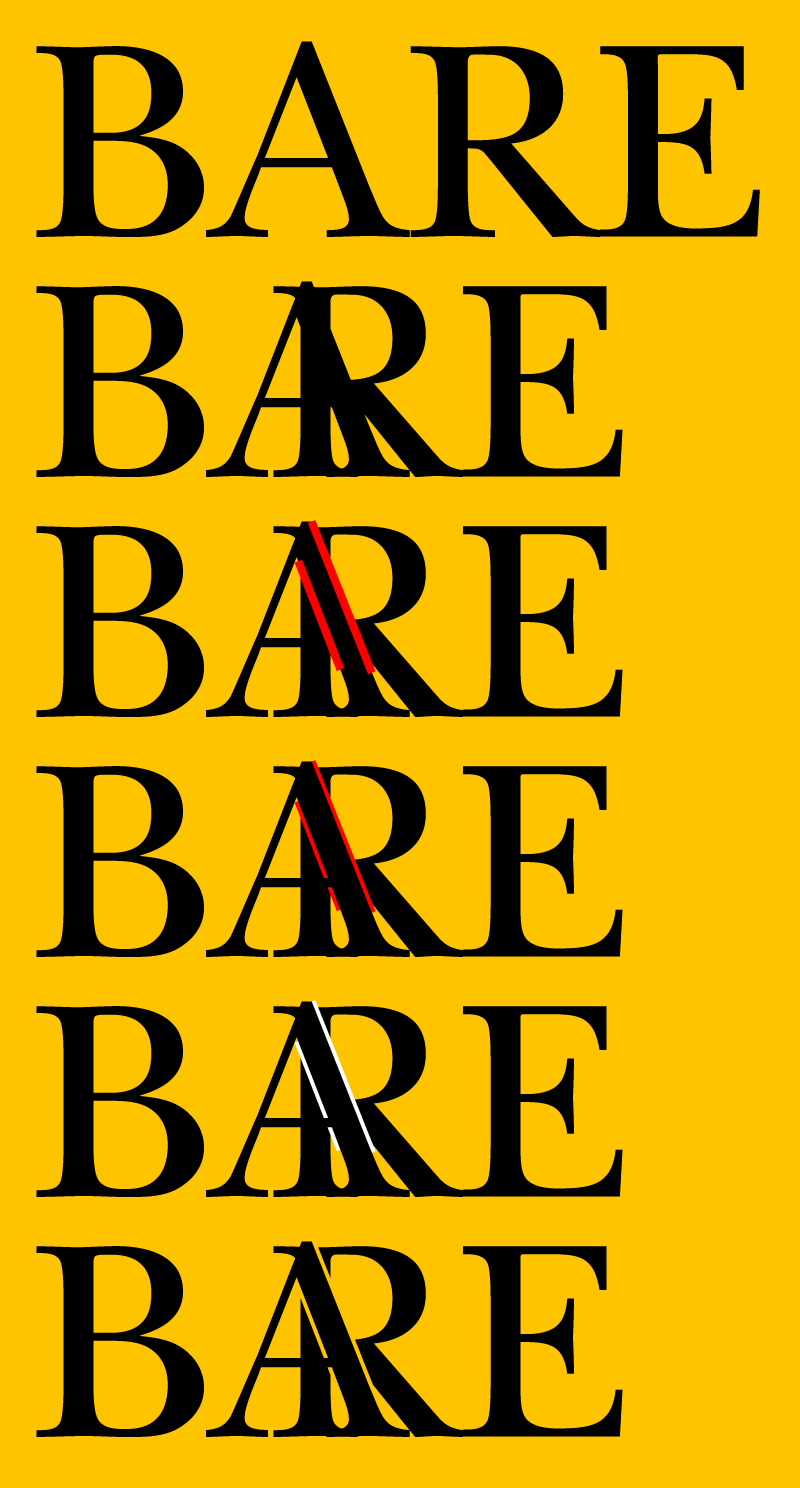
If you wish to only have apparent cutout from the stem of the R, you can do it as follows, with the A above the R (in the stacking order, as can be seen in the expanded Layer in the Layers panel), Smart Guides being your friends helping you to snap, images shown with a fair font at 72pt on a yellow background, and a Stroke Weight of 2pt.
You can use Helpx search to see more about the terms and ways at the bottom.
0) Select the A and move it above the R in the expanded Layer in the Layers panel, then switch from black fill/nostroke to nofill/red stroke with a Stroke Weight that is twice the desired cutout, this will also give an apparent cutout from the stroke of the A but only temporarily; 2pt Stroke Weight shown in the images, the red stroke colour is chosen so you can see what you are doing;
1) With the Line Segment Tool ClickDrag from the top right corner Anchor Point of the (right) stroke of the A (Smart Guides say anchor when you are within snapping distance) and along the right side of the stroke down past the stem of the R (Smart Guides say path when you are within snapping distance) and let go, then ;
2) Repeat 1) for the left side of the, only between two points on the left side on either side of the stem of the R (Smart Guides say path when you are within snapping distance);
3) Group the two red stroked paths from 1) and 2) and drag the Group down in the Layers panel between the A and the R;
4) Switch from red to white stroke colour, then ShiftClick the R, then in the Transparency panel click Make (Opacity) Mask with Invert Mask ticked.
This ought to knockout/hide the desired parts of the stem of the R.
Click/RightClick to see in full, Click again to get closer, Click Here to see in Chrome
Edit: Addition of the suggestion I had in mind when I had to leave for a while.
Edit edit: Elaboration of steps and addition of images and Helpx search.
You can use Helpx search to see more about the terms and ways here:
This link is about the Layers panel,
and the first entry is this,
https://helpx.adobe.com/illustrator/using/layers.html
This link is about the Line Segment Tool,
and the first entry is this,
https://helpx.adobe.com/illustrator/using/drawing-simple-lines-shapes.html
Copy link to clipboard
Copied
Yes I was working with too small of an artboard! See my comment above for an additional question.
Copy link to clipboard
Copied
Hannah,
I had to leave for a while and posted before suggesting the way I had in mind, then went back and added my suggestion, editing the post.
Copy link to clipboard
Copied
Alrighty, thank you but I dont think I am quite advanced enough to follow your instructions! haha. A bit confusing.
Copy link to clipboard
Copied
Hannah,
I have edited the post again, extending it to hopefully ease the way.

 AdChoices