Known Participant
March 29, 2018
Answered

Putting text inside of a vector word

  • March 29, 2018
  • 7 replies
  • 5679 views

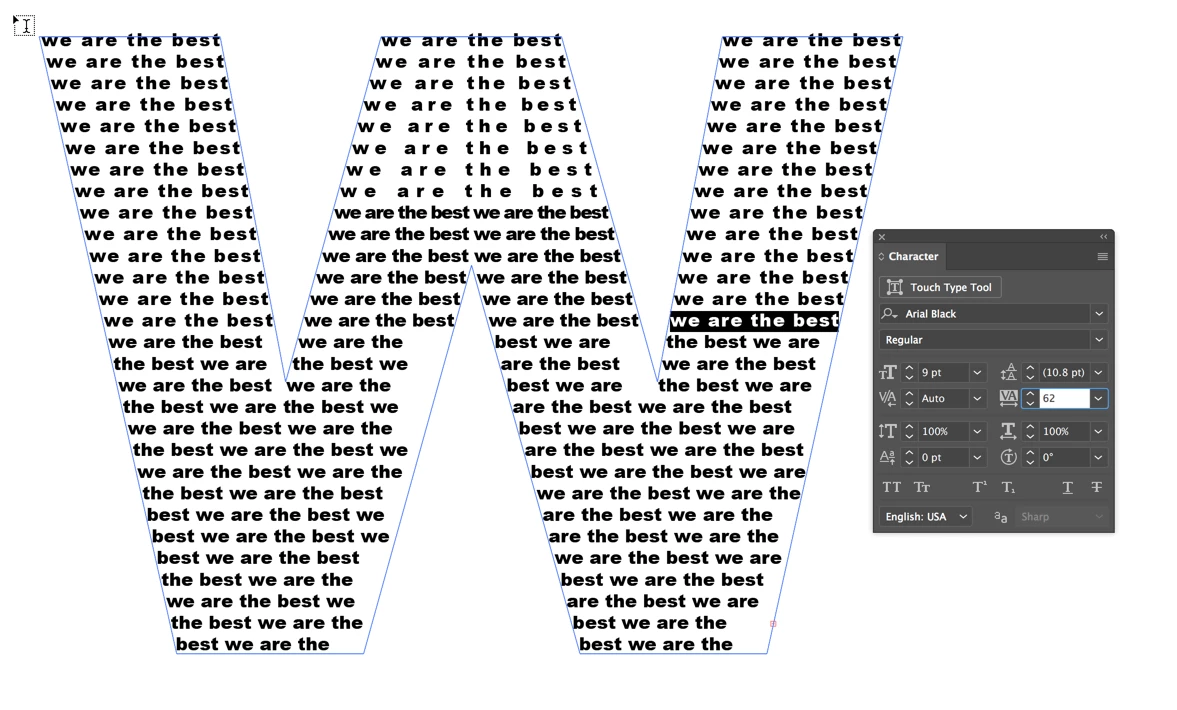
I'm really wanting to put my client's slogan inside of their business name. I found a couple of tutorials on YouTube but neither of them worked. I'm not sure what I'm doing wrong.

I have a vector file which has their name written out. Ideally, I'd like to have their slogan repeating inside of the name, removing the letter outlines so that the small repeating text forms the name. Hopefully I'm explaining this accurately...

This topic has been closed for replies.
Correct answer tromboniator

It's difficult to guess what kinds of problems you are having, so I offer this a merely one possibility for you to consider.

In this example I filled a type box with many repetitions of "we are the best", copied, clicked the outlined W with the Area Type Tool, and pasted. I decided on a type size that pleased me, then began to select each "we are the best", one at a time, and to adjust the tracking in the Character panel to make the phrase fit the space. Click in the Tracking number field to use the arrow keys to increase or decrease the spacing as needed. Obviously, I didn't finish the process. Yes, this is tedious and long, and I know of no way to do the whole thing in a click or two. There are several to try to make words fit: you can change type size, stretch words vertically or horizontally, change fonts, add strokes, offset path, etc., and my choices will be different from yours. I hope this will be of some use to you.

7 replies

Known Participant
April 25, 2018

Thank you all so so so SO much for your help and patience with me as I learn to navigate AI.

I've now run into an issue regarding hyphenation and awkward line breaks that I've been trying to troubleshoot for the past couple of hours to no avail.

I'm going to start a new thread on that since this particular question has been solved.

Thanks again Cheers!

Jacob Bugge
Community Expert
April 25, 2018

For my part you are welcome, Tiffany.

Known Participant
April 24, 2018

Does everything look okay in my layers panel? Before I start following new instructions I want to be sure my foundation is accurate...

Jacob Bugge
Community Expert
April 24, 2018

Tiffany,

It looks as if you have the inner A path of the A separate on top and then a(n incomplete) Clipping Mask made from the outer A path and the image.

You need to first create the Compound Path from both A paths, then select that along with the image, as already mentioned by Larry, so you have to release the incomplete Clipping Mask, as mentioned by Monika.

Apart from that, it is always better to have the relevant artwork selected in order to get the full advantage of looking at the Layers palette.

Known Participant
April 23, 2018

Side question: I'm curious if my file is too small. It's possible that my client will want to use this design for apparel and posters in the future. Should I start from scratch making the letters larger or is there something to EPS files that I don't yet understand as a newbie that makes them able to be enlarged while maintaining quality? I hope that question isn't too confusing.

creativejake
Participating Frequently
April 23, 2018

The beauty of using vector files (adobe illustrator/ .AI or .EPS files) is that they are completely scalable. The exception to this is if you have placed a raster (.jpg, .bmp, .tif, .png) file into the document. That will not scale easily. Keeping it all vector graphics will be scalable. Hope that makes sense.

Known Participant
April 23, 2018

Thank you for clarifying this (and not making fun of me!). Vectors are amazing!

creativejake
Participating Frequently
April 19, 2018

Would making a clipping mask be easier? Would it be alright if the letterforms are cut off along the larger letters' edges like the example here?

Known Participant
April 23, 2018

I'm happy to go this route, too, just to give my client a couple of options to choose from. If you have time to explain how you accomplished this, I'm certainly all ears (eyes in this case)

Thanks Jake!

creativejake
Participating Frequently
April 23, 2018
  1. Create the text that will be contained within the larger letterforms.
  2. Create the larger letterform and place it above the text.
  3. With the larger letterform selected, Go to Type -> Create Outline  -- (this will convert the type into a letterform shape like you had done before)
  4. Select both the text and the now outlined letterform and right click to bring up the drop-down menu, then select "Make Clipping Mask"

    - this will make the letterform shape a clipping mask to the text that is behind it.

If you need to move or change the text inside the clipping mask, just double-click on the shape. You will see the "<Clip Group>" selected in the upper ribbon of the document window. Double-click away from the shape to go back to the regular artwork.

I use this technique all the time for a number of things. Hope this helps you.

Known Participant
April 19, 2018

Something else for me to consider: would it be easier if I start from scratch and create a whole new " H A V E N " to work off of? The reason I've been avoiding that is because it is their branding and I'd have to duplicate it exactly....I don't know the font or how the original designer manipulated the sizing or anything so I wasn't sure it was possible to make happen... what would you all do?

tromboniator
Community Expert
April 19, 2018

I don't believe you need to start from scratch, Tiffany. What you should do is go to the Layers panel and click the reveal icon

in the red circle and see which, if any or all, of the letter shapes are compound paths. If they are, you need to release them, because you cannot convert a compound path to Area Type. ⌘+⇧+⌥+8 Mac or ctrl+ shift+alt+8 Win or menu Object > Compound Path > Release.

The letter A is a special case because of the counter, or hole. Ordinarily, in outlined type, the two paths forming the letter would be compounded to form the opening in the fill of the outside path, but a) your paths have no fill, and b) you can't use a compound path.

A solution is Object > Text Wrap > Make. In all likelihood, you will want to go back to Object > Text Wrap > Text Wrap Options, and set the Offset to 0.

Please let me know whether any this helps or only confuses.

Peter

Known Participant
April 23, 2018

I did what you said and I believe all letters have been released now. I attached a screenshot so you can see what I see over in the layers menu.

Does this mean I can likely follow the instructional video and the instructions you've outlined in this thread now without interference?

Is there anything I need to do once I complete the text within each letter in order to "unrelease" things again, or?

You have just been a WORLD of help to me. Thank you, thank you, thank you.

x Tiffany

tromboniator
Community Expert
March 29, 2018

Not quite sure what you're after. Is one of these even close?

Thanks,

Peter

Known Participant
April 6, 2018

Hey everyone ~ Thanks so much for your replies. I was swamped with work and life and unable to respond so thanks for being patient.

Peter - option A is almost exactly what I'm hoping to accomplish. The only detail I would hope to adjust is to wrap the words inside the text in such a way as to mitigate all white space, so that things look very clean and edges are clearly defined. The effect that she accomplishes in this video tutorial is exactly what I'm hoping to accomplish: How to Fill a Character with Text in Adobe Illustrator - YouTube

However - when I followed the steps, it didn't work out for me... and I'm too new to Illustrator to troubleshoot just WHY that's so.

Looking forward to your replies and so grateful for your help.

Tiffany

tromboniator
tromboniatorCorrect answer
Community Expert
April 7, 2018

It's difficult to guess what kinds of problems you are having, so I offer this a merely one possibility for you to consider.

In this example I filled a type box with many repetitions of "we are the best", copied, clicked the outlined W with the Area Type Tool, and pasted. I decided on a type size that pleased me, then began to select each "we are the best", one at a time, and to adjust the tracking in the Character panel to make the phrase fit the space. Click in the Tracking number field to use the arrow keys to increase or decrease the spacing as needed. Obviously, I didn't finish the process. Yes, this is tedious and long, and I know of no way to do the whole thing in a click or two. There are several to try to make words fit: you can change type size, stretch words vertically or horizontally, change fonts, add strokes, offset path, etc., and my choices will be different from yours. I hope this will be of some use to you.

Jacob Bugge
Community Expert
March 29, 2018

Tiffany,

As I (mis)understand it, you can write the repeated slogan first, then the name on top of it, all as live Type, then select both and Ctrl/Cmd+7 to turn it into a Clipping Mask.

You can also Type>Create Outlines for everything, then select the name and Ctrl/Cmd+8 to turn it into a Compound Path, then select everything and Ctrl/Cmd+7.