Copy link to clipboard
Copied
Hi, I'm trying to figure out a technique to do line shading, as in patent illustrations, the quickest way possible.
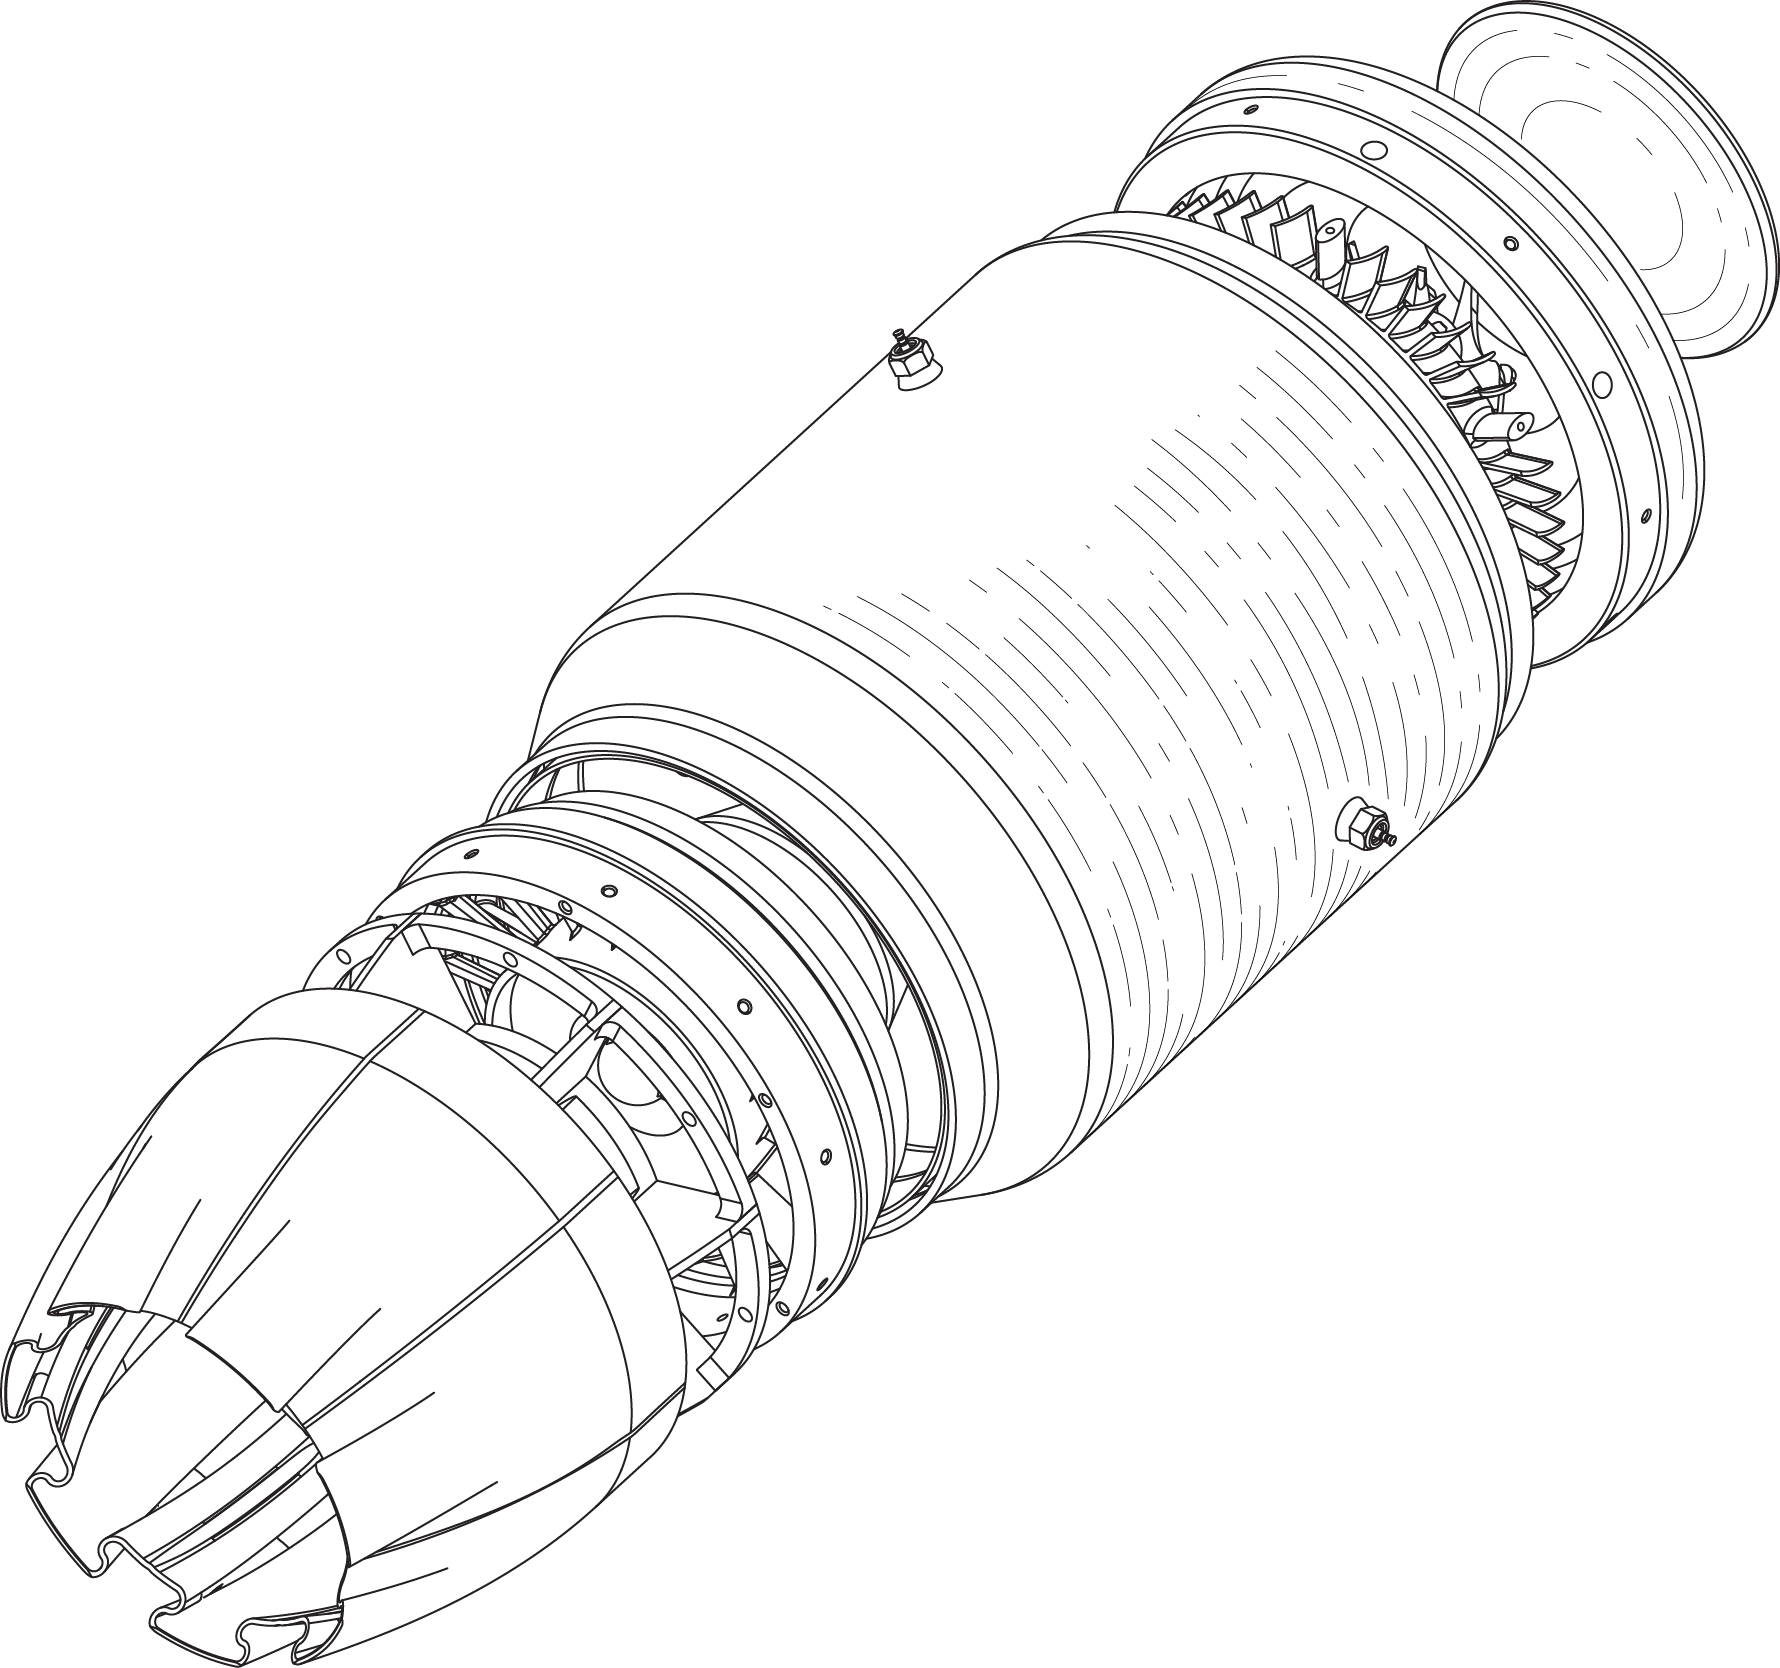
If you're not familiar with patent line shading, the preferred look is to have parallel or concentric discontinuous lines,
and are used both to differentiate one surface from another, and to give an indication of the contours of the shape.
The light source for the line shadows is supposed to be top left, so light at a 45 degree angle.
I've attached a work in progress to give you a better idea of what I mean. Here is my technique. If you want to give me some
advice or feedback, please actually open up Illustrator and test out your idea so that you can see how long it takes
rather than just opining. If you have experience actually working on patent illustrations, I'd definitely like to hear what technique
you've used for the shading. What I did here was select two lines from the drawing, copied and pasted them to a new layer
for the shading. Then, using the blend tool, adding specified steps and playing with the number to create a density of lines
that wasn't too dark. Then I expanded that object using the object menu (unchecking lines and fills). Then I selected each
line and used different dash gap settings for each line to make them non-uniform looking, so they wouldn't be confused as
some kind of surface ornamentation pattern. Lastly, I used the eraser tool to erase some of them away in order to make the
top left of that area appear to have a spot of light on it (at least for the main cylinder of the drawing).
The problem is that it's somewhat time-consuming, and I'd like to find a faster way.
So, please let me know what you think of this technique, can you improve upon it to make the process faster, more automated?
Or, if you have an idea for a completely different technique, please tell me what it is.
Copy link to clipboard
Copied
Well, most CAD-programs and some 3D rendering tools generate this stuff at the push of a button and CorelDraw even developed a new custom renderer for their technical suite that can dynamically generate vector outlines from 3D-CAD data inside their programs. It's probably fair to say that in light of that you are making your life difficult by hanging on to Adobe software. That said, I'd probably simply create a ton of rings with disconnected segments and simply delete the ones I don't want/ need. Seems quicker than endlessly fiddling with dashes.
Mylenium
Copy link to clipboard
Copied
CorelDraw even developed a new custom renderer for their technical suite that can dynamically generate vector outlines from 3D-CAD data inside their programs.
As a licensed user of Technical Designer, I also would like to know what specific feature are you talking about that has to do with automating the kind of shading which is the subject of this thread.
JET
Copy link to clipboard
Copied
Jet,
Sorry for the delay, I didn't want to write back until I had a chance to try out your technique. It looks pretty good, I'm impressed, but I need to experiment more with it in order to be able to use that technique in a streamlined way to shade any kind of area or shape in a drawing.
Recently, a project had 25 drawings, exported from a 3D program. I'd like to get the shading time down to something like 15 minutes per drawing. I don't think every surface needs to be shaded, but I want to apply the technique to multiple types of surfaces, flat, angled, curved, in the same drawing. I don't know if it'd be an effective approach to create many different brushes that could then be used in all future drawings/projects, or if brushes need to be created per drawing, or per project, to be able to perfectly fit that shape.
If you have any further insight, please let me know. Otherwise, I'm going to keep playing with your technique to try and come up with the exact steps for any shape.
Copy link to clipboard
Copied
…I want to apply the technique to multiple types of surfaces, flat, angled, curved, in the same drawing. I don't know if it'd be an effective approach to create many different brushes that could then be used in all future drawings/projects, or if brushes need to be created per drawing, or per project, to be able to perfectly fit that shape.
Using the basic principles I demonstrated, I would devise a set of Art and Pattern Brushes, and then add them to all the New Document Profile files that I typically use for axonometric drawings.
Just as a surprisingly small set of plastic templates (ellipses, hexes, springs, etc.) in pre-computer days facilitated drawing pretty much everything, one should be able to build a carefully-constructed set of Brushes that would facilitate quickly applying shading to most mechanical shapes. (I use such collections to automate drawing more ambitious things: threaded hex fasteners of any length, diameter, and axonometric orientation; wire rope, loom, terminals; round and square tubing, etc., etc.)
For example, in my post, I:
I did that to demonstrate that the resulting Pattern Brush can be used as laterally-shaded effects for any cylinder, of any length and any diameter.Well, I could have also just as easily used that same 4-path array as base art for a separate Art Brush which could be used as longitudinal shading lines for cylinders and other shapes.So there are more possibilities than just what I demonstrated.
While exploring those possibilities, always consider whether there are other features that can be exploited to semi-automate the process. For example:
One of the chronic frustrations about Illustrator's implementation of Brushes (and Symbols and Arrowheads) is that they don't provide an option to disallow scaling of stroke weights in the base art, when you scale the Brush by changing the stroke weight of the path to which the Brush it is applied. So to work around that, you could record an Action (macro) to run after using the Brush, that:
…so that all your "shading" constructs can be given the same stroke weight with the click of a button.
In the first cylindrical example I showed, just the initial single-row "dashed" Brush was applied to a live Blend. Well, a few carefully thought-out similar Blend constructs could also be exploited to serve as a set of re-useable shading assets, and stored as Symbols (if you want to have them reside in a so-called "library"), or just put copies of them outside the Artboard(s) in your New Document Profile files.
JET
Copy link to clipboard
Copied
Mylenium, I know you mean well, but I'd like more specifics if you're going to say that Illustrator or Adobe software is not the way to go. I see this all the time in Amazon reviews. "Don't buy this product, there are plenty of other competing products that are better." Oh yeah? Which ones. Except in this case, you do mention CorelDraw but no specifics, which is the software forum equivalent. Care to respond by pasting in a screenshot or screen capture gif/movie file, showing both the results and what menu item/toolbar tool achieved that? I went to the CorelDraw website and couldn't find info on it, and online searches didn't work either. If it was so easy to figure out, I wouldn't be asking on a forum. If there are 3D or CAD programs that can create patent shading lines at the push of a button, that feature hasn't shown up in weeks of Google searches, and consultation with a half dozen experts in Solidworks, 3ds Max, Fusion, Creo, etc. I'm open to whatever software works especially if it can produce vector lines, but I need a tutorial. I've also searched on youtube and no one has shown a technique other than the one I described, which is not that fast.
Copy link to clipboard
Copied
Basic principle: Use Art Brushes and Pattern Brushes.
Example:
JET
Find more inspiration, events, and resources on the new Adobe Community
Explore Now