"tilt" an image down/away
Copy link to clipboard
Copied
How can an imae be tilted, example: if holding a sheet of paper in front of me, and lower the top edge away Similar to looking at a document on a desk from a few feet away etc.
And what's the best format to place in InDesign? Seems .jpg is losing depth of the black.
Explore related tutorials & articles
Copy link to clipboard
Copied
redpointone,
If you have CS5, you can use the perspective grid. If not, you may use the Free Transform Tool on the Bounding Box, dragging on of the upper corners inward while holding (when you have just started dragging) Ctrl+Alt+Shift/Cmd+Option+Shift.
No reason to use anything but AI in InDesign.
Copy link to clipboard
Copied
No reason to use anything but AI in InDesign.
I may have misread/interperated the OP and someother remarks he has made, but I think he is working with a raster image
G
Copy link to clipboard
Copied
I think he might be working with a raster image but actually he only writes image though misspelled.
He was placing the jpeg in ID so he must be exporting as jpeg.
So we don't really know if the image is a raster or vector art. It seems that many of the users asking questions on the
forum refer to both vector art and raster images as images. I guess they may not realize how much that might affect the answer.
Copy link to clipboard
Copied
I guess they may not realize how much that might affect the answer.
too true... and their workflow!
Copy link to clipboard
Copied
Two ways but in both cases make the image a symbol first.
A. place the symbol on the canvas and select it. then use the Free Trnsform tool
to apply the perspective transform.
You do that by clicking a corner anchor with the tools cursor, it looks like you are going resize the symbol but when you then hold downthe command
optio shift key and drag it will give you a perspective transform. Read the help files.
the you make a rectangle and use the 3D Effect to rotate art nd map the symbol to the surface. Read the help files
Copy link to clipboard
Copied
There is no Symbol surface mapping in 3D Rotate; it is not necessary. Simply select the grouped artwork and apply 3D Rotate.
For InDesign import, either Save As... a PDF, or save as native AI with the PDF compatibility option on. InDesign cannot import native AI content. It imports the PDF version of the content of an AI file (if any).
JET
Copy link to clipboard
Copied
InDesign cannot import native AI content. It imports the PDF version of the content of an AI file (if any).
Thank you for reminding the forgetful (who always has PDF Compatible File on), James.
Copy link to clipboard
Copied
I'll second that.
Copy link to clipboard
Copied
Great to see that we are here, again, Peter; even in this busy time where the persistent green ghost image consists of ragged leaves, and the most disturbing concept is yellowing.
Copy link to clipboard
Copied
Thanks Jet, this was the only one that worked. There was a thin line created from the depth around the outer perimeter (rectangle) best way to remove? It was a black & white image that was cropped in PS.
Would setting a transparency for the white (extending from black object) to the perimeter resolve? Other than that I can think of getting the image size and angle (persective) correct, then erasing in PS, downside there is changing the size & angle for other applications in IL.
Copy link to clipboard
Copied
I usually do not actually use the 3D rotate to do this though I guess there is no reason not to.
I usually use the 3D extrude and bevel since if I were rotating something to make it look like a I would want a little little edge to give it a paper like quality.
One of the reasons I suggested you read the help files about the 3D Effect.
But the first method I described does not work and I do not know what I was thinking of at the time I wrote it. I apologize for that.
Copy link to clipboard
Copied
Would setting a transparency for the white (extending from black object) to the perimeter resolve?
JPEG does not support transparency. So if you inisist on using JPEG, you'll need a clipping path.
The so-called "perspective" trick of the FreeTransform tool will work on raster images if you first enclose the raster in an Envelope. Select the image. Then select Object>EnvelopeDistort>MakeWithMesh. In the resulting dialog, set 1 row and 1 column (simple rectangular Envelope). Then apply the Free Transform tool. When saved as PDF, there will be a clipping path to mask the shape.
Best method depends on specific artwork. Frankly, for CMYK print, I would usually use .tif with an alpha channel for transparency, and avoid a hard-edged clipping path.
JET
Copy link to clipboard
Copied
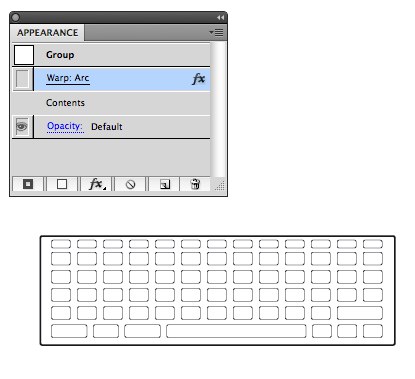
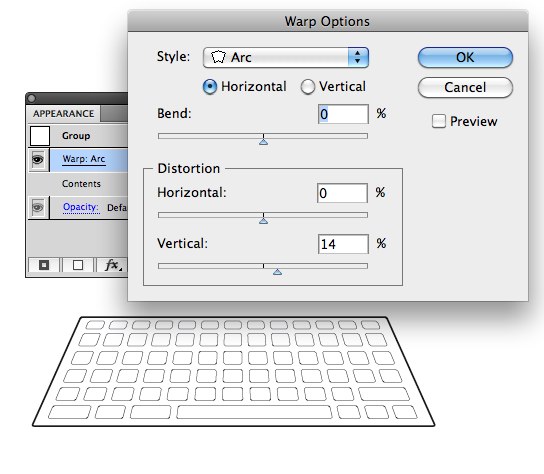
Another way to get a perspective effect is to use one of the Warp effects.
Select the object or group you want to transform, then in the Appearance panel select one of the Warp effects from the pop-up at the bottom of the panel. The trick is to make sure the warp itself is set to 0 but change the Vertical Distortion.
One advantage of using this method is that the effect can be changed at any time by clicking on the effect in the Appearance panel. Also if you need to edit the contents then the effect can be temporarily disabled by toggling the visibility of the effect in the Appearance panel.


Copy link to clipboard
Copied
if its just an image, why not use PS to 3d postcard the image... then place the PSD file in InDesign. Answering another point which seems to have been missed...
And what's the best format to place in InDesign? Seems .jpg is losing depth of the black.
Depends on resolution etc: But placing JPG is fine (always check effective PPI) if thats fine but the JPG is RGB, placing it into ID and exporting to CMYK PDF, sometimes there is a color shift (duller colours etc) ... but if you are placing the JPG in ID and looking at the image as is: then you are looking at a Proxy of the linked file and is not an accurate err... render.You can adjust the display performance of images to display better in InDesign too...
G
Find more inspiration, events, and resources on the new Adobe Community
Explore Now
