mariag21466482
Participant
July 3, 2017
Answered

Rotar un patrón (costura) en Illustrator

  • July 3, 2017
  • 1 reply
  • 1672 views

Hola,

Después de pensármelo muchísimo, por fin me he decidido a dibujar mis patrones de corte y confección en Illustrator (hasta ahora los tenía en papel a escala). Muy bien con los patrones base, el problema ha sido a la hora de crear lo que en patronaje denominamos traslados de pinza (y son la mayoría).

Cuando he empezado a hacer esto me he visto con la tesitura de que el giro no se hace adecuadamente.

Lo mejor es que les enseñe primero qué es un traslado...

Traslado%2520de%2520pinza%2520ajuste%2520de%2520sisa%2520al%2520costado.jpg

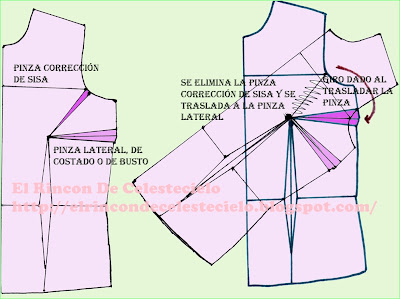
Es decir, tengo un patrón (izquierda) y para mover o eliminar su pinza, con un alfiler (p.e. y en papel), muevo el patrón de la izquierda sobre el de la derecha (previamente calcado del anterior), y desde el vértice de la pinza de talle (aquel triángulo, no invertido, que se encuentra en el mismo color que el patrón).

Lo que yo he hecho ha sido copiar mi patrón base y rotar, pero no es correcto el desplazamiento:

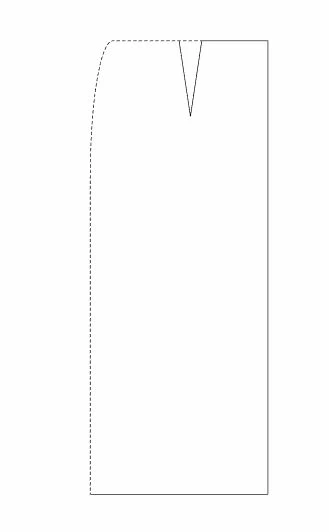
A la izquierda mi patrón base, a la derecha este patrón base y en verde el desplazamiento. Con el desplazamiento, en este caso, es eliminar el triángulo invertido (pinza). ¿Cómo? Desplazándolo punzando en su vértice. En papel es fácil, pero aquí no sé cómo hacerlo si es posible, porque también se me desplaza el vértice..

Gracias por todo!

This topic has been closed for replies.
Correct answer Jacob Bugge

Thanks for your time Jacob.

The problem is that my point isn't really a point. I'm going to explain... (excuse my poor English)... let's see! My supposed "point" really are two individual lines forming a vertex, why? I don't know any other way to do it! but I need both lines (which form a clip in this case) to be independent 'cause they can have a different format (color, stroke, etc.)

Unless you advise me another way to do it

I'm all ears!


Maria,

As I (mis)understand it now, you wish to have the apex of the rotated pattern right on top of the apex of the original pattern when you rotate by a certain angle.

If that is the case, you may, using Smart Guides which are called Guías inteligentes in Spanish:

1) Select the original pattern and then Object>Transform>Rotate with the desired angle, pressing Copy to create a rotated copy, which will be displaced like the green one in your Original Post;

2) Click with the Selection Tool (black arrow) on an empty spot to deselect, then ClickDrag the rotated pattern by its apex to coincide with the apex of the original pattern, and let go when Smart Guides = Guías inteligentes say anchor = ancla).

In order to make sure that the clip reaches the edge of the pattern, you may extend the two lines of the clip outwards past the edge of the original pattern first, and Group the clip and the pattern.

After rotating you can cut the two lines where they cross the pattern(s) by using the Scissors Tool (scissors/shears = tijeras); Smart Guides = Guías inteligentes say path = trazado).

I hope the terms are translated in the right way.

1 reply

mariag21466482
Participant
July 3, 2017

Lo acabo de conseguir con Transformar individualmente, modificando mover y el patrón (que no sé cómo se llama) donde se encuentran varios puntos del dibujo como en la foto.

No obstante, si alguien conoce de otra manera, porque hacerlo a ojo (el desplazamiento y ángulo) es un tanto coñazo para todos los patrones que tengo.

Gracias!

Jacob Bugge
Community Expert
Community Expert
July 3, 2017

Maria,

As I (mis)understand it, you wish to rotate the pattern round a specific point and by a specific angle.

If you wish to rotate round one of the corners of the Bounding Box, you may click the relevant Reference Point before rotating (the nine options above Previsualizar in your screenshot).

If you wish to rotate round another point, regardless of version you may create a nostroke/nofill circle that is large enough and centre it at the desired rotation point; it must exrend past the pattern in all directions, then rotate both the circle and the pattern as desired (you may Group them first).

mariag21466482
Participant
July 4, 2017

Thanks for your time Jacob.

The problem is that my point isn't really a point. I'm going to explain... (excuse my poor English)... let's see! My supposed "point" really are two individual lines forming a vertex, why? I don't know any other way to do it! but I need both lines (which form a clip in this case) to be independent 'cause they can have a different format (color, stroke, etc.)

Unless you advise me another way to do it

I'm all ears!