Copy link to clipboard
Copied
Thanks.
 1 Correct answer
Here is another simple way to create a scalloped edge:
- With the Ellipse Tool, draw a small black circle with no stroke (the size you want the edge to be)
- Drag the circle into your Brushes panel
- A window will pop up, asking you to select a brush type; select "New Scatter Brush"
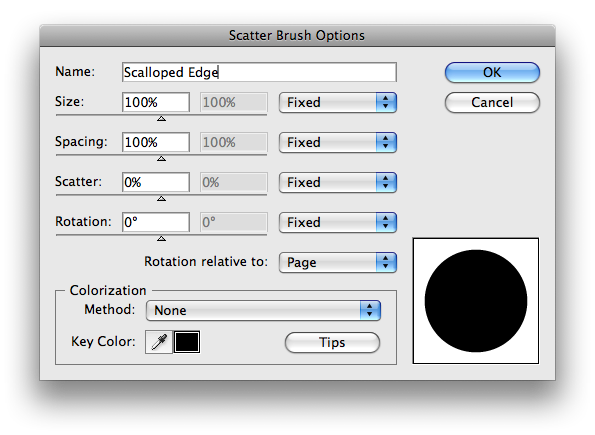
- A new window will pop up with scatter brush options; leave all of the default options which will look like this:

- Click "OK"
- Create a black shape with no stroke (such as a rectangle, circle or oval) to which you want
...Explore related tutorials & articles
Copy link to clipboard
Copied
View> snap to grid. Make a circle, say .25". copy it, paste, snap to the right side of the first, repeat, say 10 times. select all 10, copy, paste, rotate as a group 90°, snap it to the bottom of the first circle, copy, paste, snap it to the bottom of the top right circle, repeat for the bottom of the frame. Select all, use live paint bucket to fill the inside with color. Object> expand, delete the circles and you are left with a scalloped frame.
Copy link to clipboard
Copied
I used In Design (which has a "scallopie" edge option build in and dragged it into Illustrator.
It worked out nice and saved me work!
Hope this helps.
D
Copy link to clipboard
Copied
🙂 Mordy
Copy link to clipboard
Copied
Here is another simple way to create a scalloped edge:
- With the Ellipse Tool, draw a small black circle with no stroke (the size you want the edge to be)
- Drag the circle into your Brushes panel
- A window will pop up, asking you to select a brush type; select "New Scatter Brush"
- A new window will pop up with scatter brush options; leave all of the default options which will look like this:

- Click "OK"
- Create a black shape with no stroke (such as a rectangle, circle or oval) to which you want to add the scalloped edge; while the shape is selected, click your new brush in the Brushes panel; this will apply the edge to your shape
- If needed, you can resize the shape to make the scallops line up just right; the result should look like this:

- To resize and recolor your new shape while maintaining the edge and shape proportions, you can go to the Object menu and select "Expand Appearance." From there, chose the "Unite" option in the Pathfinder panel
I hope this is useful!
Copy link to clipboard
Copied
Thank you! This was so easy and so useful!
Carol
Copy link to clipboard
Copied
Maybe we should ask do you want the scalloped edge on the side like the previous post or the front like a picture frame?
Copy link to clipboard
Copied
Considering that the question is three-and-a-half years old it may be moot. I hope she finished her project.![]()
Copy link to clipboard
Copied
Ahh, I didn't look at the date. (slapping forehead now...)
Copy link to clipboard
Copied
lol! I hope she is done too. I was really just posting for anyone who might be searching the topic.
The brush is so simple to create and works well applied to a rectangle, circle or oval, so I wanted to share!
Copy link to clipboard
Copied
For some objects scatter brushes are quite difficult to handle in this case.
If you have CS5, it would be easier to just apply a dotted line and let Illustrator adjust the dashes to ends and corners.
Copy link to clipboard
Copied
You definitely helped me!!
Copy link to clipboard
Copied
Hi
Step1 : make a circle big cricle.
Step2: make a small circle.
Step3: now place the small circle center on the outline of the big circle.
Step4: select teh rotate tool and click on the center of big circle keep press alt and one dilouge box will apear and select the angle and click on copy now press ctrl+d.
Thing is that you have to put the right angle.
Thanks
Mohit
Copy link to clipboard
Copied
If anyone is looking for a way to make scalloped edges in InDesign, this post has lots of tips: Creating Scalloped Edges
Find more inspiration, events, and resources on the new Adobe Community
Explore Now
