Exit
  • Global community
    • Language:
      • Deutsch
      • English
      • Español
      • Français
      • Português
  • 日本語コミュニティ
  • 한국 커뮤니티
0

Seems easy but cannot make it work.... How do I do this?

Community Beginner ,
Jan 30, 2018 Jan 30, 2018

Hi guys, I bet the answer is over there, but don't even know how to search for it. I've seen tons of tutorials and read as much as possible but cannot find the answer to my problems.

I am working with Cs6 version

I'm making pop corn printable boxes and want to add some ethnic design to it. Since it is to be folded the ethnic design needs to warp, pretty much as how you do it with the warp option, but not rounded....following the shape of the box.

popcorn.jpg

this is my design

valentines-day-popcorn-box-1.jpg

want to achieve something like this, but with the ethic design.

Let me know if I'm not being clear

Thanks!

1.4K
Translate
Report
Community guidelines
Be kind and respectful, give credit to the original source of content, and search for duplicates before posting. Learn more
community guidelines

correct answers 1 Correct answer

Guide , Jan 30, 2018 Jan 30, 2018

well, here is even easier way, I think it will be useful for this certain job.

1. Draw the half of your facing design and reflect it to get a symmetric image.

001.jpg

2. Create the background and put the face shape on your design. Make sure that the shape is also symmetric and centered with your design. You can, for example, draw a rectangle and use the Free Transform Tool to turn it into a symmetric trapeze. If needed, change the pattern size to get the best image inside the shape.

002.jpg

3. Create Clipping Mask

...
Translate
Adobe
Guide ,
Jan 30, 2018 Jan 30, 2018

Hi,

For instance, you can create Pattern Brush and draw it into your shape. Do you need any workflow illustration to clear the idea?

Translate
Report
Community guidelines
Be kind and respectful, give credit to the original source of content, and search for duplicates before posting. Learn more
community guidelines
LEGEND ,
Jan 30, 2018 Jan 30, 2018

Here's a graphic of Anna's description:

Translate
Report
Community guidelines
Be kind and respectful, give credit to the original source of content, and search for duplicates before posting. Learn more
community guidelines
Guide ,
Jan 30, 2018 Jan 30, 2018

Thanks! Yes, this is the way I meant.

Translate
Report
Community guidelines
Be kind and respectful, give credit to the original source of content, and search for duplicates before posting. Learn more
community guidelines
Community Beginner ,
Jan 30, 2018 Jan 30, 2018

Awesome!

Do you know of any tut in order to guide me a bit?

Thanks!

Translate
Report
Community guidelines
Be kind and respectful, give credit to the original source of content, and search for duplicates before posting. Learn more
community guidelines
Guide ,
Jan 30, 2018 Jan 30, 2018

show please the moment that is difficult for you. Is it creating Pattern Brush or Clipping Mask? Is it rotating the shape? Describing all the process with illustrations will take a lot of time and space here. It would be better if we could clear the certain moments.

Translate
Report
Community guidelines
Be kind and respectful, give credit to the original source of content, and search for duplicates before posting. Learn more
community guidelines
Community Beginner ,
Jan 30, 2018 Jan 30, 2018

Sorry, It's my first question here I am amazed on how fast and accurate you were!

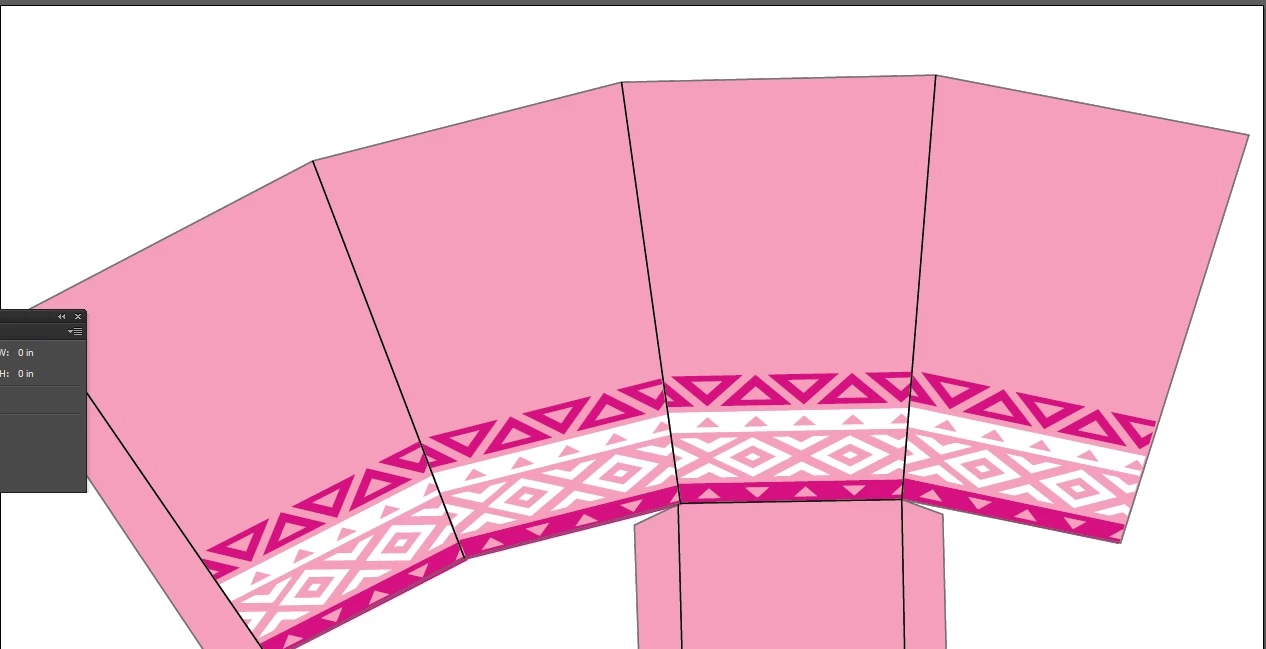
This is my file right now. I replicated rcraighead process and got this. I'd like it to have a seamless look. The edges are not looking as good as they should, the triangles should continue from one face to the other.

1.jpg

Translate
Report
Community guidelines
Be kind and respectful, give credit to the original source of content, and search for duplicates before posting. Learn more
community guidelines
LEGEND ,
Jan 30, 2018 Jan 30, 2018

If you create a single trapezoid and reflect it the seams should match. You can also convert the first shape to a "Symbol" and repeat the symbol. That way you can tweak it one place and have it update throughout. The simplest option is for your pattern to be centered in the trapezoid so either side will matchup with the next frame.

Translate
Report
Community guidelines
Be kind and respectful, give credit to the original source of content, and search for duplicates before posting. Learn more
community guidelines
Guide ,
Jan 30, 2018 Jan 30, 2018

well, here is even easier way, I think it will be useful for this certain job.

1. Draw the half of your facing design and reflect it to get a symmetric image.

001.jpg

2. Create the background and put the face shape on your design. Make sure that the shape is also symmetric and centered with your design. You can, for example, draw a rectangle and use the Free Transform Tool to turn it into a symmetric trapeze. If needed, change the pattern size to get the best image inside the shape.

002.jpg

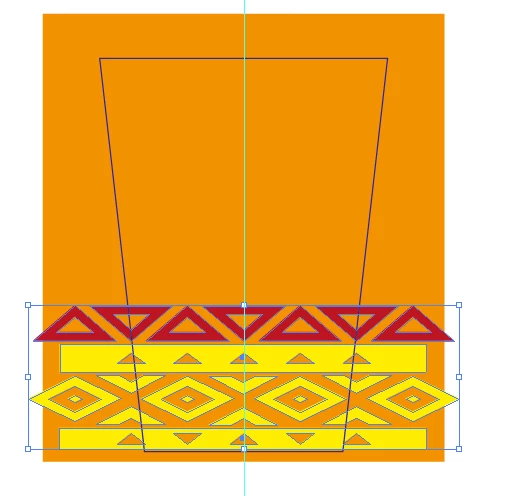
3. Create Clipping Mask (select all and use Cmd/Ctrl + 7 shortcut)

003.jpg

You see, now the edges are symmetric and if we put another face instance side by side, the pattern will connect well.

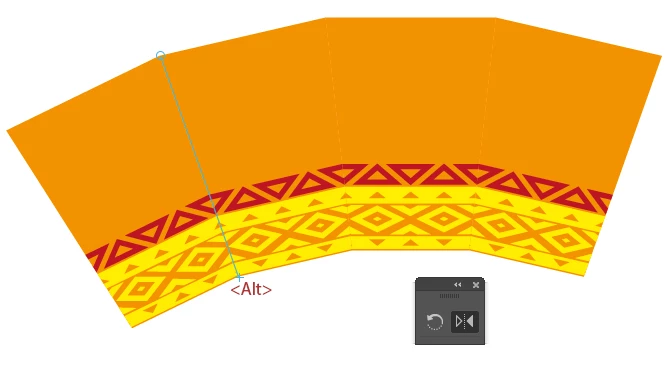
4. Use Reflect tool. Set the reflection axis along the needed side of your face shape (1st click on the starting point, the 2nd on the ending one keeping the ALT button pressed). The copy will lean to the original shape. Repeat until you have the desired result.

004.jpg

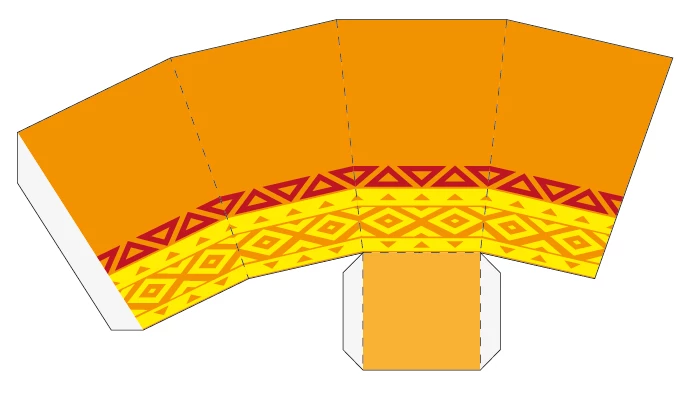
5. Add other details. You can add strokes to each element or draw the common contouring shape and mark the folding lines by dashed strokes.

005.jpg

well, making screenshots took even more time than the working process

If you have any question, just ask, we'll clear the points.

Translate
Report
Community guidelines
Be kind and respectful, give credit to the original source of content, and search for duplicates before posting. Learn more
community guidelines
Community Beginner ,
Jan 30, 2018 Jan 30, 2018

Whoa!!! Thanks Anna!

I really appreciate all the time you took to help me. I've been wanting to do this for more than a week, your explanation is super detailed and accurate.

Thanks is not enough!

Translate
Report
Community guidelines
Be kind and respectful, give credit to the original source of content, and search for duplicates before posting. Learn more
community guidelines
Community Beginner ,
Jan 30, 2018 Jan 30, 2018

Yes! This is it! Thanks!

Unfortunately still strugling to get this done. rcraighead illustration helped quite a lot, but not sure on how to implement it.

Translate
Report
Community guidelines
Be kind and respectful, give credit to the original source of content, and search for duplicates before posting. Learn more
community guidelines
Community Expert ,
Jan 30, 2018 Jan 30, 2018

Should work like this:

Make an extra shape like the cyan one (on top of the object stack) and then Object > Envelope distort > Make with top object

Bildschirmfoto 2018-01-30 um 17.50.44.png

Translate
Report
Community guidelines
Be kind and respectful, give credit to the original source of content, and search for duplicates before posting. Learn more
community guidelines
LEGEND ,
Jan 30, 2018 Jan 30, 2018

I'm not sure the questioner is wanting to distort. It seems she simply wants to rotate.

Translate
Report
Community guidelines
Be kind and respectful, give credit to the original source of content, and search for duplicates before posting. Learn more
community guidelines
Advocate ,
Jan 31, 2018 Jan 31, 2018

As a side note on that given repeat pattern if you are using that.

Zoom in: You may want to tweak the vertical center alignment on that 3rd row pattern while you at it.

The devil is in the details.

K

Vertical align.png

Translate
Report
Community guidelines
Be kind and respectful, give credit to the original source of content, and search for duplicates before posting. Learn more
community guidelines
Advocate ,
Feb 03, 2018 Feb 03, 2018

Since I enjoy working with patterns, I decided to try this.

Even though this thread has been answered, I thought I would share how I did it.

To add in part with what has already been suggested, shown here is what worked if anyone is interested.

I recreated the given 4 row pattern. Made seamless.

Drew out a rectangle, same width as the pattern.

Next I used the Free Transform Tool>Perspective Distort.

This created a trapezoid with your pattern seam on your edges.

Next I took that single trapezoid and duplicated using the Reflect Tool.

Notice all the edges and panels:

Perfect tiles and seams with all 4 rows pattern matching,

Perfect placement and rotation.

K

Seamless pattern.pngPattern placement.png

Translate
Report
Community guidelines
Be kind and respectful, give credit to the original source of content, and search for duplicates before posting. Learn more
community guidelines
Advocate ,
Feb 03, 2018 Feb 03, 2018

Also I am including my Zoom view_Outline Mode.
K

Zoom view_Outline Mode.png

Translate
Report
Community guidelines
Be kind and respectful, give credit to the original source of content, and search for duplicates before posting. Learn more
community guidelines
Community Beginner ,
Feb 03, 2018 Feb 03, 2018
LATEST

Great! Thanks for taking the time to write this. It looks amazing

Translate
Report
Community guidelines
Be kind and respectful, give credit to the original source of content, and search for duplicates before posting. Learn more
community guidelines