- Home
- Illustrator
- Discussions
- Re: tracé : créer le tracé central d'un tracé ferm...
- Re: tracé : créer le tracé central d'un tracé ferm...
Copy link to clipboard
Copied
Bonjour, nouveau sur le forum merci d'être indulgent...
Voila en fait j'ai une typo vectorisé dans illustrator avec donc un tracé pour le contour de la typo. J'ai besoin d'obtenir un tracé du centre de mon tracé originel. La fonction décalage de tracé ne fonctionne pas pour ce cas je tiens à le préciser... merci d'avance
 2 Correct answers
You could try if something in that thread helps you: https://community.adobe.com/t5/illustrator-discussions/merge-outlines-to-1-solid-stroke/m-p/12956621#M322442
merci ! j'ai trouvé un debut de solutions sur le fil...
en ligne : https://online.rapidresizer.com/tracer.php
Explore related tutorials & articles
Copy link to clipboard
Copied
fmonnot,
I believe it will help helpers to see a screenshot with the path selected and the relevant expanded Layer in the Layers panel and the Appearance panel also shown.
Copy link to clipboard
Copied
Copy link to clipboard
Copied
You want a centerline trace?
Copy link to clipboard
Copied
Oui bien c'est bien cela, un tracé de l'axe d'une typo vectorisée par exemple...
Copy link to clipboard
Copied
You could try if something in that thread helps you: https://community.adobe.com/t5/illustrator-discussions/merge-outlines-to-1-solid-stroke/m-p/12956621...
Copy link to clipboard
Copied
merci ! j'ai trouvé un debut de solutions sur le fil...
en ligne : https://online.rapidresizer.com/tracer.php
Copy link to clipboard
Copied
fmonnot,
If possible, the obvious solution would have been to go back to the original stroke/nofill artwork behind the letters, and undoubedly you are looking for a (more) readymade solution.
But it is possible to go back and recreate the original artwork (very) accurately in ways including the path offset you have already tried, albeit a bit differently and wth a bit of additional work.
It may very well involve more work than you wish to put into it.
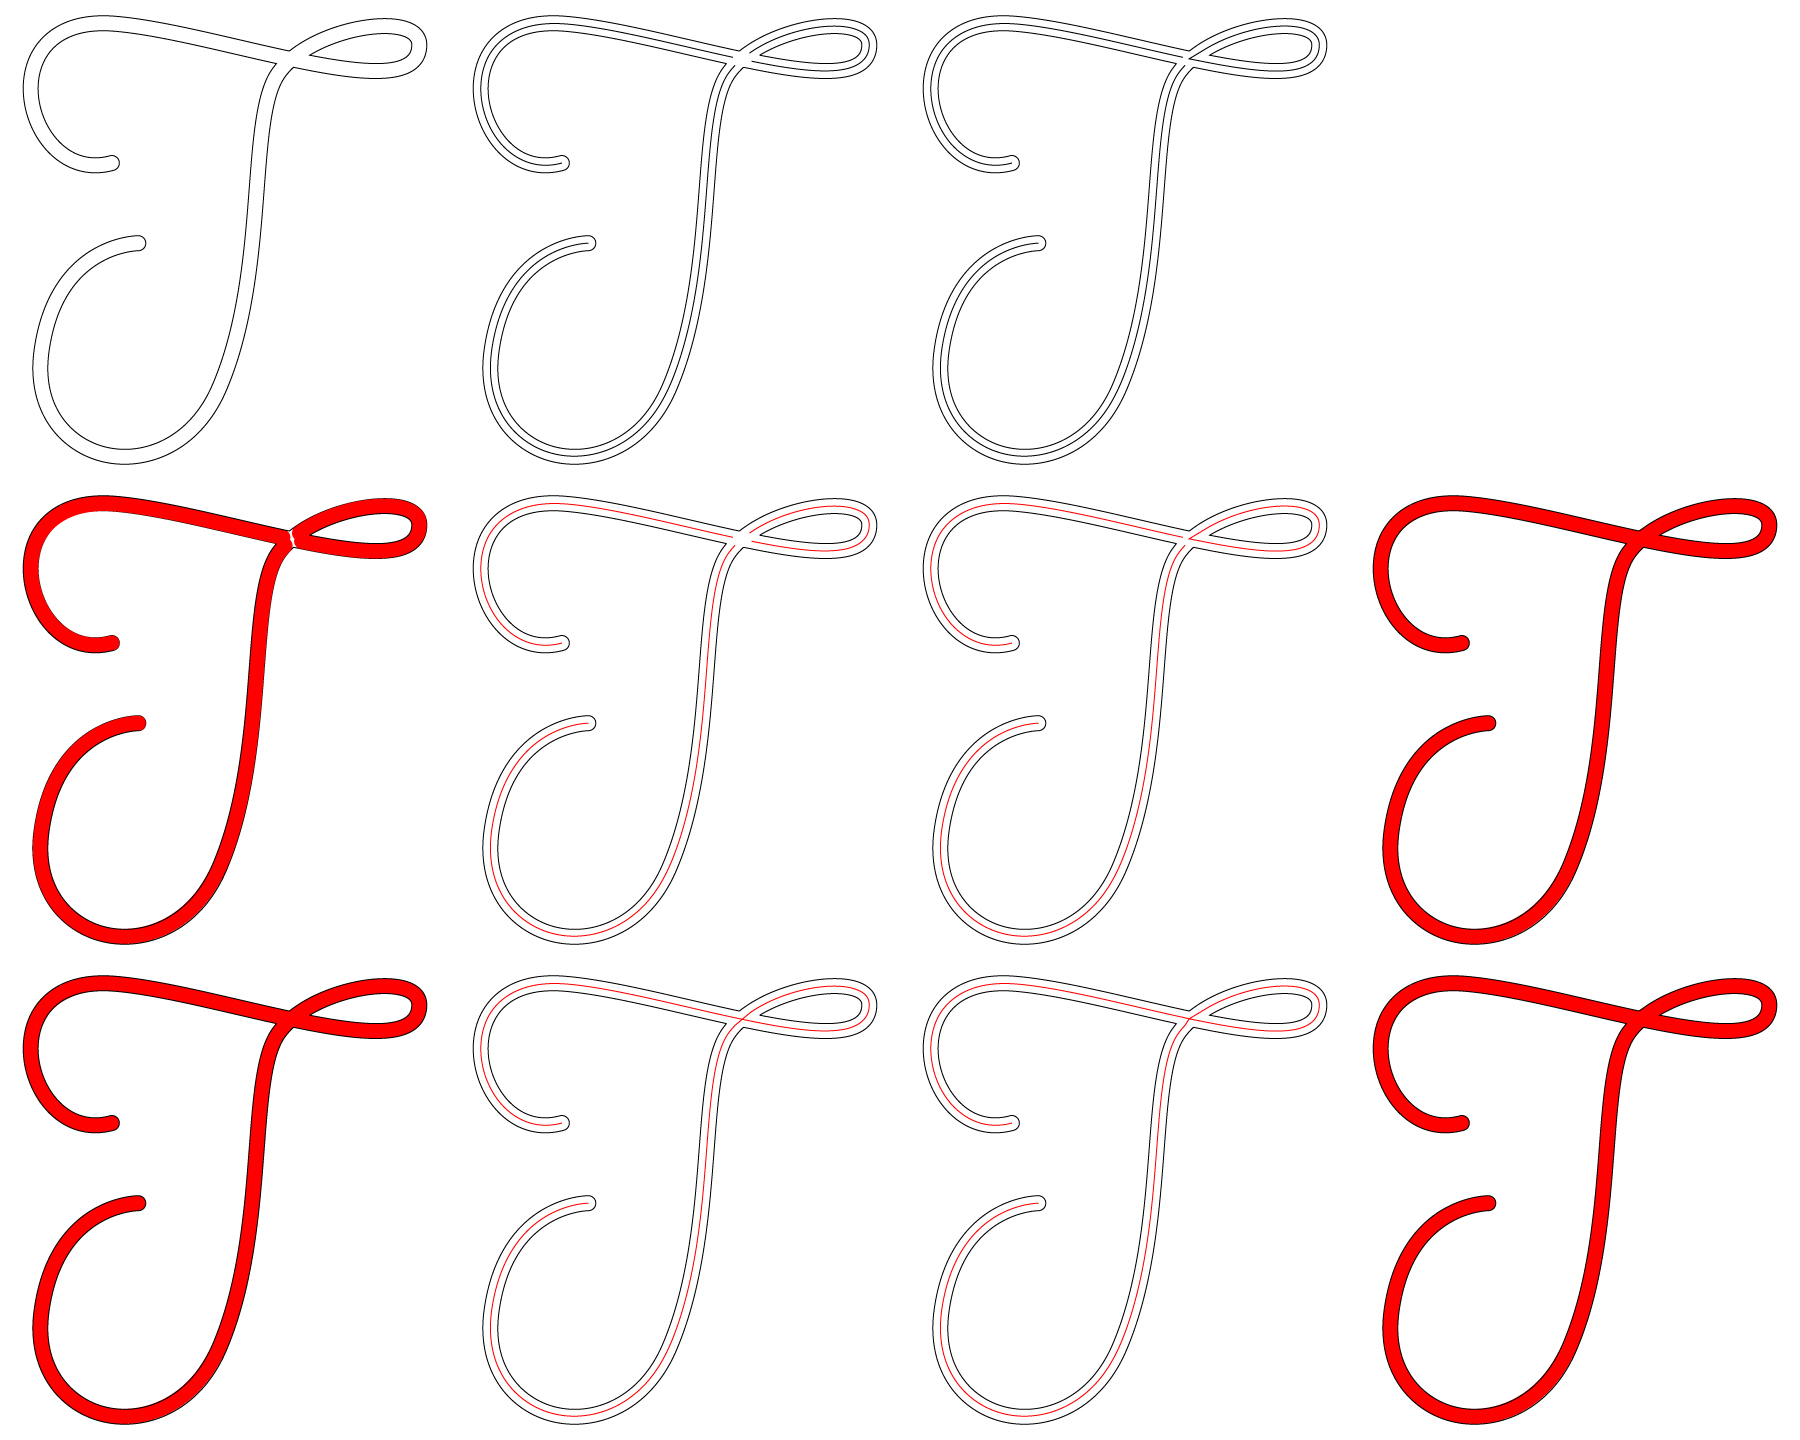
Below are shown two ways to recreate the T. The other letters are more complicated, of course.
Depending on the use, additional work may not be needed (on the T).
The following is a demonstration based on a (dis)similar T:
!) The first row shows the Compound Path forming the T, then two ways based on breaking it open:
1A) In the 1st way, the Compound Path is cut (Scissorst Tool) at all the corner Anchor Points at the crossing, and at the rounded ends (the original Round Caps), and three 1 step Blends are made, notice the gaps;
1B) In the 2nd way, the Compound Path is only cut at three of the corner Anchor Points at the crossing, leaving the inner loop to the right as a closed path whinch is then offset, so only two 1 step Blends are made along with the offset, notice the (different) gaps;
2) The second row shows the new paths in red, and beside them the result if they were used for a router with the same width as the original Stroke Weight (the cutout shown in red; as it appears, the one to the right based on both Blends and Offset Path is enough so no further work is needed, whereas the one to the left based only on Blends has a small gap;
3) The third row shows the new paths in red and the gaps closed with simple straight line(segment)s, and beside them the result if they were used for a router; as it appears, the simple straight lines cause no (discernible) distortion of the router result;
If the centre path is to be used by itself, it is necessary to close the gaps, and to use curved path(segment)s; and the 1st way using three 1 step Blends is the way to go, because the other way including the Offset Path gives a clearly visible distortion.
Click/RightClick to get closer, and Click again to get closer still; Click Here to see in Chrome
Copy link to clipboard
Copied
Bonjour, merci pour la méthode ! Mais effectivement je recherche une solution plus automatique...
encore merci
Copy link to clipboard
Copied
You are welcome, fmonnot.
I was almost certain that it would be too work intensive.
May I ask whether the task is related to some kind of machining, such as routing (routage I think)? Depending on the equipment that might give other options, fully automated on your part.
Copy link to clipboard
Copied
Bonjour, Je réalise des enseigne NéonLED en silicon inserées dans un plexi. Il faut créer le tracé du lettrage qui sera réalisé en gravure laser sur le plexi, ensuite le nNéonLED et fix dans la glisière...
Copy link to clipboard
Copied
Copy link to clipboard
Copied
Thank you for sharing, fmonnot.
I can see that you really do need the actual centre path.


