

Trace colour

Copy link to clipboard
Copied
Hi im new to Ai and was wondering how to change the trace colour. It automatically traces blue but i need the lines to be red and can't figure it out. Thanx in advance


Explore related tutorials & articles
 20
Replies
20
20
Replies
20

Copy link to clipboard
Copied
When you say it traces blue are you talking about after you have committed to the trace and expand it into paths?
OR are you talking about when you view your tracing result with outlines?
In which case you should see light blue lines around your trace... which is working as expected:

Best wishes,
EW
Copy link to clipboard
Copied
Hi thankyou for your reply and info.. yes it shows like ur attached pic. I need it to be a vector file with red lines.. after the trace what am i supposed to do.. i had no idea i had to follow further steps lol
Copy link to clipboard
Copied
Hisanaac
Once you have traced your image... and ensured that the trace looks as close to the image as possible... You need to click expand to convert that image to paths.
You can then with your paths selected apply fills and strokes as necessary.
For general knowledge about image tracing the following links may be useful to you:
- Using the Image Trace panel
- Working with Image Trace in Adobe Illustrator CS6 > Begin Tracing
- How to edit artwork in Illustrator using Image Trace
However, I can advise you better with a screenshot of the image you are trying to trace posted into this forum.
Copy link to clipboard
Copied
.png)
Copy link to clipboard
Copied
i have posted a pic, in the mean time i will try play around with the expand etc.
thanx again
Copy link to clipboard
Copied
So I did a bit of prep work and it ends up I've done the work for you:
The Gradient background and colour was throwing my Image Trace off... So I went in to photoshop and selected only the imagery in the foreground.. I then made a copy of my selection to a new layer... With the new layer selected and the selection still active I used a brush with fill and opacity set to 100% and the colour set to default black.
I created a new layer which I filled with white and put this underneath so that I now had a logo that was only black and white... This in my experience can make image tracing much easier and more precise.
I then saved this and loaded my PSD into Illustrator and ran an Image Trace on that with the preset set to silhouette.
Expanded > and Filled the outlines with red:
Here is the result as a screenshot:

A Dropbox link to download the file can be found below:
Hope this looks ok... I did it relatively quickly...
Best,
EW
Copy link to clipboard
Copied
Was this what you wanted?
Copy link to clipboard
Copied
honestly i cant thankyou enough for being so helpful, its much appreciated..
i need to get the design cut out of acrylic.. i will send you a link to the company so you can get an idea of what i need the file to be.
Copy link to clipboard
Copied
What effect(s) are you going for?
As this will affect the advise we give you.
You're most welcome by the way.
I would appreciate you marking any answer that was helpful as helpful as this will help with indexing and other people who may have similar issues in the future.
Best,
EW
Copy link to clipboard
Copied
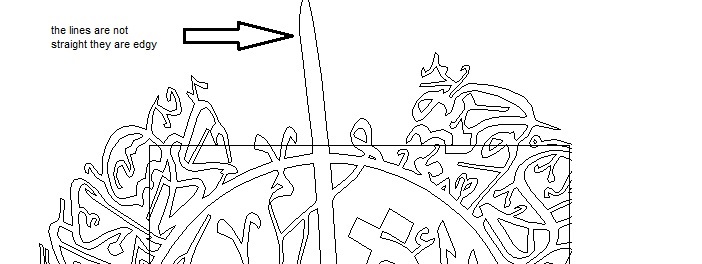
ok i kinda figured it out.. only thing is lines aren't very straight and crisp if you get what i mean.. edges seem alittle jaggered
Copy link to clipboard
Copied
i want it cut out.. so i need the picture to be outlined in red for the laser machine to pick it up.
and the fill to be white so you only see the outline..
hope that makes sense
again.. thankyou
Copy link to clipboard
Copied
What is the sheet size needing to be set to?
Copy link to clipboard
Copied
Im honestly not sure... i didnt realise it would affect the format of the pic..
i want the design to be between 30 - 40 cm height or width..
is there a way to stop the pic from becoming blurry and what is causing the outline to become jaggered
thanx
Copy link to clipboard
Copied
It doesn't I just figured I may as well try help set the file up for you.
This is it as far as I can tell from their instructions ready to go at 60 cm x 60 cm in size.
If you want I can resize it to 30 cm x 30 cm
What do you mean by jaggered? Screenshot please?
Best,
EW
Copy link to clipboard
Copied
By doesn't I mean that it DOES in terms of the end result.
But doesn't because vector artwork is relatively easy to resize and modify etc.
Copy link to clipboard
Copied
Copy link to clipboard
Copied
Try switching from GPU to CPU preview
View > Preview on CPU.... (Or Ctrl + E)
Also see if it is edgy or jagged when you send it to print...
If it isn't when it prints its just a display issue.
Copy link to clipboard
Copied
hi again.. so I have tried and tried and I have given up lol
its not working with me at all.. i cant even change the line colour it wont work even after going through the steps you mentioned.. thankyou again for all ur help and time..
Copy link to clipboard
Copied
i guess the larger the better.. easier to decrease size than increase..
i have attached a screenshot..
Copy link to clipboard
Copied
Here are some examples https://onlinelasercutting.com.au/materials/type/acrylic

Get ready! An upgraded Adobe Community experience is coming in January.
Learn more
 AdChoices