

- Home
- Illustrator
- Discussions
- Re: Trying to combine isometric elements into desi...
- Re: Trying to combine isometric elements into desi...
Trying to combine isometric elements into design, HELP please!

Copy link to clipboard
Copied
I'm trying to combine isometric pieces into a cohesive design for transportation. For instance, i have one square for a straight piece of road, one for a curve to the left, one for a curve to the right, etc.
I'm trying to find the best ways to put all these "squares" together to create a complete design. Right now it seems incredibly time consuming, and they aren't lining up perfectly. I do have other elements to add(buildings, traffic signals, etc) but I think with this info I could get on the right path.
PLEASE HELP if you're a good willing soul!


Explore related tutorials & articles
 13
Replies
13
13
Replies
13

Copy link to clipboard
Copied
how are you making these? are you using actions?
Copy link to clipboard
Copied
I got these elements/pieces online, trying to save design time for a rough edit, not trying to create everything from scratch. Even if i did create from scratch, I still want to know how to piece everything together, without there being a 'seam' between the pieces.

Copy link to clipboard
Copied
For aligning stuff in Illustrator the cursor position is relevant.
You need to turn on Smart guides.
Then take the selection tool and grab the group by that point that you can (or want to) align to another point.
Move until it snaps.
When working in RGB mode, in order to prevent any even small adjustments in your graphic: turn off align to pixels. Otherwise Illustrator might do some scaling or moving stuff around any moment you move i somewhere. Those adjustmens add up later and your pieces no longer match
Copy link to clipboard
Copied
maybe the person that made them made them with those issues you mentioned? with the resources i sent you, you can edit them incase you purchased art made with errors on it
Copy link to clipboard
Copied
working in isometric illustrations can be easy if you work with Actions.
You can draw a cube, in the actions panel hit record and make 3 actions, left, top, and right. for each action follow the steps below going down. You can also record the steps backwards to undo the isometric view and go back to 2d for editing purposes.
Working like this makes it easy to edit, adjust and guarantee everything is on the same drawing angles so it all fits nice.
Hope this helps.

Copy link to clipboard
Copied
Von has a course that is a must watch for learning how to work with isometric illustrations, here:
Copy link to clipboard
Copied
That course would be great, if it was free to watch.
Copy link to clipboard
Copied
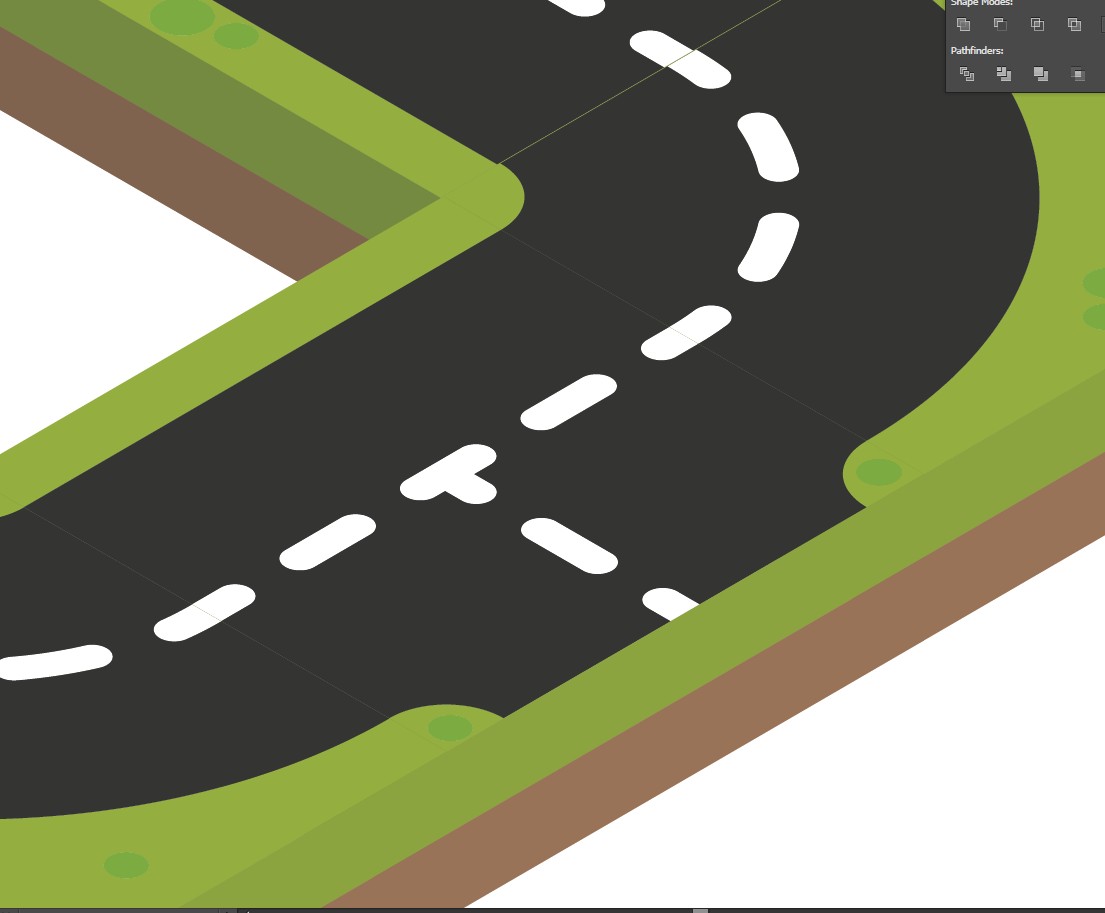
I have Smart Guides on, but my pieces still don't align perfectly, there is a 'seam' between them, see the picture.

Copy link to clipboard
Copied
These kinds of seam maybe anti-aliasing issues.
Try and in the Preferences > General turn off Anti-aliasing (something like "Smooth artwork" - I don't know exactly, have a German version)
Is the seam still there?
Copy link to clipboard
Copied
The seam is gone in most cases, but it makes the rest of the shapes(specifically the dotted lines in the road) look very wonky, like they fade away to smaller and smaller sizes.

Copy link to clipboard
Copied
Can you try this and write the result here:
Export your finished work that you aren't satisfied. To any kind of bitmap image or pdf . 90% you won't see those thin lines.
Copy link to clipboard
Copied
Nope, tried exporting as a few different file types, seams are still there. 
Copy link to clipboard
Copied
When exporting raster images, make sure you select the option Supersampling for antialiasing. You can also try and export a larger image , then scale down.
When exporting vector images, this should not matter in printing, but you might test it.

Find more inspiration, events, and resources on the new Adobe Community
Explore Now
 AdChoices