 Adobe Community
- Home
- Illustrator
- Discussions
- Turning a photo into a vector image with multiple ...
- Turning a photo into a vector image with multiple ...

Copy link to clipboard
Copied
Hello!
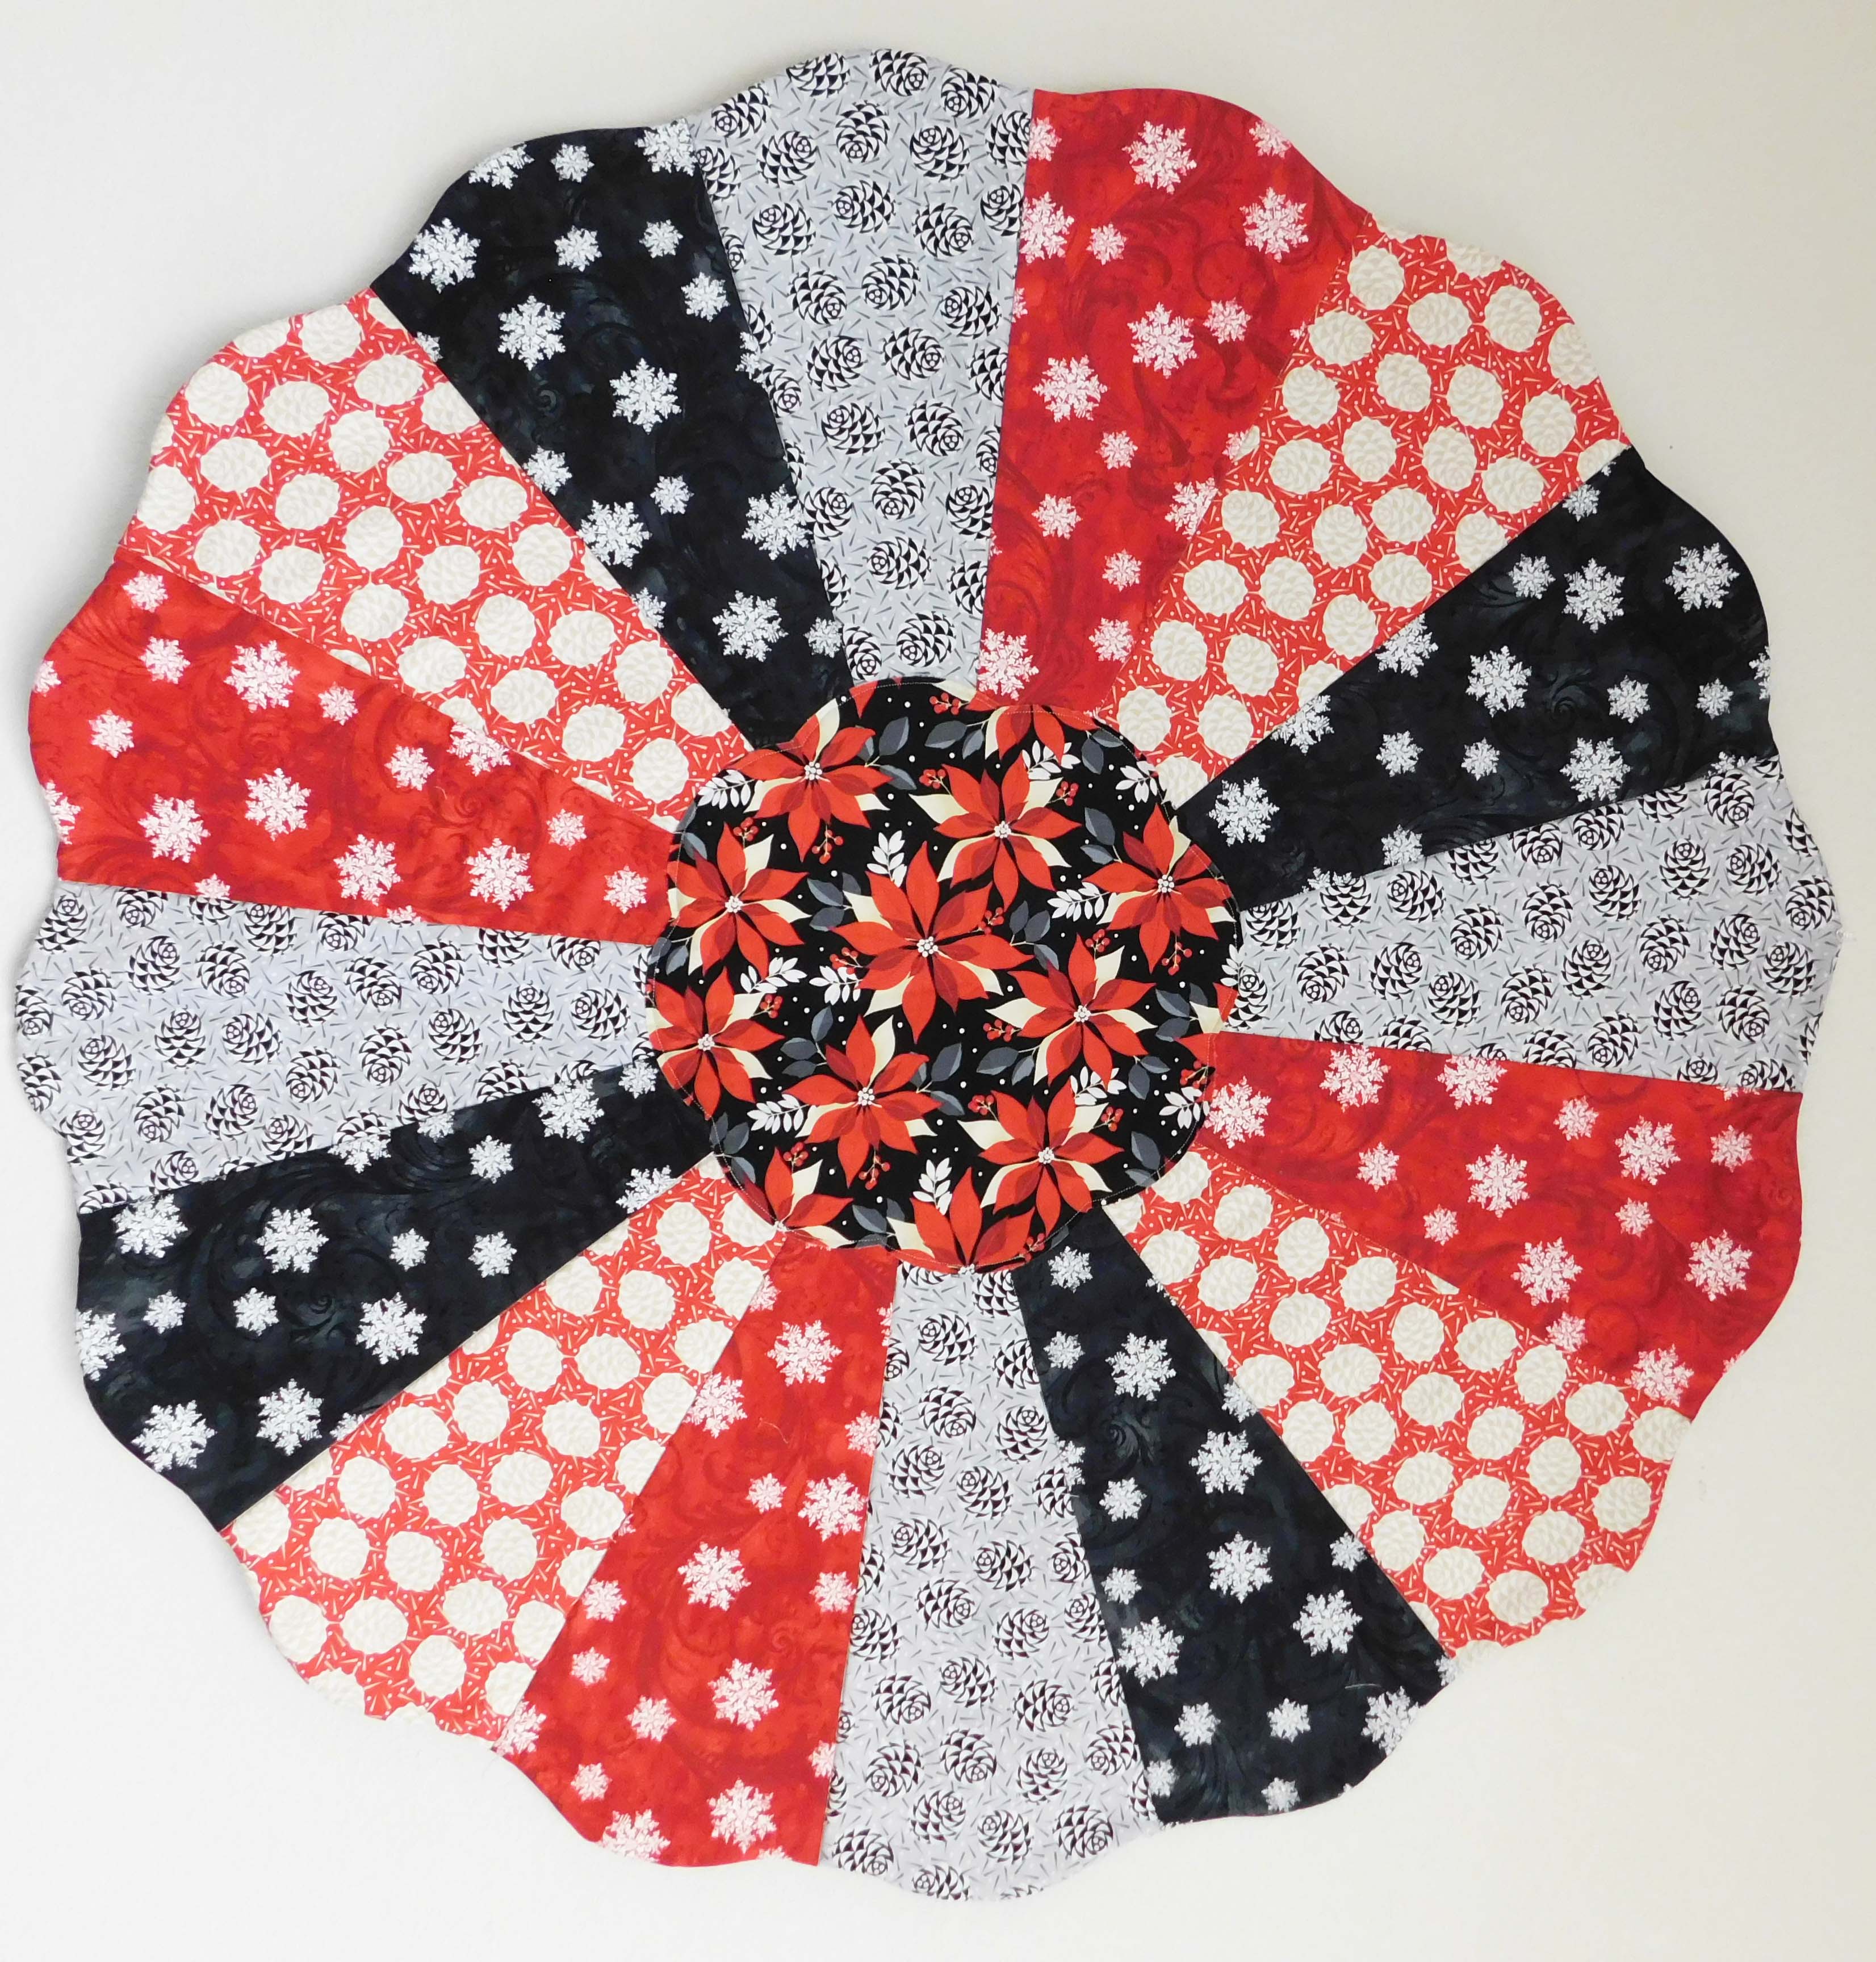
Bear with me, as I'm a very novice Illustrator user. I have a photo (seen below) that I am needing to turn into a vector graphic, allowing me to manipulate each shape by switching out the fabric in each one. I'm familiar with how to go about placing images into the shapes using clipping masks once I have the shapes created, but I'm just not sure how to go about turning each of these into the vector shape in order to do so. Does this make sense? Any input would be awesome! Thanks!!


 1 Correct answer

ok, back on. here's what I did earlier:
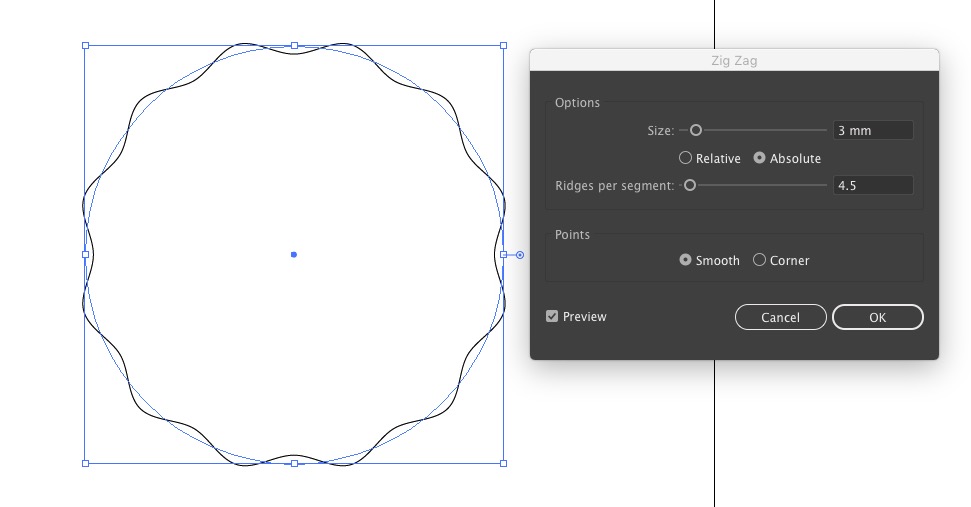
draw a circle with the ellipse tool (L). hold shift to constrain it. go to Effect > distort & Transform > Zig Zag and use these settings. you might need a different Size depending on the scale you're working though:
make sure smart guides are on (View > Smart Guides). draw a line from the centre of the circle to the outside, overlapping the circle's wavy path. doesn't need to be accurate since we'll get rid of it later. select it and the Rotate tool (R). def
...Explore related tutorials & articles
 13
Replies
13
13
Replies
13

Copy link to clipboard
Copied
Have you tried using Image Trace? Depending on the resolution of the original raster image that may be a good place to start.
Copy link to clipboard
Copied
I did try that...the problem I run into there is it traces each and every shape, including the little snowflakes and shapes with each pattern. I only there to be 17 shapes created...the center circle and each of the 16 main "fan outs" ...if that makes sense.
Copy link to clipboard
Copied
if that's all you need it'd be far simpler to just draw it.
Copy link to clipboard
Copied
I'd love to do that...but like I said, I'm a complete novice. I don't know how to manipulate shapes well enough to draw it.
Copy link to clipboard
Copied
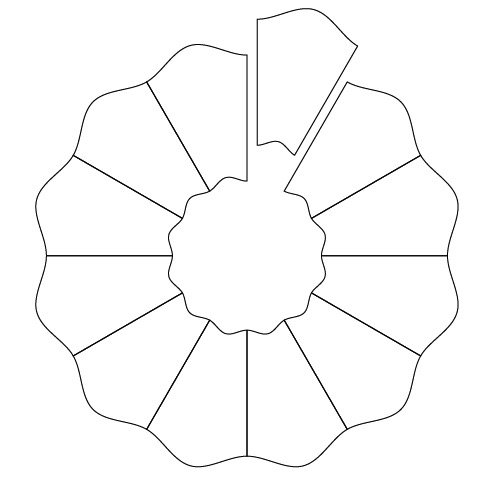
here's one i knocked up quickly. i'll post detailed instructions when i get a chance if you want them.
Copy link to clipboard
Copied
Oh my gosh...I have so much to learn. HA. That is wonderful.. THANK YOU!! I would LOVE a tutorial on that whenever you get time.
Copy link to clipboard
Copied
Also, is there a way to use the middle circle as a shape as well? In order to place an image in it using a clipping mask?

Copy link to clipboard
Copied
Responding to:
Also, is there a way to use the middle circle as a shape as well? In order to place an image in it using a clipping mask?
Yes, there is.
- Place an image where you want it to go.
- Make sure your clipping mask shape is on top of the image in the layers panel
- Select both the image and the shape that you want to use as the clipping mask
- Go to Object > Clipping Mask > Make
Hope this helps! 
Copy link to clipboard
Copied
Hey Emily,
Since you say you are a complete novice, here are some cool short tutorials that I have my students use. They are very helpful while you are learning Illustrator.
Copy link to clipboard
Copied
Thank you very much! I'm familiar with using the clipping mask to place images into shapes. In the example above though that Dough so graciously drew for me, each of the outer "fans" as I call them, for lack of better term, are paths, but the middle circle is not since the fans combined together make up the circle. So, as far as I'm aware, it isn't possible to select the circle as a shape in order to make a clipping mask out of it. Again, I'm probably missing something though...

Copy link to clipboard
Copied
Select Doug's example.
Select the Shape Builder Tool (Shift M)
Drag over the Center.
That should make it a separate shape.
Copy link to clipboard
Copied
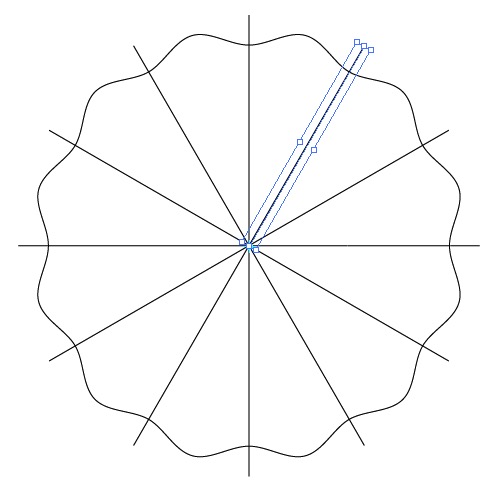
ok, back on. here's what I did earlier:
draw a circle with the ellipse tool (L). hold shift to constrain it. go to Effect > distort & Transform > Zig Zag and use these settings. you might need a different Size depending on the scale you're working though:
make sure smart guides are on (View > Smart Guides). draw a line from the centre of the circle to the outside, overlapping the circle's wavy path. doesn't need to be accurate since we'll get rid of it later. select it and the Rotate tool (R). define the rotation point at the centre of the circle (alt + click on the centre). set up this rotation in the dialogue box that appears and click Copy:
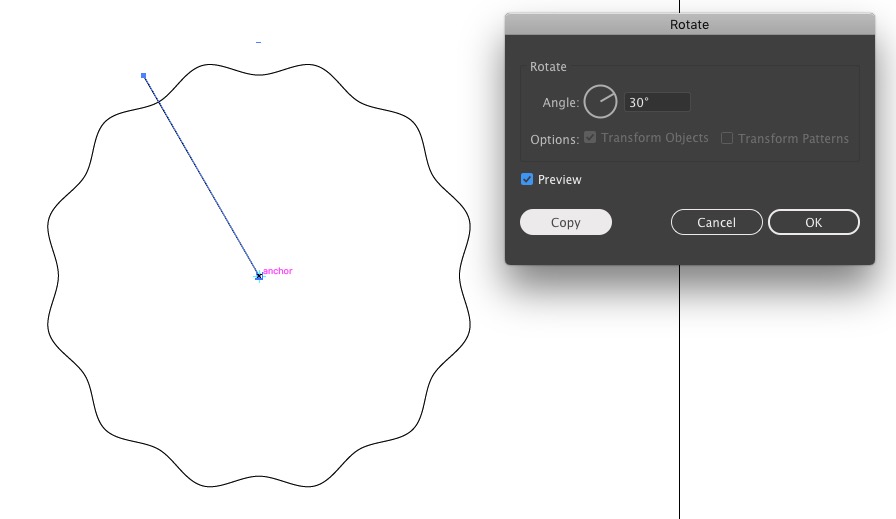
hit ctrl + D (Transform Again) to repeat the rotate & copy until you have lines going all the way round the circle:
select the circle again. copy it (ctrl + C) and Paste in front (ctrl + F). scale it -- with the scale tool or bounding box -- constrained and from the centre by holding shift + alt as you drag. position it where you need to.
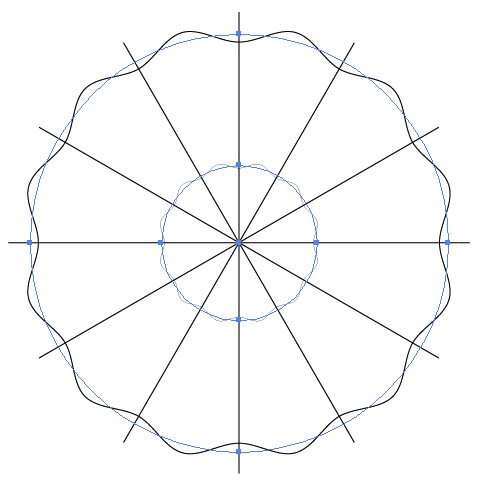
select both circles and go to Object > Expand Appearance. this makes the wavy lines 'real' vectors as opposed to effects.
select everything and in the Pathfinder panel, click Divide:
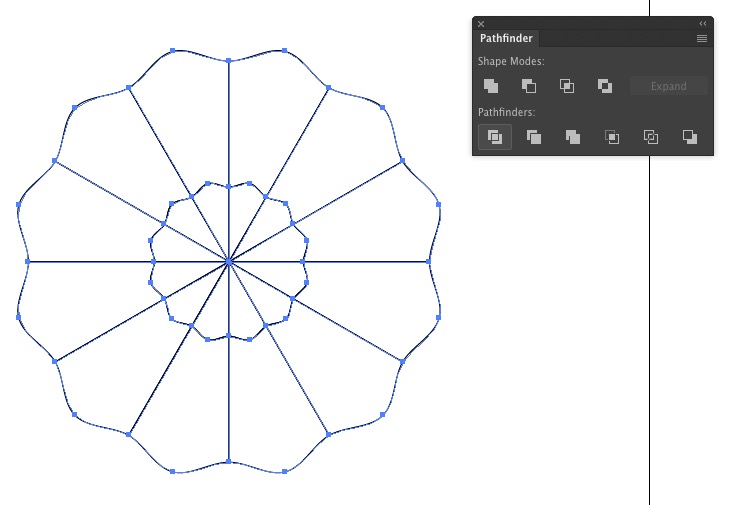
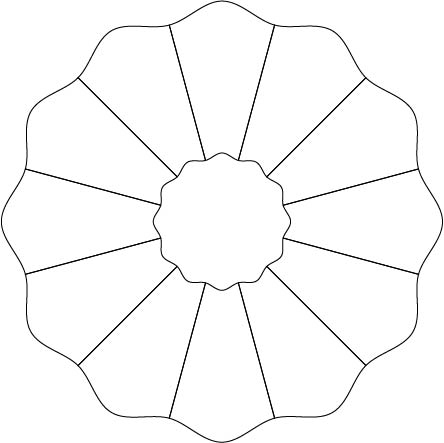
this produces closed paths based on every intersection. select the paths within the inner circle you don't need and delete them. ungroup the paths and every outer section will be an individual path:
Copy link to clipboard
Copied
I'm so sorry for the late reply to this, but thank you SO MUCH for the detailed step-by-step. This was very, very helpful!

 AdChoices