Participating Frequently
May 2, 2019
Answered

Weird cuts in stroke

  • May 2, 2019
  • 9 replies
  • 4797 views

Hi! I am experiencing some weird cuts when applying a stroke in Adobe Illustrator.

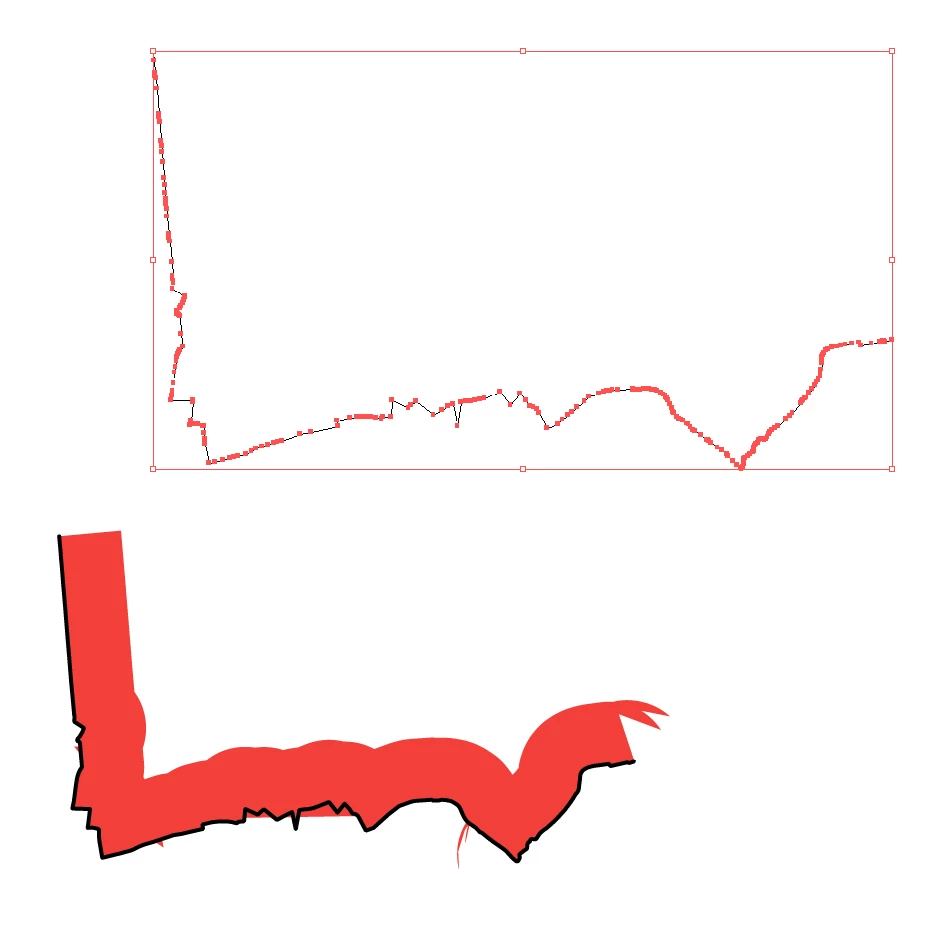
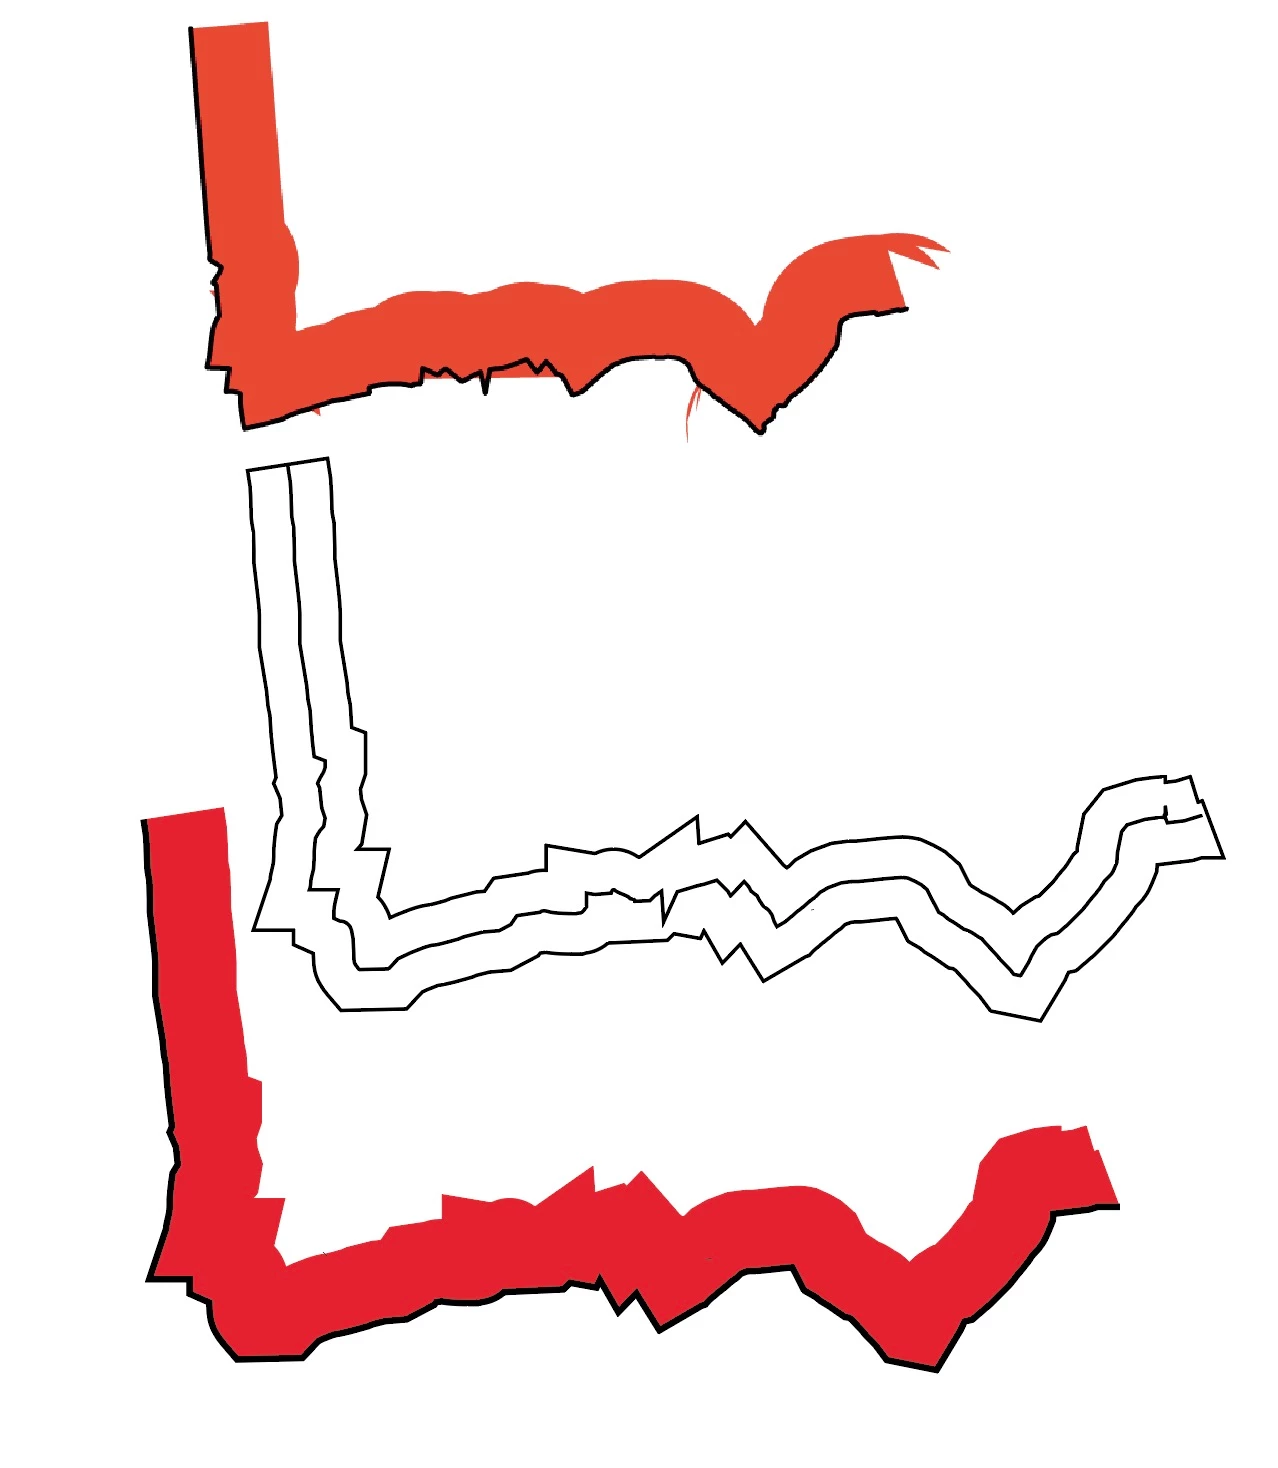
As you can see in the image below, I have a quite detailed path containing of straight lines only, on which I applied a double stroke (a simple 0.5 pt black stroke and a wide 10 pt red stroke on one side only). As you can see, there's some weird stuff happening at various places. When scaling the entire thing, weird stuff keeps happening, though it does change a bit. When removing anchor points around the area where this happens, it usually becomes worse...

I have the feeling that, even though it has a lot of anchor points, it should be a relatively simple shape to add a stroke to. I bet that it somehow has to do with my one-sided profile that I created for this, and I wonder if there's a solution.

This topic has been closed for replies.
Correct answer meganchi

1) Select your black stroke

2) Offset path (let's say by 0.25 inches)

3) Delete the resulting center stroke

4) Fill the leftover shape in red

5) Copy red fill shape and paste in front, now set its fill to none and add stroke of black

6) Use scissor tool to cut the the top left and far right points of the black stroke. Now select and delete the top part of the black stroke

9 replies

Participating Frequently
May 5, 2019

@Jacob: That's a very clever adjustment to Megan's solution. And one that works for sure. Awesome!

Participating Frequently
May 5, 2019

@Jacob: I think I understand what you're suggesting. Am I correct if I say that it is to create a second layer on top that does not have the weird cuts, and use that as a mask to block out the cuts on the coloured layer below? If so, I believe that doesn't work, as the top black-and-white layer will still have the same cuts, as it is a very similar art brush that you apply (only the colours and opacity change). I have tried it, and it makes no difference, I'm afraid.

@Meganchi: Clever solution! Though if I'm correct, the thin black stroke is not anymore on the same position as it was before. Maybe I should have mentioned that, as that is a prerequisite in this case. :-)

Jacob Bugge
Community Expert
Community Expert
May 5, 2019

Carel,

I believe the exquisite solution by Megan is the happiest one, usable with any difficult shape, with an adaptation to keep the original (black) path in its original place.

Referring to her post #11, you can try the following changes:

2) Offset path (let's say by 0.25 inches) > Offset path by the 10 pt (the desired thickness of the red/yellow apparent stroke)

3) Delete the resulting center stroke > Delete the end segments of the closed offset path with the Direct Selection Tool, then delete the bottom (outer) offset path (you can use the Direct Select Tool twice), then select the original path and the top offset path and Ctrl/Cmd to join them

This should give you a closed shape corresponding to the desired appearance of the apparent red stroke with the (bottom) black stroke in its original place, and then you can proceed as in 4) - 6) (in post #11) by copying it on top of itself, apply the fill (only) to the original and keep the stroke (only) on the copy (removing the unwanted bits).

meganchi
meganchiCorrect answer
Legend
May 3, 2019

1) Select your black stroke

2) Offset path (let's say by 0.25 inches)

3) Delete the resulting center stroke

4) Fill the leftover shape in red

5) Copy red fill shape and paste in front, now set its fill to none and add stroke of black

6) Use scissor tool to cut the the top left and far right points of the black stroke. Now select and delete the top part of the black stroke

Participating Frequently
May 3, 2019

@Jacob: I'm not sure what the goal of those steps is. If you make a second layer with a black art brush, you get an exact copy of the yellow version (so also with the weird cuts). Then creating a mask of it does not change the appearance of the yellow version at all. Or am I misunderstanding something?

@FastHand: I have tried that before too, but rounding corners does not remove the weird cuts. It merely changes them (and sometimes even worsen them).

In the meantime I have tried to remove some specific anchorpoints to find out which ones are causing harm. Apparently it's those that are situated approximately the stroke's width away from the problem. Usually it's a small but very sharp corner, but sometimes it looks quite ordinary. See below a screenshot of the location of problematic anchor points.

Jacob Bugge
Community Expert
Community Expert
May 3, 2019

Carel,

Or am I misunderstanding something?

Quite the opposite, Carel: I had forgotten how the original Art Brush was made because I considered another way of making it.

Here is an amended version:

A) Create the original Art Brush (as you have done in the first go),

B) Create a new Art Brush by changing the red (or yellow) part to black and changing the transparent part to white (this should give you an Art Brush that is black in the top (including the original black stroked/filled path) and white in the bottom,

C) Create the path (as you have done in the first go) and apply the original Art Brush (as you have done in the first go),

D) Copy the path to the front and apply the new Art Brush,

E) Select everything and in the Transparency palette (flyout) click Make (Opacity) Mask with Clip unticked and Invert Mask ticked (the settings will hide the bleeding out in the bottom part.

Inspiring
May 3, 2019

I would round the corners in stroke settings

Participating Frequently
May 3, 2019

Thank you all for the quick replies!

@Monika: There are a lot of anchor points indeed, but there weren't any extreme handles. They're all straight lines.

@Larry: Simplify does help a bit, but for it to fix the problem you have to simplify it way more than reasonable. I have used Jim Heck's 'remove redundant points' script and got better results, but it's not yet optimal.

@Jacob: Clever idea to use the brush stroke! I have tried it, though the result is exactly the same, unfortunately. See the screenshot below:

In the meantime I have found two workaround solutions, but they're not optimal:

1: Apply a normal two-sided stroke, only show half of it by applying a clipping mask, and add the black stroke in a separate shape on top.

2: Apply a normal two-sided stroke, expand the shape, remove half of it by using the Pathfinder tools, and add the black stroke in a separate shape op top.

tromboniator
Community Expert
Community Expert
May 3, 2019

Do you get different results if you go to View menu > View using CPU (cmd/ctrl E)?

Participating Frequently
May 3, 2019

@Tromboniator: Yes, as in that the preview improves, but the weird cuts stay the same. :-)

Jacob Bugge
Community Expert
Community Expert
May 2, 2019

Carel,

It looks like a new meaning to the term bleed (sorry, it was stronger than I).

What happens if you:

1) Create a red rectangle with a height equaling the width of the red stroke, then add a horizontal stroke/nofill path along the bottom edge (centre aligned stroke, you can outline the stroke to have only filled paths), then move a copy of the red rectangle down by its height and give it an Opacity of 0,

2) Group everything and turn it into an Art Brush,

3) Apply the Art Brush to the original stroked path (with a 1 point stroke)?

This ought to make the Art Brush follow the original stroked path with the desired appearance.

Larry G. Schneider
Community Expert
Community Expert
May 2, 2019

Does it work any better if you use Object>Path>Simplify first?

Monika Gause
Community Expert
Community Expert
May 2, 2019

This happens because of all the anchors and there might also be extreme handles.

And then of course astoke to one side (via variable width?) might get out of control quickly