Inspiring
April 7, 2018
Question

What is the efficient way to merge a bunch of paths into one?

  • April 7, 2018
  • 4 replies
  • 1069 views

Could someone tell me how to do the following more efficiently in Illustrator?

I began with this vector:

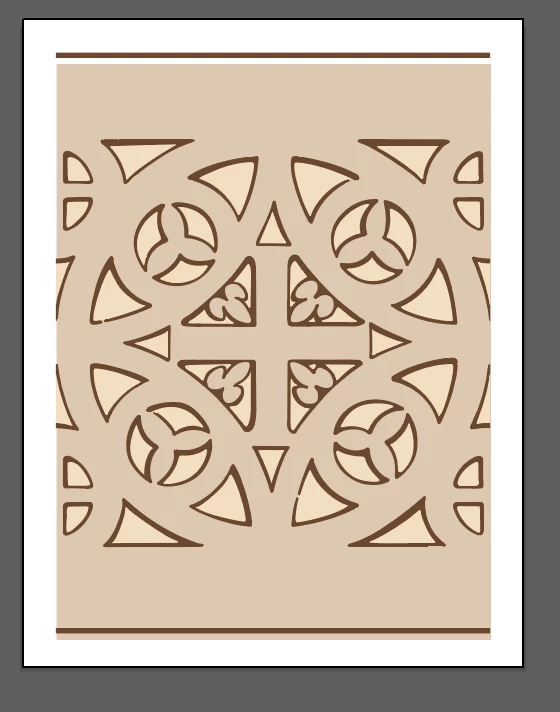
I want to simplify it by removing all the detail in the center. It is very "bitty" - there are lots and lots of paths in that space.

What I did was use the pentool to create a new closed path on top of that area, to cover it up. Like so:

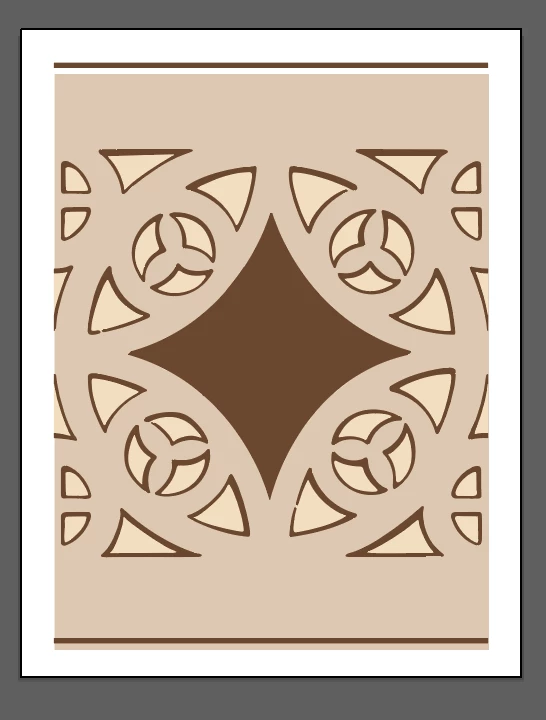
I'm pretty certain that is the most inefficient way to accomplish this goal, and also that it results in a file what only looks good small. I'm not great with the pen tool, so I'm sure if you saw this big you would notice lots of wonkiness.

Any thoughts on a more sophisticated and efficient approach? Here is a link to the original file.

Dropbox - 28-08-ssm.ai

    This topic has been closed for replies.

    4 replies

    Jacob Bugge
    Community Expert
    Community Expert
    April 7, 2018

    Marie,

    Here is another possible approach, working on top of the original locked image, based on the assumption that the four concave shapes you wish to have in full are parts of circles with the same size as the outer partial circle (the one with its centre within the cross in the middle), with Smart Guides on:

    1) Create a circle with its centre at the centre (of the original cross) and a size that fits the outer partial circle; you can move the centre about and adjust the size until you are close (enough);

    2) Ctrl/Cmd+C+F to create a copy on top, then ShiftClickDrag it up to the right so its lower left part covers the top right concave shape in the desired way;

    3) Select the circle from 1), Ctrl/Cmd+C+F to create a copy on top, then Object>Transform>Move and add a minus to the horizontal move to have a corresponding copy at the top left corner;

    4) Select the top circles from 2) and 3) and Ctrl/Cmd+C+F to create a copy set, then Object>Transform>Move and delete the horizontal move and add a minus to the vertical move and multiply it by 2;

    Now you should have four circles covering the four concave shapes in the desired way; you may need to move things a bit round and maybe adjust sizes if there are irregularities;

    7) Select all four copy circles and Pathfinder>Divide, then Ctrl/Cmd+Shift+G to Ungroup, then delete the outlying circle parts including the original outer circle when you are satisfied;

    Now you should have the full shape which you can give a fill.

    Or you can use it to actually remove or knockout the underlying paths with some more steps, including steps to recreate a possibly varying stroke.

    For other cases there may be other shapes to work with in similar ways.

    ceyhun_akgun
    Legend
    April 7, 2018

    I tried to explain the application visually.

    I chose to talk through a different solution.

    Graphic Designer Educator / PrePress Consultant
    barbara_a7746676
    Community Expert
    Community Expert
    April 7, 2018

    One way that would be fairly fast would be to select the whole thing and use the Eraser tool.

    Inspiring
    April 7, 2018

    I've been experimenting with the eraser tool, as you suggested. I confess it is something I've never paid too much attention to. I can now see that it has its uses! However, I don't think it will ever give me that refined edge that I need.

    barbara_a7746676
    Community Expert
    Community Expert
    April 7, 2018

    This is what I ended up with, but I wanted a little more curve.

    Illustrator does not have a good way to resize both handles of a curved anchor point at the same time if you try to do it manually.

    However, you can select an anchor point with the Direct Selection tool.

    Then double-click  the Scale tool. Double click it in the Tools panel, not on the artboard. That will bring up the Scale dialog box.

    Turn on Preview and turn on a Uniform Scale percentage that looks good to you.

    Repeat for the other anchor points.

    barbara_a7746676
    Community Expert
    Community Expert
    April 7, 2018

    It would help if you could upload the AI file so we could see how its constructed.

    Inspiring
    April 7, 2018

    I included a link.

    barbara_a7746676
    Community Expert
    Community Expert
    April 7, 2018

    Thanks for the link. If you actually want to get rid of all the little pieces rather than cover them up, you will have a tedious task on your hands.

    I think what you did is efficient, although you may not be happy with the shape you drew.

    Here's a way to draw the center shape without using the Pen tool:

    Draw a square with the Rectangle tool.

    Rotate it 45 degrees.

    Resize it so that it is the same size or slightly larger than the area you want to cover.

    Choose Object > Path > Add Anchor Points. That will add a new anchor point between each of the original anchor points.

    With the Direct Selection tool, select one of the new anchor points and click on Convert to Smooth in the Properties panel.

    Pull the anchor point towards the center.

    Repeat for the others.

    Simmer1
    Community Expert
    Community Expert
    April 7, 2018

    Hey,

    To be honest I think using the Pen Tool as you have is the simplest and probably best option.

    I say this because the pattern has a loose finish to it, which I think is cool so if the centre silhouette is not exact

    I think it works within the pattern.

    I hope this helps!

    Sim