Exit
  • Global community
    • Language:
      • Deutsch
      • English
      • Español
      • Français
      • Português
  • 日本語コミュニティ
  • 한국 커뮤니티
1

Dotted border

Participant ,
Sep 02, 2017 Sep 02, 2017

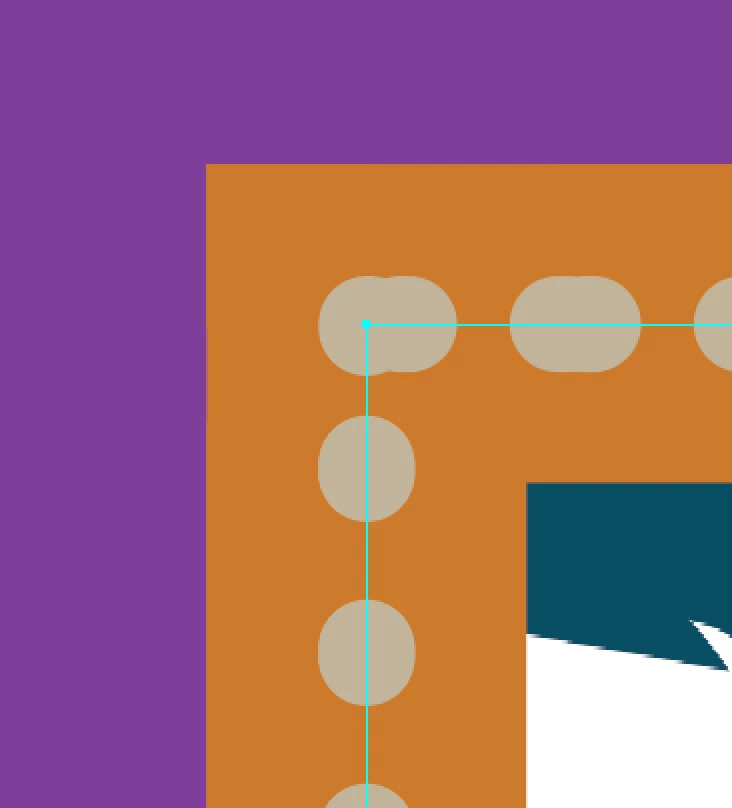
Hi I have used a dotted border around a rectangle but can only get one side of the border to look how I would like it to appear, see screenshots.  As you can see the corner is almost a double dot and the top border as well.  The left hand side border is how I am trying to get it to look.

Screen Shot 2017-09-03 at 9.48.57 am.png

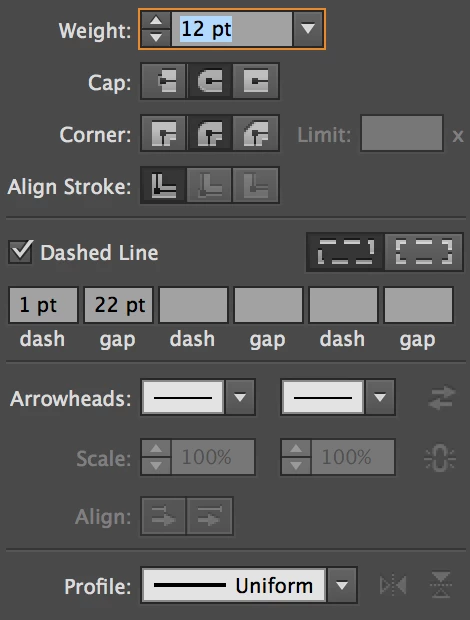
These are the settings for the stroke

Screen Shot 2017-09-03 at 9.53.18 am.png

Appreciate your help, thanks!

4.3K
Translate
Report
Community guidelines
Be kind and respectful, give credit to the original source of content, and search for duplicates before posting. Learn more
community guidelines

correct answers 1 Correct answer

Community Expert , Sep 02, 2017 Sep 02, 2017

I would make them into two different strokes. The simplest way at this point would be to copy the stroke as it is (command-c on mac control-c on a PC) and then while the stroke is still selected paste the copy in front (Command-f for mac control-f on PC) and while what is now the copy is still selected put it on a new layer. Then on the original layer select the original stroke and in the appearance panel delete the dotted stroke. In the top layer select the stroke and in the appearance panel de

...
Translate
Adobe
Enthusiast ,
Sep 02, 2017 Sep 02, 2017

Capture.jpg

Translate
Report
Community guidelines
Be kind and respectful, give credit to the original source of content, and search for duplicates before posting. Learn more
community guidelines
Participant ,
Sep 02, 2017 Sep 02, 2017

Hi yes I already tried that, this is the outcome.  Thanks for trying though.

Screen Shot 2017-09-03 at 10.48.12 am.png

Translate
Report
Community guidelines
Be kind and respectful, give credit to the original source of content, and search for duplicates before posting. Learn more
community guidelines
Enthusiast ,
Sep 02, 2017 Sep 02, 2017

Check the appearence panel that you have only 1 stroke.

Translate
Report
Community guidelines
Be kind and respectful, give credit to the original source of content, and search for duplicates before posting. Learn more
community guidelines
Participant ,
Sep 02, 2017 Sep 02, 2017

No I have 2 strokes, see screenshot.  Thanks for helping out.  Does this make a difference to the dash?

Screen Shot 2017-09-03 at 11.27.47 am.png

Translate
Report
Community guidelines
Be kind and respectful, give credit to the original source of content, and search for duplicates before posting. Learn more
community guidelines
Community Expert ,
Sep 02, 2017 Sep 02, 2017

The dotted stroke should be separate from the thicker stroke.

Translate
Report
Community guidelines
Be kind and respectful, give credit to the original source of content, and search for duplicates before posting. Learn more
community guidelines
Community Expert ,
Sep 02, 2017 Sep 02, 2017

I would never have done it with two strokes in the appearance panel like that so it was not obvious from the original question that you had done so.

Translate
Report
Community guidelines
Be kind and respectful, give credit to the original source of content, and search for duplicates before posting. Learn more
community guidelines
Participant ,
Sep 02, 2017 Sep 02, 2017

Thanks Bill .. I did google how to do it and this was the way it was portrayed.  Can you suggest a better way, thanks so much for your help so far

Translate
Report
Community guidelines
Be kind and respectful, give credit to the original source of content, and search for duplicates before posting. Learn more
community guidelines
Community Expert ,
Sep 02, 2017 Sep 02, 2017

I would make them into two different strokes. The simplest way at this point would be to copy the stroke as it is (command-c on mac control-c on a PC) and then while the stroke is still selected paste the copy in front (Command-f for mac control-f on PC) and while what is now the copy is still selected put it on a new layer. Then on the original layer select the original stroke and in the appearance panel delete the dotted stroke. In the top layer select the stroke and in the appearance panel delete the 40 point stroke. Now use the settings I gave you for the dotted line on the top layer stroke and make sure that the stroke on the lower layer does not have the dotted settings. Your dotted line should look like the one I showed in my earlier post.

Translate
Report
Community guidelines
Be kind and respectful, give credit to the original source of content, and search for duplicates before posting. Learn more
community guidelines
Participant ,
Sep 02, 2017 Sep 02, 2017

Wow thanks so much for your detailed instructions.. can't wait to try it later this afternoon.. out at the moment visiting my dad .. happy Father's Day to you

Sent from my iPhone

Translate
Report
Community guidelines
Be kind and respectful, give credit to the original source of content, and search for duplicates before posting. Learn more
community guidelines
Participant ,
Sep 04, 2017 Sep 04, 2017

Hey Bill .. thanks so much for all your help.  I finally worked out your instructions and have it working now.  Thanks.

Translate
Report
Community guidelines
Be kind and respectful, give credit to the original source of content, and search for duplicates before posting. Learn more
community guidelines
Community Expert ,
Sep 04, 2017 Sep 04, 2017

Happy to help.

Translate
Report
Community guidelines
Be kind and respectful, give credit to the original source of content, and search for duplicates before posting. Learn more
community guidelines
Community Expert ,
Sep 02, 2017 Sep 02, 2017

Use the dashes and gaps settings and all others as in this screen shot:

DOTTEDLINE.png

You're using a 12 point stroke so the gap needs to be twice that and the dash set to zero with round end caps to keep the dots as perfect circles.

Translate
Report
Community guidelines
Be kind and respectful, give credit to the original source of content, and search for duplicates before posting. Learn more
community guidelines
Participant ,
Sep 02, 2017 Sep 02, 2017

Thanks for the suggestion, this is the outcome ..

Screen Shot 2017-09-03 at 11.32.47 am.png

Translate
Report
Community guidelines
Be kind and respectful, give credit to the original source of content, and search for duplicates before posting. Learn more
community guidelines
Participant ,
Sep 02, 2017 Sep 02, 2017

Sorry forgot to set the other panel, similiar outcome, see screenshot

Screen Shot 2017-09-03 at 11.36.19 am.png

Translate
Report
Community guidelines
Be kind and respectful, give credit to the original source of content, and search for duplicates before posting. Learn more
community guidelines
Community Expert ,
Sep 03, 2017 Sep 03, 2017

Your screendumps from the Appearance panel show that you have added the strokes to the layer (it says Layer at the top). I guess you have added another stroke at the path level, that is why they are showing as duplicates.

Get rid of the layer appearance.

Click the circle next to the layer name and clear the layer appearance effects in the Appearance panel.

Translate
Report
Community guidelines
Be kind and respectful, give credit to the original source of content, and search for duplicates before posting. Learn more
community guidelines
Participant ,
Sep 04, 2017 Sep 04, 2017

Hi thanks for your response, I am having difficulties with this despite Bills really helpful instructions and I am assuming it is because of the fact that I have added 2 borders to the layer.

If I follow Bills instructions and copy the dotted border and paste in front the dotted border on a new layer, I get this .. whereby I lose half the orange border

Screen Shot 2017-09-04 at 6.23.14 pm.png

with the body layer having a 40 pt stroke and the new layer having the dotted border.  I am assuming its because the fill gets copied when I try to copy the dotted stroke.  Not sure how to fix it.

Screen Shot 2017-09-04 at 6.26.49 pm.png

I am also unsure as to what you mean .. Click the circle next to the layer name and clear the layer appearance effects in the Appearance panel.

Translate
Report
Community guidelines
Be kind and respectful, give credit to the original source of content, and search for duplicates before posting. Learn more
community guidelines
Participant ,
Sep 04, 2017 Sep 04, 2017

The weird thing is that when I click the path layer, I cant even see the orange border in the appearance panel.

Screen Shot 2017-09-04 at 6.36.00 pm.png

Translate
Report
Community guidelines
Be kind and respectful, give credit to the original source of content, and search for duplicates before posting. Learn more
community guidelines
Community Expert ,
Sep 04, 2017 Sep 04, 2017

Looks like you put every bit of your artwork on a new layer.

There's really no need to.

You need to understand the difference between how layers work in Illustrator and Photoshop. Actually in Illustrator you only need them to organize your stuff, but not for editability. Everything stays editable in Illustrator even if you just put all your stuff on the same layer.

Putting everything on its own layer messes up your file.

All you would need to to to get out of your issues would be to clean up the problem layer (the one that Ton pointed out. To do that: target this layer (click on the circle in the layer panel to the far right of the layer name) and then open the appearance panel and clear the strokes you have applied to it.

Then delete the extra strokes you created. It's really not necessary and it will make edits more difficult for you.

Instead keep your two strokes on the path (make sure the appearance panel always says "Path" when working with it).

Understand the difference bewteen selecting and targeting. This is crucial when working with layers. Many online "tutorials" don't differentiate between the two. Read about the layers, appearances and target in the documentation: How to adjust appearance attributes in Illustrator

Translate
Report
Community guidelines
Be kind and respectful, give credit to the original source of content, and search for duplicates before posting. Learn more
community guidelines
Participant ,
Sep 04, 2017 Sep 04, 2017

Thanks Monika, I finally have it sorted

Translate
Report
Community guidelines
Be kind and respectful, give credit to the original source of content, and search for duplicates before posting. Learn more
community guidelines
Community Expert ,
Sep 04, 2017 Sep 04, 2017

You are showinf different things in your screendumps, in some the layer is targeted and in others the path.

There is nothing wrong with multiple strokes added in the appearance panel to a single object.

But you get a mess when you also apply them to a layer.

The link that Monika gave should give you more information.

layer and object.png

Translate
Report
Community guidelines
Be kind and respectful, give credit to the original source of content, and search for duplicates before posting. Learn more
community guidelines
Participant ,
Sep 04, 2017 Sep 04, 2017

Thanks Ton, I finally have it working

Translate
Report
Community guidelines
Be kind and respectful, give credit to the original source of content, and search for duplicates before posting. Learn more
community guidelines
Community Expert ,
Sep 04, 2017 Sep 04, 2017
LATEST

Good to hear that.

Translate
Report
Community guidelines
Be kind and respectful, give credit to the original source of content, and search for duplicates before posting. Learn more
community guidelines