Exit
  • Global community
    • Language:
      • Deutsch
      • English
      • Español
      • Français
      • Português
  • 日本語コミュニティ
  • 한국 커뮤니티
0

Optical Illusion Need He

Community Beginner ,
Apr 06, 2019 Apr 06, 2019

Screen Shot 2019-04-06 at 10.10.19 AM.png

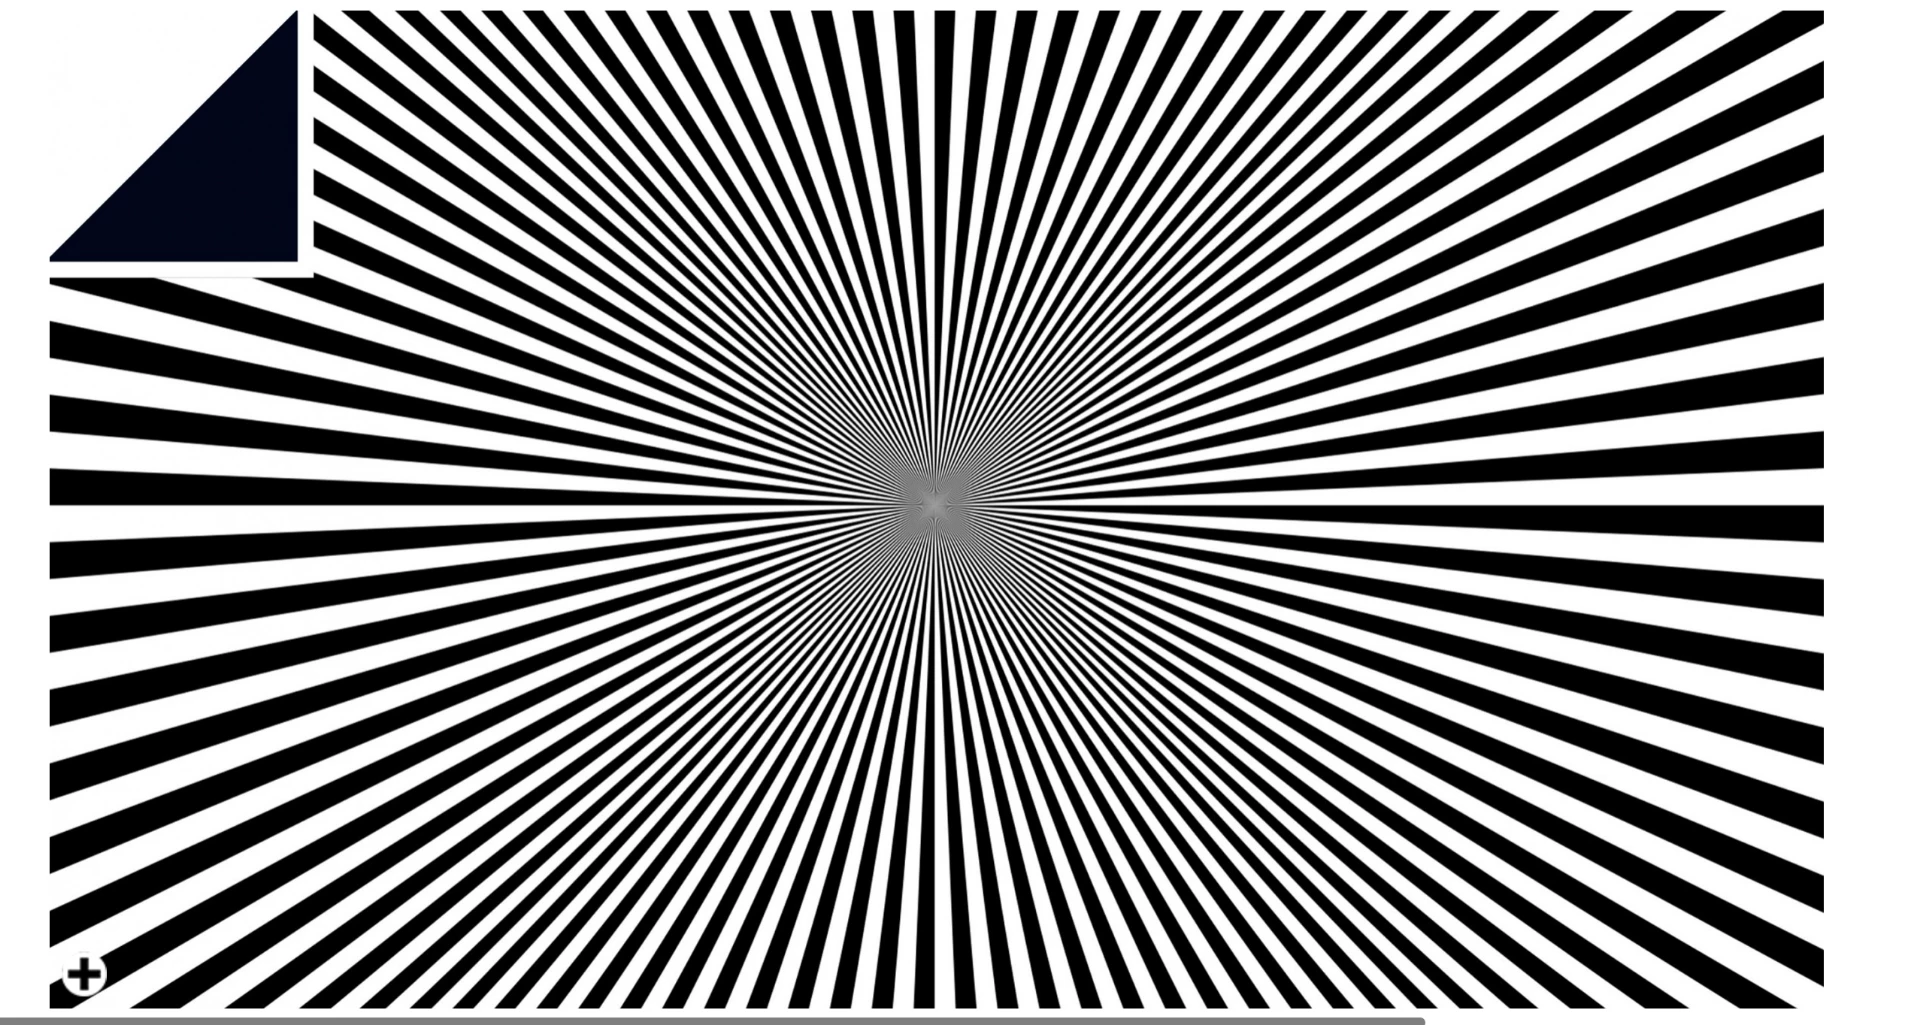
If someone can help me create this in illustrator that would be amazing!! I am not concerned with the folded corner effect.

1.8K
Translate
Report
Community guidelines
Be kind and respectful, give credit to the original source of content, and search for duplicates before posting. Learn more
community guidelines

correct answers 1 Correct answer

Community Expert , Apr 06, 2019 Apr 06, 2019

Draw the line with the same thicknes from the centento the edge, then use the rotate tool ( press R ) Then hold down

the alt key and click on the tip of the line in the center to set the anchor point, a dialog box will show up to put the rotation value insert any value ( 6 dgree) and click copy

then press ctrl + D

Translate
Adobe
Community Expert ,
Apr 06, 2019 Apr 06, 2019

Draw the line with the same thicknes from the centento the edge, then use the rotate tool ( press R ) Then hold down

the alt key and click on the tip of the line in the center to set the anchor point, a dialog box will show up to put the rotation value insert any value ( 6 dgree) and click copy

then press ctrl + D

Translate
Report
Community guidelines
Be kind and respectful, give credit to the original source of content, and search for duplicates before posting. Learn more
community guidelines
Community Beginner ,
Apr 06, 2019 Apr 06, 2019

I will try it. I figured that the lines were drawn horizontally across the page then warped or something similar.

Translate
Report
Community guidelines
Be kind and respectful, give credit to the original source of content, and search for duplicates before posting. Learn more
community guidelines
Community Expert ,
Apr 06, 2019 Apr 06, 2019

Victora,

If you wish to create what is normally called a sunbeam effect or sunburst, which I doubt, you can read all about it in these threads,

Re: Sunbeam effect- I think is done using blend mode

Re: How to create sunburst effect?

As you can see, if extended into the centre they have a circular inner dark haze.

If you wish to create the more starlike (four point) inner haze as in the image you have show, which I believe, you will have to do it in another way, such as the following.

It should be mentioned that the white gaps are wider than the black triangular shapes, which you may or may not wish to use; also, the vertical and horizontal parts are gaps.

Crucially, if you follow the ends of the black triangular shapes forming horizontal/vertical lines, you can see that the widths of both the shapes and the gaps are constant; with a sunbeam/sunburst both would be increasing towards the corners.

You may, Smart Guides being your friends:

0) Choose a basic length of the triangular shape that is closest to vertical along with a width to go with it, such as 200 in length and 10 in width (using your preferred unit), and then choose a gap width that fits, such as 10 (identical width of shape and gap), so that the total repetitive width (being the sum of shape and gap widths), such as 20, is a divisor/factor of the basic length; this will ensure a nice transition at 45 degrees;

In the following, the numbers in 0) are used, which will give you a gap at 45 degrees:

1) Create a rectangle with the chosen width 10 and height/length 200, then move the upper left corner to the desired centre, then click the upper right corner with the Delete Anchor Point Tool; this will give you the basic shape;

2) Switch to the Direct Selection Tool and perform the following until you have all the shapes between vertical and 45 degrees from vertical (that will be 9 times giving you a total of 10 shapes): Select the last shape in the expanded Layers palette and copy it to the front, then lock the original, then deselect the copy and ClickDrag over the lower (corner) Anchor Points, then Object>Transform>Move horizontally by the total repetitive width of 20;

3) Switch to the Direct Selection Tool and unlock all the locked shapes, then select them and Group them, then Object>Transform>Reflect a copy horizontally (Vertical Axis/90 degrees), then deselect and ClickDrag the new Group by its upper (common) Anchor Point to snap to the original Group/centre;

4) Select both Groups, then Object>Transform>Reflect a copy vertically (Horizontal Axis/0 degrees), then deselect and ClickDrag the new Group by its lower (common) Anchor Point to snap to the original Group/centre;

5) Select all four Groups, then Object>Transform>Rotate a copy by 90 degrees; this should give you the whole set of shapes forming a square;

If you wish to have a smaller rectangle of the shapes (shown) instead of the square, you may:

6) Create a rectangle with the desired width and height and centre it over the shapes, then:

6a) Select everything and Ctrl/Cmd+7 to create a Clipping Mask with the outer parts of the shapes hidden, which is reversible, or

6b) Select only the rectangle and Object>Path>Divide Objects Below, then deselect and with the Direct Selection Tool ClickDrag over each of the unwanted sets of outer ends (safer to start outside the longer side) and press Delete twice; this should give you 80 closed paths.

This should leave you with the desired appearance and structure.

You, or someone else, may come up with an easier/more automated way for step 2), and in 6b) it is possible to use Pathfinder>Crop or something but it may give a mess with more than the 80 paths.

Translate
Report
Community guidelines
Be kind and respectful, give credit to the original source of content, and search for duplicates before posting. Learn more
community guidelines
Community Expert ,
Apr 07, 2019 Apr 07, 2019

Another way - constructed, not drawn. (Ctrl+D or Transform effect with one triangle does not help in this case - because of every triangle does have another width! )

variableSunburst01.png

variableSunburst02.png

variableSunburst03.png

variableSunburst04.png

variableSunburst05.png

variableSunburst06.png

variableSunburst07.png

Translate
Report
Community guidelines
Be kind and respectful, give credit to the original source of content, and search for duplicates before posting. Learn more
community guidelines
Community Beginner ,
Apr 11, 2019 Apr 11, 2019

Just like to say thank you to everyone for all their help. Finally created what I needed and thanks so much!!

Translate
Report
Community guidelines
Be kind and respectful, give credit to the original source of content, and search for duplicates before posting. Learn more
community guidelines
Community Expert ,
Apr 12, 2019 Apr 12, 2019

For my part you are welcome, Victora.

May we hear which way you did it?

Translate
Report
Community guidelines
Be kind and respectful, give credit to the original source of content, and search for duplicates before posting. Learn more
community guidelines
Community Beginner ,
Apr 12, 2019 Apr 12, 2019

Kinda a combination using your recommendatin and pixxel shcubser. Here is mine. Cheers.Screen Shot 2019-04-12 at 11.30.25 AM.png

Translate
Report
Community guidelines
Be kind and respectful, give credit to the original source of content, and search for duplicates before posting. Learn more
community guidelines
Community Expert ,
Apr 12, 2019 Apr 12, 2019

Thank you for sharing, Victora.

I failed to include the sketch I made while writing post #3, by the way, sorry.

Translate
Report
Community guidelines
Be kind and respectful, give credit to the original source of content, and search for duplicates before posting. Learn more
community guidelines
LEGEND ,
Apr 12, 2019 Apr 12, 2019

Translate
Report
Community guidelines
Be kind and respectful, give credit to the original source of content, and search for duplicates before posting. Learn more
community guidelines
Community Expert ,
Apr 12, 2019 Apr 12, 2019

Hi rcraighead​,

nice try. But that's only the "comfortable variant" of s description. Unfortunately it doesn't help (in that special case).

Translate
Report
Community guidelines
Be kind and respectful, give credit to the original source of content, and search for duplicates before posting. Learn more
community guidelines
LEGEND ,
Apr 12, 2019 Apr 12, 2019

Thanks. Tried to delete the post but the site won't let me.

Translate
Report
Community guidelines
Be kind and respectful, give credit to the original source of content, and search for duplicates before posting. Learn more
community guidelines
Community Expert ,
Apr 12, 2019 Apr 12, 2019
LATEST

No. Let it here.

The video does show a good explanation of the transform effect.

Translate
Report
Community guidelines
Be kind and respectful, give credit to the original source of content, and search for duplicates before posting. Learn more
community guidelines