Exit
  • Global community
    • Language:
      • Deutsch
      • English
      • Español
      • Français
      • Português
  • 日本語コミュニティ
  • 한국 커뮤니티
0

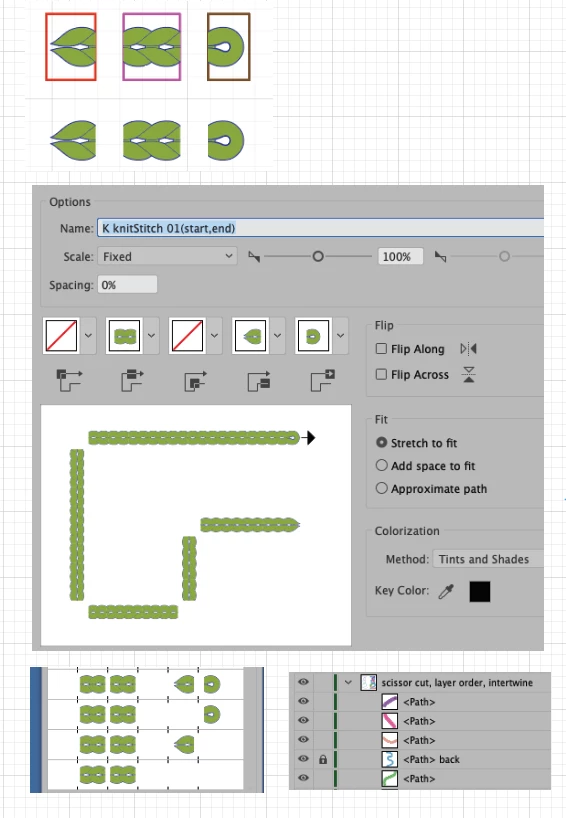
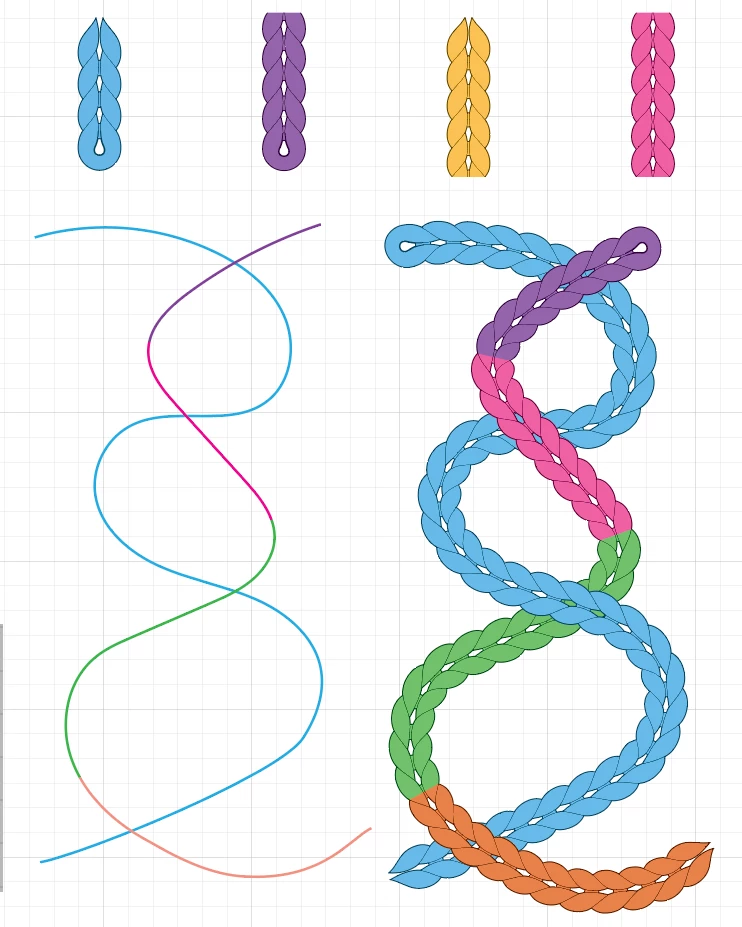
Trying to make a knitted cable stitch using blends or brushes

Community Expert ,
May 13, 2021 May 13, 2021

I am trying to make a twisted effect, where two obejcts rotate around each other. The efect that I am trying to acheive is a realistic knitted cable stitch.


I have tried using the blend tool, with two separate blends, but the objects from one blend cannot wrap around the objects of another blend.


I have also tried using the brush tool, but when I cut the path and move the various parts to the front or the back, the edge is harsh and doesn't look correct.


Can anyone assist?


TOPICS
Draw and design
3.8K
Translate
Report
Community guidelines
Be kind and respectful, give credit to the original source of content, and search for duplicates before posting. Learn more
community guidelines

correct answers 1 Correct answer

Advocate , May 18, 2021 May 18, 2021

Document Greek, Hi.


In addition to Doug’s reply, I once created a single KnitStitch single row Pattern brush if anyone is interested.


Actually, I created 4 different versions as you can see.

To intertwine, I used all 4.

I random colored so you can see the scissor cut and Layer order.

No Masking.


K

Screen Knit 01.pngScreen Knit 02.png

Translate
Adobe
Community Expert ,
May 13, 2021 May 13, 2021

Please show an example of what you want to achieve. This sort of thing with a pattern brush?

Screenshot 2021-05-13 143021.png

Translate
Report
Community guidelines
Be kind and respectful, give credit to the original source of content, and search for duplicates before posting. Learn more
community guidelines
Community Expert ,
May 13, 2021 May 13, 2021

I can show you an example of what I tried that doesn't work. I made this using brushes, but when I cut each object to make it sit on top, the edge is wrong and is not realistic.

Screen Shot 2021-05-13 at 9.53.23 AM.png


Here is an exmaple of something I found onle to show how it should look.

c48bc13a14712ac9f7eff8fc2b779766--cable-knitting-free-vector-art


Translate
Report
Community guidelines
Be kind and respectful, give credit to the original source of content, and search for duplicates before posting. Learn more
community guidelines
Community Expert ,
May 13, 2021 May 13, 2021

If that's all you want, you just need to cut the path somewhere away from the crossing point rather than right on it.

Translate
Report
Community guidelines
Be kind and respectful, give credit to the original source of content, and search for duplicates before posting. Learn more
community guidelines
Community Expert ,
May 13, 2021 May 13, 2021

I tried that, but since I need the peice to intertwine, the same issue remains. If I just needed one of the strands to wevae back and forth on top of the other, it wouldn't be a problem. But since I need them to intertwive, that's where I'm getting stuck.

Screen Shot 2021-05-13 at 11.08.22 AM.png

Translate
Report
Community guidelines
Be kind and respectful, give credit to the original source of content, and search for duplicates before posting. Learn more
community guidelines
Community Expert ,
May 13, 2021 May 13, 2021

I'm not entirely sure what you need to intertwine here, but each 'strand' you need to intertwine needs to be a separate path. You have three 'strands' on the same path there; perhaps they all need to be separate.

Translate
Report
Community guidelines
Be kind and respectful, give credit to the original source of content, and search for duplicates before posting. Learn more
community guidelines
Community Expert ,
May 13, 2021 May 13, 2021

It's still not working quite right. I don't know if brushes are the way to go. If there was a way that blends could rotate around each other, like a helix, that would do the trick.


Screen Shot 2021-05-13 at 11.43.54 AM.png

Translate
Report
Community guidelines
Be kind and respectful, give credit to the original source of content, and search for duplicates before posting. Learn more
community guidelines
Community Expert ,
May 13, 2021 May 13, 2021

Perhaps I'm misunderstanding. Is this what you're after, or something else?

Screenshot 2021-05-13 170430.png

Translate
Report
Community guidelines
Be kind and respectful, give credit to the original source of content, and search for duplicates before posting. Learn more
community guidelines
Community Expert ,
May 13, 2021 May 13, 2021

YES!! How did you do that?

Translate
Report
Community guidelines
Be kind and respectful, give credit to the original source of content, and search for duplicates before posting. Learn more
community guidelines
Community Expert ,
May 13, 2021 May 13, 2021

As I said in my second reply; cut the path somewhere away from the overlap:


Screenshot 2021-05-13 172013.png

Translate
Report
Community guidelines
Be kind and respectful, give credit to the original source of content, and search for duplicates before posting. Learn more
community guidelines
Community Expert ,
May 13, 2021 May 13, 2021

Very cool!

Translate
Report
Community guidelines
Be kind and respectful, give credit to the original source of content, and search for duplicates before posting. Learn more
community guidelines
Community Expert ,
May 13, 2021 May 13, 2021

How did you make those orange and blues lines? Because I made mine using brushes, and when I cut the path in the place you specifiy. my brushes get messed up.


Screen Shot 2021-05-13 at 12.29.29 PM.png

Translate
Report
Community guidelines
Be kind and respectful, give credit to the original source of content, and search for duplicates before posting. Learn more
community guidelines
Community Expert ,
May 13, 2021 May 13, 2021

Geek,


What happens if you simply cut the path with the Scissors Tool?


You seem to have somehow converted the resulting end Anchor Points, losing the Handles/curvature.

Translate
Report
Community guidelines
Be kind and respectful, give credit to the original source of content, and search for duplicates before posting. Learn more
community guidelines
Community Expert ,
May 13, 2021 May 13, 2021

 I stil get the weird empty triangles. I even made brand new paths with curves.

Screen Shot 2021-05-13 at 5.54.06 PM.png

Translate
Report
Community guidelines
Be kind and respectful, give credit to the original source of content, and search for duplicates before posting. Learn more
community guidelines
Community Expert ,
May 13, 2021 May 13, 2021

Geek,


My suggestion was based upon the (wrong) assumption that the yellow brush thingie consists of a triple brush applied to a single curved path.


Whichever way it is created, I believe you can, maybe as the simplest solution, or at least as a temporary way until other ways can be established:


1) Copy the hindmost brush thingie (whether it is the yellow or the blue one) in front of itself;

2) For each crossing where you want it on top (one or multiple) create a stroke/nofill rectangle that covers at least the whole part of the brush thingie that is hidden at the crossing (avoid the parts covered at the other crossings);

3) Is you have created multiple rectangles  in 2), select them both/all and Ctrl/Cmd+8 to turn them into one Compound Path;

4) ShiftClick the copy brush thingie from 1) to also select that, then Ctrl/Cmd+7.


This will give you a Clipping Mask where the clipped parts get in front of the other brush thingie, all in one go.


Translate
Report
Community guidelines
Be kind and respectful, give credit to the original source of content, and search for duplicates before posting. Learn more
community guidelines
Community Expert ,
May 14, 2021 May 14, 2021

Can you share an example file? Mine are made with a pattern brush:


Screenshot 2021-05-14 083502.png

Translate
Report
Community guidelines
Be kind and respectful, give credit to the original source of content, and search for duplicates before posting. Learn more
community guidelines
Community Expert ,
May 14, 2021 May 14, 2021
Translate
Report
Community guidelines
Be kind and respectful, give credit to the original source of content, and search for duplicates before posting. Learn more
community guidelines
Community Expert ,
May 14, 2021 May 14, 2021

You need smooth curves rather than corner points for this to work well. I had a go at tidying up your brush too; it had protruding end caps which would create an imperfect join anyway.


https://drive.google.com/file/d/1uPMVC0COcFUffa1a1Dz17xvsMGd57KHn/view?usp=sharing

Translate
Report
Community guidelines
Be kind and respectful, give credit to the original source of content, and search for duplicates before posting. Learn more
community guidelines
Community Expert ,
May 15, 2021 May 15, 2021

THANK YOU!!!

Translate
Report
Community guidelines
Be kind and respectful, give credit to the original source of content, and search for duplicates before posting. Learn more
community guidelines
Advocate ,
May 15, 2021 May 15, 2021

Salut!

Moi je fais dans la dentelle...

dentelle02.jpg


Translate
Report
Community guidelines
Be kind and respectful, give credit to the original source of content, and search for duplicates before posting. Learn more
community guidelines
Community Expert ,
May 13, 2021 May 13, 2021

This is the old problem of "how can something be both in front and behind another object at the same time?

Well, as you know Brushes present a huge problem, in that, you can't cut the path without screwing up everything.

Well maybe the answer is a Mask with a Compound Path as the Mask.

  1. Select the Brushed object that's in back.
  2. Copy and Paste in front of everything.
  3. Draw objects with the Pen tool where the overlaps of Brushes need to be.
  4. With all of these objects selected, go to Object > Compound Path > Make.
  5. Select the Compound Path and top Brushed path.
  6. Go to Object > Clipping Mask > Make.

Hope this helps!


Translate
Report
Community guidelines
Be kind and respectful, give credit to the original source of content, and search for duplicates before posting. Learn more
community guidelines
Community Expert ,
May 13, 2021 May 13, 2021

Very interested in Doug's response.

Translate
Report
Community guidelines
Be kind and respectful, give credit to the original source of content, and search for duplicates before posting. Learn more
community guidelines
Advocate ,
May 18, 2021 May 18, 2021
LATEST

Document Greek, Hi.


In addition to Doug’s reply, I once created a single KnitStitch single row Pattern brush if anyone is interested.


Actually, I created 4 different versions as you can see.

To intertwine, I used all 4.

I random colored so you can see the scissor cut and Layer order.

No Masking.


K

Screen Knit 01.pngScreen Knit 02.png

Translate
Report
Community guidelines
Be kind and respectful, give credit to the original source of content, and search for duplicates before posting. Learn more
community guidelines