• Global community
    • Language:
      • Deutsch
      • English
      • Español
      • Français
      • Português
  • 日本語コミュニティ
    Dedicated community for Japanese speakers
  • 한국 커뮤니티
    Dedicated community for Korean speakers
Exit
0

Create a frame from a picture

New Here ,
Jul 31, 2020 Jul 31, 2020

Copy link to clipboard

Copied

Hello, I am new to indesign and I took a simple course on udemy to understand the basics and I think I'm ready to work on Indesign now. I am trying to create and Architecture Portfolio. I did the cover page on photoshop before learning indesign but now I need to have the same language from the cover page on some other pages.


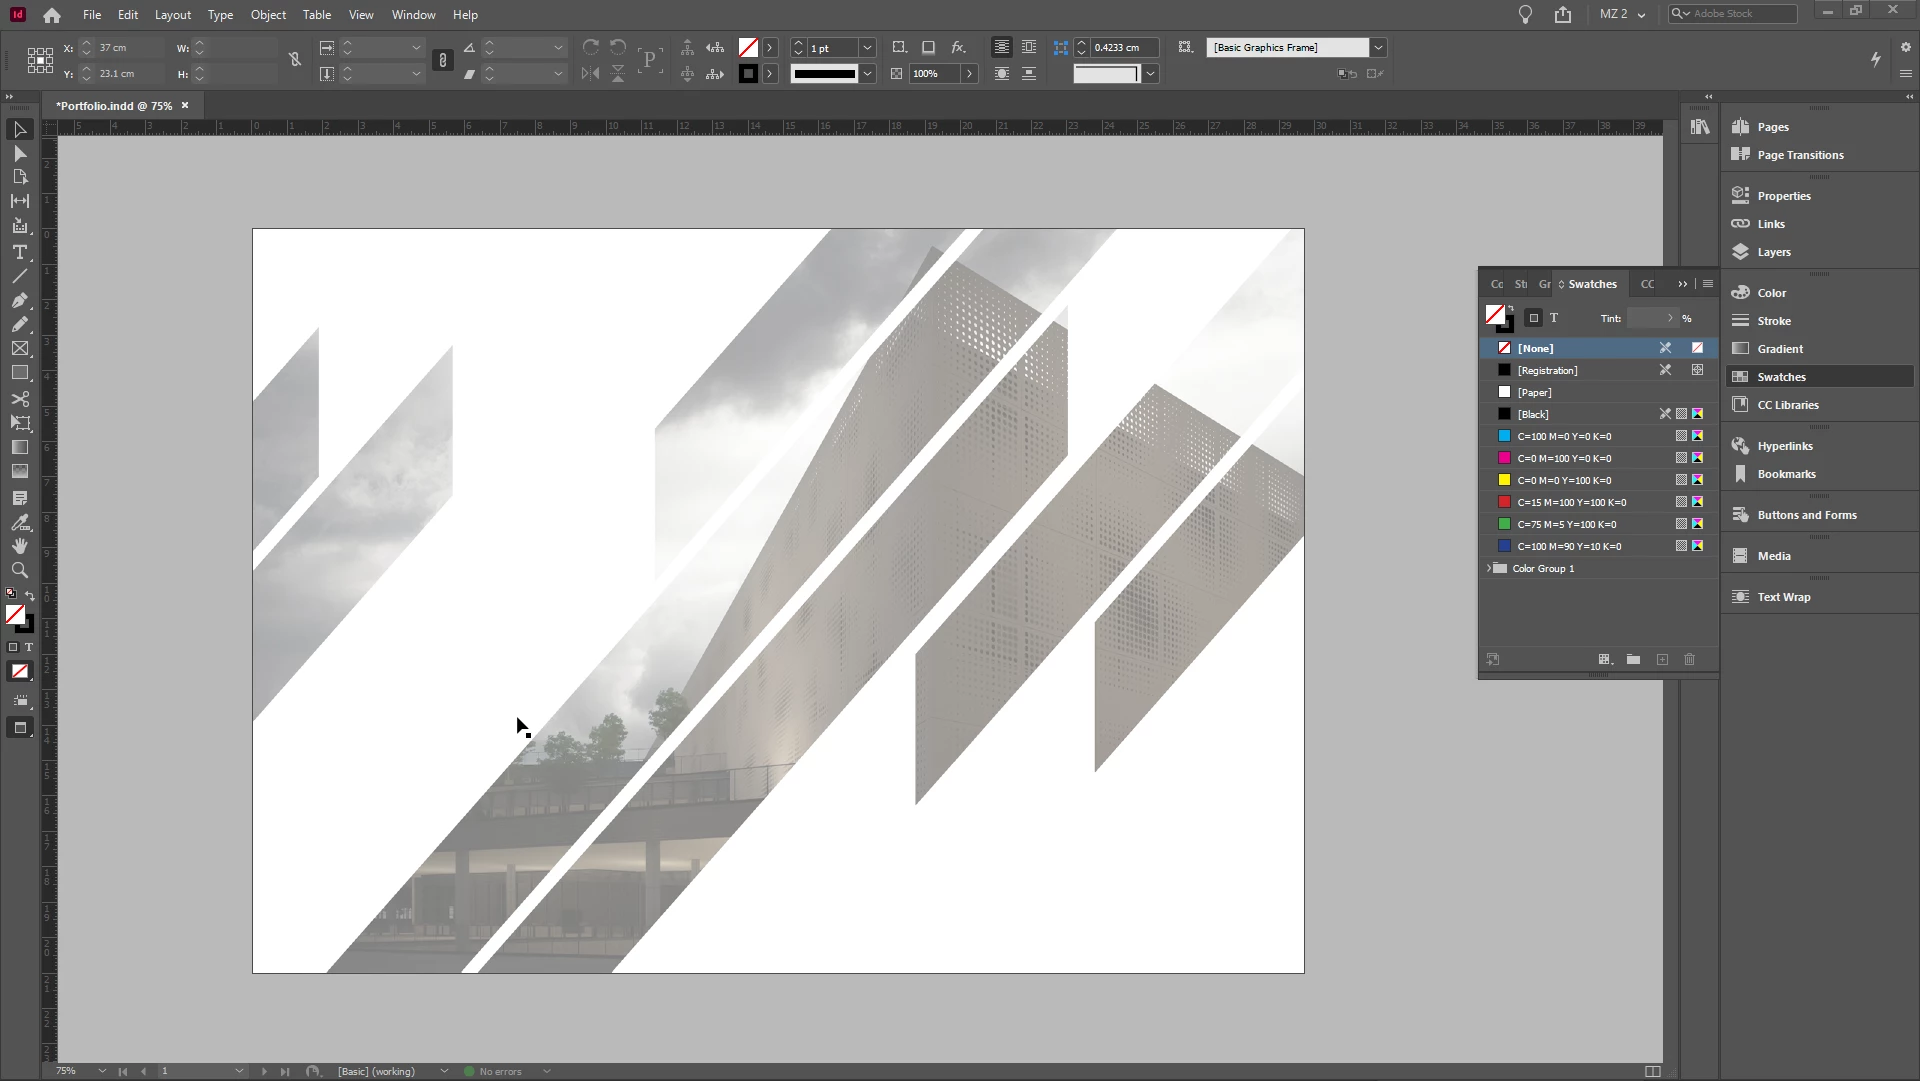
I want to create a frame out of the shape you see below, I tried doing it with the pen tool by clicking on the edge of each shape you see but It is going to take time and it is not a 100% accurate. Is there a way to create a frame out of these shapes? I have the picture as png where instead of the white parts it's actually transparent.

InDesign_3oCBAhQZlF.png

TOPICS
How to

Views

368

Translate

Translate

Report

Report
Community guidelines
Be kind and respectful, give credit to the original source of content, and search for duplicates before posting. Learn more
community guidelines

correct answers 2 Correct answers

Community Expert , Jul 31, 2020 Jul 31, 2020

Draw your boxes and then make them into a compound path—Select All, Object>Paths>Make Compound Path. With the compund path selected place your image. In general .PSD is a better image format than .PNG.


Screen Shot 8.pngScreen Shot 9.png

Votes

Translate

Translate
Community Expert , Jul 31, 2020 Jul 31, 2020

In effect you see a couple of rectangles that are rotated and cut.

You can do this easily in InDesign.


After you rotated the rectangles draw a rectangle for every "cut" you want to do, position it on top of a rotated rectangle, select both and use the pathfinder tools to subtract the shape on top from the one in the back.


All tools and techniques you need explained here:

Step and repeat

https://helpx.adobe.com/indesign/using/grouping-locking-duplicating-objects.html

Compound shapes and pathf

...

Votes

Translate

Translate
Community Expert ,
Jul 31, 2020 Jul 31, 2020

Copy link to clipboard

Copied

Not entirely sure what you are trying to achieve, but re format, don't save as PNG, save as a native PSD file (in Photoshop) and Place that in InDesign and add the text there.


Votes

Translate

Translate

Report

Report
Community guidelines
Be kind and respectful, give credit to the original source of content, and search for duplicates before posting. Learn more
community guidelines
New Here ,
Jul 31, 2020 Jul 31, 2020

Copy link to clipboard

Copied

What I am trying to do is that I need the same boundaries or shape, and just replace the picture, I want to do it multiple times. I did something right now is that I managed to trace the shape on illustrator and have the shape, now I just want to import that shape into indesign and place the picture on the shape. Is there a way to do that?

Votes

Translate

Translate

Report

Report
Community guidelines
Be kind and respectful, give credit to the original source of content, and search for duplicates before posting. Learn more
community guidelines
Community Expert ,
Jul 31, 2020 Jul 31, 2020

Copy link to clipboard

Copied

Draw your boxes and then make them into a compound path—Select All, Object>Paths>Make Compound Path. With the compund path selected place your image. In general .PSD is a better image format than .PNG.


Screen Shot 8.pngScreen Shot 9.png

Votes

Translate

Translate

Report

Report
Community guidelines
Be kind and respectful, give credit to the original source of content, and search for duplicates before posting. Learn more
community guidelines
Community Expert ,
Jul 31, 2020 Jul 31, 2020

Copy link to clipboard

Copied

Keep you images in RGB colour mode.

Will the final output of your portfolio from InDesign be digital or printed?

Votes

Translate

Translate

Report

Report
Community guidelines
Be kind and respectful, give credit to the original source of content, and search for duplicates before posting. Learn more
community guidelines
Community Expert ,
Jul 31, 2020 Jul 31, 2020

Copy link to clipboard

Copied

In effect you see a couple of rectangles that are rotated and cut.

You can do this easily in InDesign.


After you rotated the rectangles draw a rectangle for every "cut" you want to do, position it on top of a rotated rectangle, select both and use the pathfinder tools to subtract the shape on top from the one in the back.


All tools and techniques you need explained here:

Step and repeat

https://helpx.adobe.com/indesign/using/grouping-locking-duplicating-objects.html

Compound shapes and pathfinder options:

https://helpx.adobe.com/indesign/using/compound-paths-shapes.html


Regards,
Uwe Laubender

( ACP )


Votes

Translate

Translate

Report

Report
Community guidelines
Be kind and respectful, give credit to the original source of content, and search for duplicates before posting. Learn more
community guidelines
Community Expert ,
Jul 31, 2020 Jul 31, 2020

Copy link to clipboard

Copied

LATEST

Depending on how you created your Photoshop file, another option is to place the photos in Photoshop. Place the one PSD file in InDesign and use layer control to show the layer your want.

David Creamer: Community Expert (ACI and ACE 1995-2023)

Votes

Translate

Translate

Report

Report
Community guidelines
Be kind and respectful, give credit to the original source of content, and search for duplicates before posting. Learn more
community guidelines