

- Home
- InDesign
- Discussions
- Re: how to remove pink boxes in one fell swoop (wi...
- Re: how to remove pink boxes in one fell swoop (wi...

Copy link to clipboard
Copied
 Hello
Hello
I have copied a formatted list in MS Word over to InDesign.
In InDesign each line item is preceded with a pink box. I understand that it is perhaps a missing font issue. And that's not my worry.
I have many such lists that I wish to bring over from Word to InDesign. Presently, I am manually deleting each pink box. Is there a way I can automate this procedure using Find/Change. Better still, can I bring it over from Word without the pink box... by which I mean to say, when I copy the content in InDesign, the application pastes the content and not the missing font glyph.
Any guidance is appreciated.


 1 Correct answer

Hi,
I have not read entirely what is being talked about but you should try this:
Find what: <enter glyph id within this bracket>\t
Change to: desired thing here
-Aman
 20
Replies
20
20
Replies
20
Copy link to clipboard
Copied
Hi,
Why not change the font entirely so that the missing glyph is replaced by a non missing one?
Do all the missing glyphs have the same unicode?
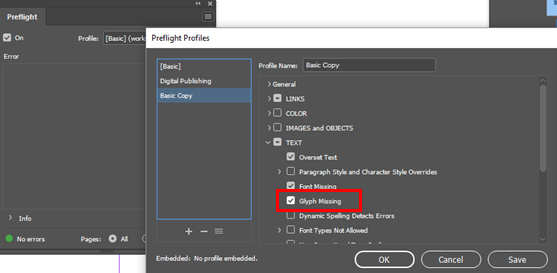
You can anyway detect them using the preflight panel to ensure that you have manually deleted them all.
-Aman
Copy link to clipboard
Copied
Aman, I am copying it over from a large Word document that is full of lists so I cannot change anything in there.
Also, I am trying to detect the Unicode for the missing glyphs, but my preflight panel is showing without errors:

What am I missing here.

Copy link to clipboard
Copied
It's likely that the box is an actual character in the Word document, and that it only shows as a box in InDesign because the font that you have applied to your text in InDesign doesn't have a glyph in that Unicode location. Have you seen what the character is in the Word document? Maybe you were given a printout, PDF or screenshot of the Word document, or maybe the character is visible when you open the Word document. The point I'm getting at is that if there is a glyph that you need, you will want to know what it is. If it isn't important, have you tried selecting it, copying it to the Find field and replacing it with nothing? That should remove it if you don't really need it.
Copy link to clipboard
Copied
it's a simple hypen in the Word document that is showing up as a pink box in InDesign
Copy link to clipboard
Copied
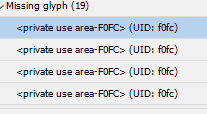
so I guess I had to create a new preflight profile in order for the missing glyphs errors to show, but how do I find the Unicode of the pink box.

Is fofc the Unicode:
Copy link to clipboard
Copied
Also, in InDesign, it is showing with a pink box and a tab. so how can I delete both of them simultaneously.
Copy link to clipboard
Copied
Copy the glyph to the Find field in the Find/Change window. After you paste the glyph, type ^t
That's the Find>Change code for a tab. If you click on the @ symbol next to the Find field, you can select special characters to search for or replace with. If you select, for example, a paragraph return, it will load ^p into the field, and a line break will load ^n
To replace with nothing, make sure the Change field doesn't have anything in it.
Copy link to clipboard
Copied
Copy the glyph to the Find field in the Find/Change window. After you paste the glyph, type ^t
So I select the pink box, and right click, and select the option: "Load selected glyph in find"
this opens the find/change dialog
Now how do I and where do I enter ^t... im afraid im not following

Copy link to clipboard
Copied
Try switching from the Glyph sub-menu to the Text sub-menu. That's up at the top in your screenshot that's highlighted in blue. Paste the glyph into the Find field, then type ^t
Copy link to clipboard
Copied
So I searched for f0fc in my Glyph submenu, and in the Text menu I entered ^t
and hit Change. But it says "cannot find match."
Copy link to clipboard
Copied
Did you try pasting the glyph into the Find field in the Text sub-menu and then typing ^t after the paste into the same menu? That was my suggestion.
Copy link to clipboard
Copied
I am sorry for this back and forth, but what do you mean"pasting the glyph into the find field in the text sub-menu"
how do I do that.. I don't see any option in the flyout menu (@) that will enable me to insert the missing glypc(f0fc) preceding the tab.

Copy link to clipboard
Copied
Hi,
I have not read entirely what is being talked about but you should try this:
Find what: <enter glyph id within this bracket>\t
Change to: desired thing here
-Aman
Copy link to clipboard
Copied
Aman, that worked.
Miginintosh and Aman, thank you v much for your time and patience in leading me to the solution.
Copy link to clipboard
Copied
Let's break it down:
- Select the Type tool
- Click into your text frame
- Select only the glypn
- Copy
- Go to Edit>Find/Change
- Select the Type sub-menu at the top

- Paste (this will be the contents of the clipboard, which will only contain the last thing you copied, which will be the glyph)
- With the cursor still in the Find field, go to the @ fly-out to the right of the Find field and select Tab. This will insert the characters ^t into the Find field, just after the glyph you pasted. You could have also just typed those characters instead of using the fly-out @ menu.
- In the Change field, hit the Delete key to ensure that it is blank
- Set the Search field to Document or All Documents if you have more than one open, and you want to do this to all open documents. The field may have set itself to Story (in which case it won't find anything outside of the continuous story of text in this frame or any frames that are linked in a text chain with this one) or Selection (in which case it will only search for what is selected by the text cursor at the moment)
- Click the Find button, and one of your glyphs with the tab that follows should be selected.
- Click either Change (it will delete just that instance), Change All (it will delete all that it finds) or Change/Find (it will delete only the first one, but will then go on to select the next one it finds, allowing you to examine each instance before you click one of the Change options.
Copy link to clipboard
Copied
ashimg23377171 wrote
…but how do I find the Unicode of the pink box.
Select the character with the Type tool, like this:
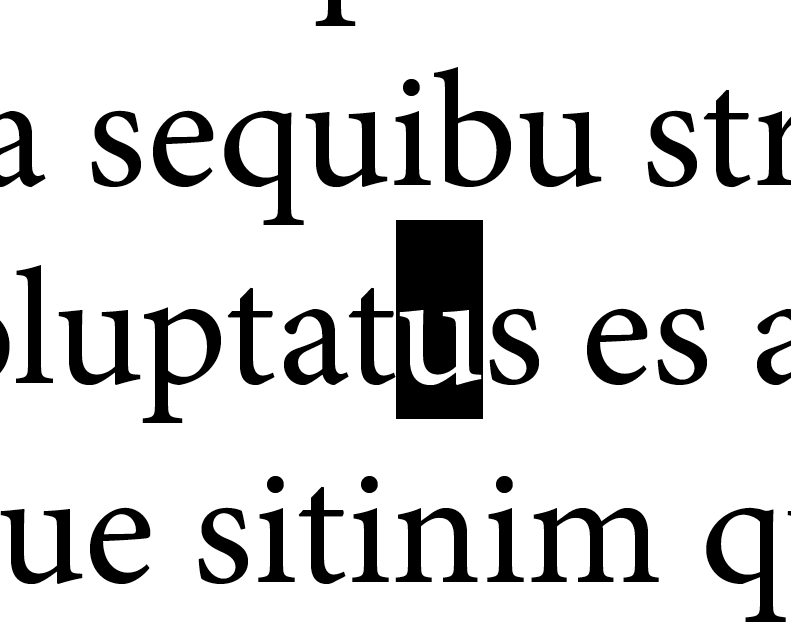
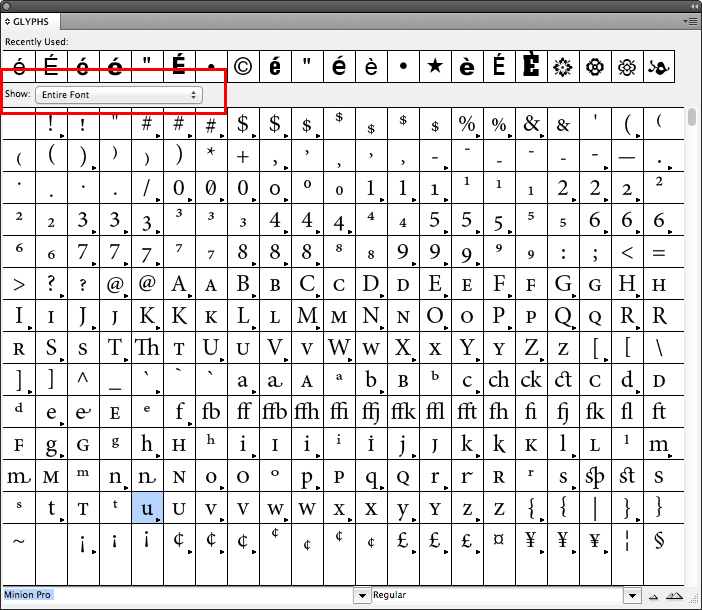
Then go to Type>Glyphs, and the character should be highlighted in the Glyphs window, like this:

Hover the mouse cursor over the glyph and you will see info. This character is
GID: 86
Unicode: 0075
Name: LATIN SMALL LETTER U
Is that helpful?
Copy link to clipboard
Copied
thanks... but I don't see any character highlighted in my glyph window that corresponds to the pink box.
Copy link to clipboard
Copied
At the top right of the Glyphs window, do you have Entire Font selected? Have you scrolled through the entire set of glyphs with the scroll bar?
Copy link to clipboard
Copied
Hi,
The UID in poreflight panel is the unicode ID. Since all missing glyph in your case are the same with same UID you can easily find change them using:

Since the glyph is missing, it is ok for it to not come in the glyph panel
For more info see this:https://indesignsecrets.com/tackling-missing-glyphs.php
-Aman
Copy link to clipboard
Copied
Thanks Aman.... so this is what I have
I have entered the Unicode of the missing glyph: f0fc, and it is able to search for all the missing glyphs

When I hit Change, it deletes it, but I wish to delete the tab space as well and have the text align to the left edge of the text frame.


Find more inspiration, events, and resources on the new Adobe Community
Explore Now
 AdChoices