- Home
- InDesign
- Discussions
- Insert Curly Brackets, Multi-line indicator of a g...
- Insert Curly Brackets, Multi-line indicator of a g...
Insert Curly Brackets, Multi-line indicator of a group
Copy link to clipboard
Copied
I am learning, mostly on my own, how to use InDesign. I have searched Adobe for help on how to insert a curly bracket } that spans multiple lines used to indicate a group of things. I have tried to insert a symbol and rasterize it and just drag handles, but small and large brackets end up looking drastically different. I would appreciate any suggestions/tips on this question.
Thanks
Copy link to clipboard
Copied
What sort of "groups of things" are we talking about? Is this some sort of methematical work? You might be best off creating this as a separate graphic of some sort (that is, a graphic of the entire group) and then placing that into ID. More explanation and a screen shot would be helpful.
Copy link to clipboard
Copied
The groups are not mathematical, see my reply to the original post. Thanks for the suggestion to post
a screenshot. It is now in the post.
Separate graphic was the direction I was going, but it wasn't working the way I needed.
Thanks for trying.
Copy link to clipboard
Copied
OK, now I can see what the problem is, I think. You want to have the radii at the ends and the height of the "v" in the center consistent from group to group, and adjust the lengths of the verticals only. Is that correct?
That's doable with a separate graphic, and I'd suggest making one for each number of lines you are likely to need, then put them all ina library. I'd approach this by typing a curly brace in a size you find appealing for the fixed elements, then convert that to outlines.
Use the direct select tool to marquis around the path nodes for each end, one group at a time, and use the up or down arrow keys to move the groups toward or away from the center in equal amounts. Not really as much work as it sounds.
Copy link to clipboard
Copied
Thanks, Peter. You are exactly correct on what I am trying to do. I will give it a try. Right now I am dealing with a major issue with my wife's laptop. I will get to it when I have time. When I do, I will let you know how it turns out.
Thanks again
Copy link to clipboard
Copied
I hope that involves some heavy hugging and kissing.
![]()
Copy link to clipboard
Copied
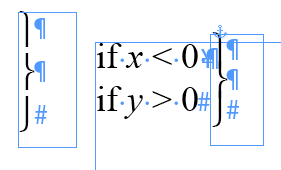
a. Use the Symbol font. It has several parts of curly and straight braces and parentheses, designed to stack upon eachother with zero extra leading (or slightly less, if you want a smaller brace).
b. Put these into an Anchored object, anchored somewhere at an appropriate place, so its frame will always keep the same relative position to its text.
c. Well, it oughta look like this. On the left: a frame with three parts of a curly brace. In the middle: some random math. The top line "contains" the anchored object, as can be seen by the ¥ sign. On the right, the anchored object itself, positioned relatively to its anchor.

Copy link to clipboard
Copied
I was pondering doing something similar, but using a drop cap in an otherwise empty frame.
Copy link to clipboard
Copied
I am going to try this suggestion. It may be the easiest to implement.
Copy link to clipboard
Copied
I believe this suggestion is the best offered so far. It seems to me that it should offer a more consistent look than the PowerPoint brackets which are pictured in the screenshot.
I will let you know how it works. My choice of correct answer will wait until then.
Thanks
Copy link to clipboard
Copied
Thank you Jongware.
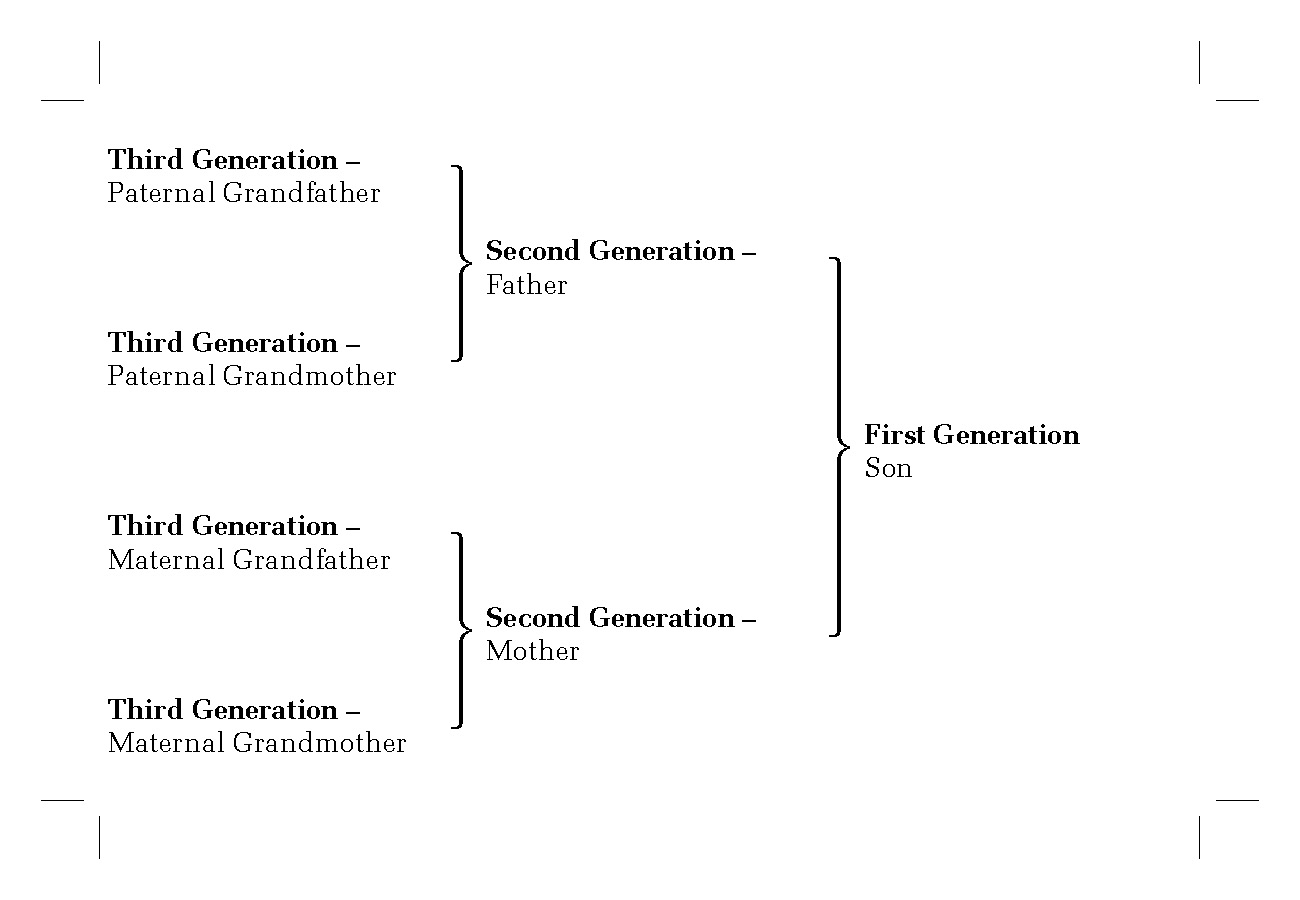
Having grown up with TeX, I find your response to the extensible curly braces query to be the most elegant. I will now implement this in InDesign for my own pressing need (a genealogical table).
Cheers!
- JXN.
Copy link to clipboard
Copied
Thusly,
Document width = 5.5". Height: in the golden proportion.
I drew one text frame and used the AddGuides script to split into 3 columns and 4 rows with 12pt gutters (to save room for the braces).
All text boxes have 3pt inset (just because) and are set to align center.
The brace boxes are set to justify vertically. This ensures that the top and bottom parts of the curly (actually the frame that contains them) are right on the center of the boxes they refer to (except for the part of the brace that "overhands" the box).
I selected the 3 parts of the brace from the Symbol font and chose 18pt on 9pt leading and inserted more vertical extensions on the longer brace.
Only problem is when you get to 10 generations, the text box is only 1.477 points in height! Ouch.
So, once again, the answer to one situation leads to another question.

Copy link to clipboard
Copied
I'm trying to use the Symbol font, copying the characters from Windows Character Map. This is the result, the division symbols in Symbol and the letters in Myriad Pro.
ö÷ý÷ø
In MS Word 2010, the symbols show correctly.
Copy link to clipboard
Copied
Forgive my ignorance, but I can't seem to find these keys either. In MacOS 10.13.6 in PS 2018 using the Symbol font - while I can find the brackets, I can't seem to find the separate components regardless of shift and option key modifiers. What am I missing? What are the exact keystrokes that should give us these characters?
Copy link to clipboard
Copied
This thread is 4 years old and pertains to InDesign. Please post your question in the Photoshop forum.
Copy link to clipboard
Copied
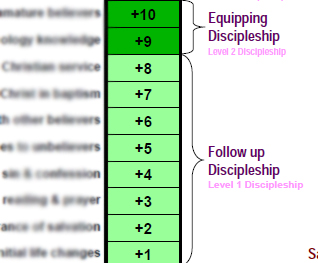
The suggestion to include a screenshot was a good one. So
here it is:

On the left are steps in a process, each step has a scale value. Steps are grouped together in phases with the curly brackets pointing to the phase title.
Get ready! An upgraded Adobe Community experience is coming in January.
Learn more