Export to PDF, Lose Bleed Every Time
Copy link to clipboard
Copied
I've exported thr same file to pdf at least two dozen times and I cannot get the bleed to show up.
There is a .125" bleed on top, bottom, and exterior in InDesign. When exporting, I have tried "use the document's bleed setting," but I get no bleed. I have tried adding the size fo the bleed through the export menu-- no bleed. Nothing I do can make a bleed.
I HAVE to have the bleed for the book printer. They've sent this file back repeatedly because of the bleed issue.
Thanks to anyone who might know how to solve this!
~~Kate

Copy link to clipboard
Copied
what version of Indesign are you using? what platform--MAC or PC?
do you have 'bleed' set in the 'document setup' dialog?
do your pages actually bleed?
can you post a screen shot of one of your pages?
can you post a screen shot of your export dialog box-specifically the 'marks and bleeds' section?
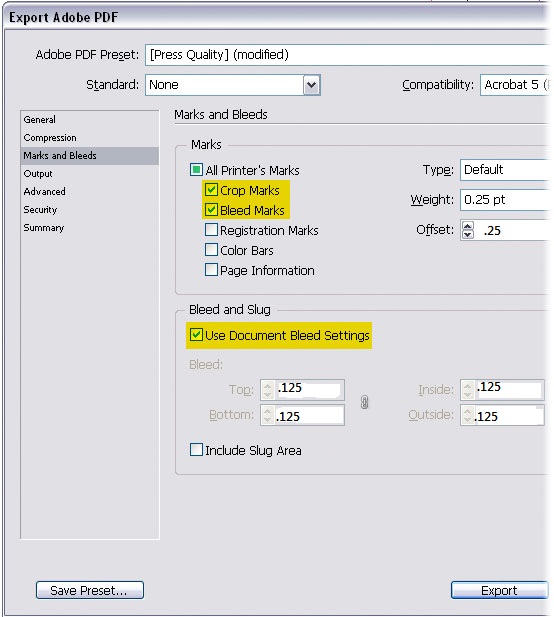
assuming that you have bleed set for the document--the export dialog should look like this


Copy link to clipboard
Copied
Hi!
I am in CS5, Windows 7.
I have the bleed set within the document and the image does extend to the bleed.
IMAGE EXTEND TO BLEED IN DOCUMENT
EXPORT TO PDF MENU
KEEP THE DOC BLEED SETTINGS
No Bleed
Thank you for responding!!! I'm stumped.
Copy link to clipboard
Copied
Not sure what I'm looking at in the last screen shot.
It wouldn't sirprise me though if the printer is confused. You haven't used trim marks, so there won't be any immediate visual indication on the PDF itself that there is a bleed. They would have to find the bleed box using peflight or imposition software, and they may not be going that far. When you hover the mouse in the lower left corner of the PDF, doe the document dimensions that pop up match the page trimmed page size, or the bleed dimensions?
I would export including crop marks, and you should increase the offset on those to push them completely outside the bleed area. ID's default offset impinges into the bleed slightly.
Copy link to clipboard
Copied
Peter... the page size shows as though there were a bleed. It's actually larger than with the .125 bleed I on three sides. Page size is 8.5. Top, bottom, ext bleed = .125", interior=0. Should be 8.625w x 8.75h
Copy link to clipboard
Copied
The larger numbers would be normal if you now have included marks. The page dimension are for the full extent of wahtever is there, and the marks should be outside the bleed.
Copy link to clipboard
Copied
With bleed marks. How can it show bleed marks and have no bleed? I don't understand.
Copy link to clipboard
Copied
In AcrobatPro oder AdobeReader go to: "Preferences…/Categories: PageDisplay/Page Content and Information" and check:
1. Show art, trim & bleed boxes
2. Always show document page size
and set "Use Overprint Preview" to "Always"
This last step is optional, but I would recommend it.
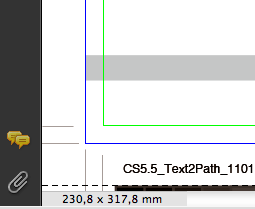
Then do a screenshot of the lower left corner of your pdf shown in Acrobat. Just like the screen shot here (perhaps a bit more to see):

The green box is the TrimBox (the net size of your page), the blue box is the BleedBox (in my case 3 mm apart from the TrimBox).
Grey rectangle is an object on my page that "bleeds" to the left.
The document page size shown here is the size of the CropBox (and the size of the MediaBox which is invisible to the "Crop Pages"-panel in Acrobat Pro (something Adobe should have fixed years ago)).
Uwe
Copy link to clipboard
Copied
LAubender...
I did what you said, and I can see the bleed, but the printer keeps rejecting it.
This is a snip of the bottom of one page, top of another. Bleed is clearly visible.
Why would my printer still be rejecting this?
Copy link to clipboard
Copied
See my post above and look at the difference betweeen your marks and mine relative to the corner of the outside of the bleed. You need CROP marks, not bleed marks, to make this guy happy.
Copy link to clipboard
Copied
@Peter:
You need CROP marks, not bleed marks, to make this guy happy.
With an decent pdf workflow this guy would be happy with a TrimBox that fits.
@TTPub: are you really sure you see the TrimBox (the red rectangle in your screenshot)? Go to the "Crop Pages"-panel in Acrobat Pro and check for that. If that's the case why is this print guy still complaining? You leave me speachless…
Uwe
Copy link to clipboard
Copied
@ Laubender,
With an decent pdf workflow this guy would be happy with a TrimBox that fits.
And do you think he's happy? Or that he has a decent PDF workflow?
Copy link to clipboard
Copied
TTPub wrote:
With bleed marks.
AH HA!
I believe we have identified the problem. Bleed marks indicate the outside of the bleed, and are essentially useless 99.9% of the time. Your printer is confusing these with the missing Crop or Trim marks, which would be set at the line of the edge of the page (set in from the edge of the bleed) and show where to cut:
You get these marks by checking the Crop Marks box (the first one on the list) in the Printer's Marks list in the export dialog. It's OK to also have the bleed marks, but I've never had a printer actually ask for them. Without crop marks, though, they have no way to know where to trim unless they are advanced thinkers and read the job ticket to get the page size, but that can still be a problem if, as in your case, the bleeds are uneven. In their shoes I wouldn't want the responsibility for making that decision, either, and adding the correct marks will make everyone happy, I think.
Copy link to clipboard
Copied
Copy link to clipboard
Copied
I’m sorry, but you’re going to have to do better than saying, “me too.” We need full details from you including screenshots.
Bob
Copy link to clipboard
Copied
PLease post a screen shot od a corner of your Indesign document, and screen shots of the same corner of the PDF, and of the marks and bleeds section of the Export didialog for the settings you are using.
Copy link to clipboard
Copied
Copy link to clipboard
Copied
Your document bleed settings are zero.
Bob
Copy link to clipboard
Copied
That would have been my first guess ![]()
Copy link to clipboard
Copied
![]() How silly, didn't see that! Thanks!
How silly, didn't see that! Thanks!
Copy link to clipboard
Copied
Eugene Tyson wrote:
That would have been my first guess
It wasn't a guess. I cheated and looked at the screen shots. <g>
Bob
Copy link to clipboard
Copied
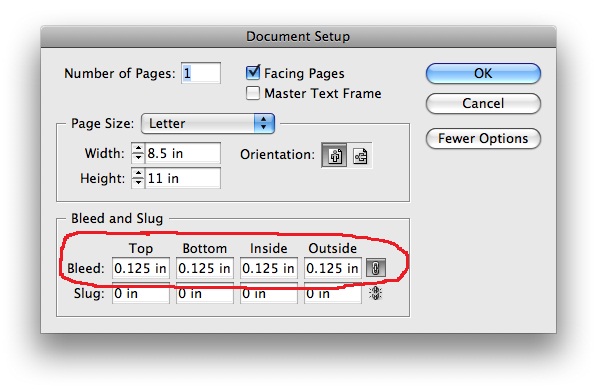
To expand a bit on Bob and Eugene's explanation, to set a document bleed you must go to Document Setup, and if the Bleed and Slug fields are not showing, press the More Options button to reveal them, then enter an amount in the the Bleed fields. This will add an additional guide outside the page for the defined bleed and one for the slug as well, if you define that too. Now when you select Use Document Bleed in the print or Export dialogs, the area between the page edge and the bleed guide will be included.
You don't HAVE to set your bleeds this way, but it's convenient. In cases where there is no set document bleed, or you want to use a different value, instead of Use Document Bleed, uncheck that box and enter values into the fields in the dialog.


