

- Home
- InDesign
- Discussions
- Using 'arrange' to place object behind—can't figur...
- Using 'arrange' to place object behind—can't figur...
Using 'arrange' to place object behind—can't figure it out

Copy link to clipboard
Copied
Hi,
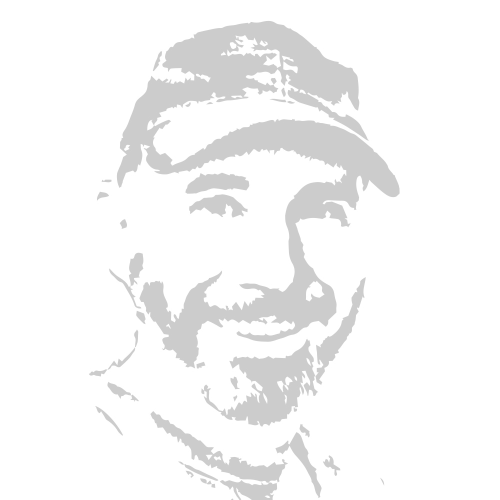
My aim is to place the geometric objective below behind the owl. However, clicking arrange and "send to back" does not seem to do the trick. What am I missing?
thanks!


 21
Replies
21
21
Replies
21
Copy link to clipboard
Copied
I understand your issue but I can't really tell how many elements are in play here. Could your owl image, which is a PNG, have transparency in areas you didn't expect?
Copy link to clipboard
Copied
Hey, thanks for the response! I think you may be on to something: the owl is fully transparent (I made all the whites transparent in photoshop) and so the geometric design may be "shining" through as if it is above.
If this is the case, would you have any advice as to how to better hide the geometric design so it appears to be behind the owl? I am new to Adobe services and so any advice is much appreciated!
thanks again,
- Caleb
Copy link to clipboard
Copied
Thanks mate.
Do you perhaps know Photoshop better than InDesign? If so, is there any reason why you couldn't combine your graphics in Photoshop and then place that completed Photoshop file into InDesign?
Photoshop has far more image manipulation tools compared to InDesign. You could take advantage of masking within Photoshop which would easily allow you to show and hide different parts of your geometric design.
Copy link to clipboard
Copied
Unfortunately not—I'm new to both. I was hoping for a quick fix here, but if you think it's necessary I'll dig into masking and see what I can do! I would just prefer to keep both graphics separate so I can play with them more.

Copy link to clipboard
Copied
If you haven't resolved this isssue of text appearing behind an image, it my be to do with text wrap.
Try: Text > Text Frame Options, tick Ignore Text Wrap.

Copy link to clipboard
Copied
Looking at your layers panel - you've selected the last object in the layer. This is why those options aren't there.
Copy link to clipboard
Copied
Hey, thanks for the response. I took a picture of the geometric figure in the last layer to illustrate my problem: that even though it is underneath everything else, it still appears to be on top of the owl.
Copy link to clipboard
Copied
- If you work with Photoshop, don't use PNG, use PSD as it does fully support all kind of transparency, PNG supports only alpha transparency.
- You should work with layers.
- If you have text warp applied and you want to appear text on an image either ignore text warp at all or apply ignore text warp to the text frame (cmd/ctrl+B)
- For the geomtric drawings use Adobe Illustrator, save as AI or PDF/X-4 and place that in InDesign.
Copy link to clipboard
Copied
Hey, thanks for the reply. I saved my geometric image as an .ai but am still getting the same problem. Would saving my owl as a PSD as opposed to PNG possible solve this problem?
Copy link to clipboard
Copied
There is no reason to use a PNG if you have the PSD file. Use the PSD file. It might not cause your problem, but will often cause other problems.
If you have an AI file, use that or PDF/X-4 saved from Illustrator. It reduces the quality terrible if you use anything else than these file types from Illustrator.
Why do you use PNG anyway?
Copy link to clipboard
Copied
I'm new to the Adobe suite and the tutorial video I watched recommended it. Currently all my images are PNG—hopefully the quality won't be noticeably worse when printing?
Copy link to clipboard
Copied
I'm new to the Adobe suite and the tutorial video I watched recommended it. Currently all my images are PNG—hopefully, the quality won't be noticeably worse when printing?

Copy link to clipboard
Copied
Hi Caleb:
I'm suspecting the blend mode for the owl image is set to Multiply (or similar).
In InDesign, select the owl graphic and then choose Object > Effects > Transparency. What is the Blend mode set to? If anything other than Normal, choose Normal. And what is the opacity value?
If both of these are Normal/100% then check the image in Photoshop. With the owl layer selected in Photoshop, these values appear at the top of the Layers panel.
~Barb
Copy link to clipboard
Copied
Hi Barb,
Thanks for your helpful response! I've checked both programs and both read Normal/100%.
My feeling is the issue lies in how I made the object transparent: I used a YouTube tutorial which has me convert to greyscale, create an Alpha Channel, and then fill a new layer with solid black. This is all new to me, so I was just following instructions without understanding them.
The video is here if it helps: https://www.youtube.com/watch?v=hgIbj1gZ7Kg
Let me know if there is any other information you need and thanks again!
Copy link to clipboard
Copied
Hi Caleb:
I watched the video, but am not clear on your goal. Was it to make the area outside the owl transparent, or make make everything that wasn't black on the owl (inside his body and outside his body) transparent?
Can you show your Photoshop image, with the Layers panel open?
~Barb
Copy link to clipboard
Copied
Hi Barb,
The goal is the latter: to make everything transparent besides the black. Upon reflection, this may be why the geometric design appears to be above the owl even when it is, in fact, below. With this being the case, my goal is to hide the geometric design more fully behind the owl. u/maxwithdax has suggested an option below I may look into!
Below are screenshots of my layers & channels tabs open. Thanks for your help!


Copy link to clipboard
Copied
If you know that is the final resting place of your owl, I would suggest bringing a copy of the background into your PSD. Place it below your owl layer. Then select the area around your owl, Invert that selection and make it a mask for your background layer. Then save your psd. This will create the illution of transparency and allow the geometry to appear behind the owl. The other way you could do it is just to edit the container of the geometry to trace around the owl. There are lots of ways this can all be done once you know exactly where it is going.
Copy link to clipboard
Copied
Thanks for the tip! Part of the problem is I still would like to play with the images before committing. The background is also just a placeholder for the craft paper I plan on printing on.
Copy link to clipboard
Copied
well in that case it sounds like you are looking at a clipping mask as the most viable option. Use this tutorial as a starting point - https://design.tutsplus.com/tutorials/quick-tip-using-a-photoshop-clipping-path-within-indesign--vec...
Copy link to clipboard
Copied
The goal is the latter: to make everything transparent besides the black.
You succeeded! The InDesign layers panel shows that the owl is on top of the geometric design—it's just that you can see through it.
In Photoshop, I would:
- right click the owl > Edit with > Photoshop
- select the owl (use Select and Mask to refine the edge)
- make a new layer
- fill the selection with whatever color/texture you want behind the owl
- drag that layer under the owl
- don't flatten the image in case you need to refine it
~Barb
Copy link to clipboard
Copied
Thanks for staying with me through this! I will try that now 🙂

Find more inspiration, events, and resources on the new Adobe Community
Explore Now
 AdChoices