• Global community
    • Language:
      • Deutsch
      • English
      • Español
      • Français
      • Português
  • 日本語コミュニティ
    Dedicated community for Japanese speakers
  • 한국 커뮤니티
    Dedicated community for Korean speakers
Exit
13

P: Large numbers of brush strokes leads to slowdowns and can cause an image's edits to reset.

Advocate ,
Jul 14, 2022 Jul 14, 2022

Copy link to clipboard

Copied

In Lightroom it is impossible to edit a photo as much as we want or need, using Masking regardless of the hardware you have.


EXPLANATION 

Let's say you want to edit a photo with Masking to your heart's content OR because you need to change many aspect of the photo.

Logic tells you "we have Masking so obviously it's possible to do masking safely and as much as I want"

Reality is that in Lightroom Classic there is an "upper limit" of local edits that we can have on a photo: once we reach that "upper limit" the photo will be be reset.

So in Lr it's not possible to sue Masking as much as we want/need.


Usually if you have lots, lots of edits on an image other editing software struggle and get progressively slower and slower (if one has powerful hardware generally slowdowns don't happen or appear later) but in LR a photo can reach a point where it's no longer editable and it will be reset NO MATTER THE HARDWARE YOU HAVE.


All Masking tools (gradients, spot removal, brush, Ai, et...) contribute to reaching this "upper limit" of local edits BUT Brush is the tool that contributes the most because each strokes is made of countless of dab points that are heavy to process.

Here I have attached a preset for everyone to use.
Apply it on one of your photos that already has Masks and your photo will be reset. (Please be sure to undo, or use another another history step or Snapshot to revert back to your safely edited photo)

This "Reset Bug" is a huge problem/limitation AND as long as it exists we users will never, ever be able to use Masking as much as needed/wanted in Lr.

For the record this issue is not present in Adobe Camera Raw or other non Adobe softwares: it is totally unique to Lr.

As far as I have tested we can have "infinite" number of local edits in ACR...logically with many, many mask ACR becomes progressively slower but there is no photo reset.


Best Practice When Working in ACR and LrC using Masking


If you are doing Masking in ACR and import the photo in LrC (or import settings form disk if the photo is in the LrC catalog) then the photo will either be slower to edit OR be reset in LrC.


If a photo is resetting in LrC then you must go one step back beore the reset after that you can finish editing it in ACR but unfortunately you can't safely open/import that photo in LrC again as the edits will be unusable by LrC


Keep a Virtual Copy in LrC before you edit in ACR or import form ACR.

That Virtual Copy will be always usable in LrC.


Best Practice with Brush Tool


  1. Create a new Brush Mask for every single stroke you do. This way you can delete the stroke(s) that you don't like, redo them better and go back to an editable photo when the reset happens.
  2. I recommend to ONLY use Subtract as and never user Erase Brush that adds dab point but are not visible in the overlay. Subtractions are always visible in the overlay and can be deleted.
  3. If you are working with Brush Density I recommend to ALWAYS keep the same Brush Density in the same Correction and ideally write it in the Correction's name. On the same correction a new brush with different Density will overwrite the previous stokes adding more dab points above the ones created but in the overlay it looks like you did fewer. It you find a that a brush at the current density is not giving you what you want then: create a new correction > use the same settings AND use Brush with a different Density in that correction.

I personally work with very low flow and keep always Density at 100 for all my corrections. When is see that a brush is not enough or too much and is not giving me the result I want I: delete it > create a different Correction with  higher/lower different settings and brush there but the Density is always at 100.
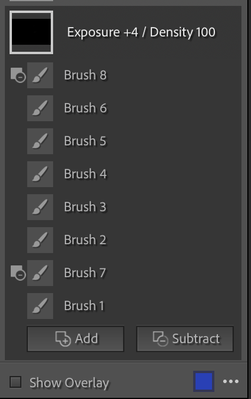
 

Correction Stucture.pngCorrections with Differet Density.png


P.S.
I was the first to discover and report this back in 2017 in this thread. (The username is different but it's me)
I bring it back as a full fledged Bug Report upon request of the Adobe team so please moderators do not merge this with existing Bug reports as this needs to be traceable as a standalone.


Bug Investigating
TOPICS
macOS , Windows

Views

5.0K

Translate

Translate

Report

Report
Community guidelines
Be kind and respectful, give credit to the original source of content, and search for duplicates before posting. Learn more
community guidelines

correct answers 1 Correct answer

Adobe Employee , Jul 14, 2022 Jul 14, 2022

setting status to Investigating

Status Investigating

Votes

Translate

Translate
replies 123 Replies 123
123 Comments
Community Expert ,
Dec 03, 2017 Dec 03, 2017

Copy link to clipboard

Copied

How do you prove the are the same ones, not copies of the files? If you apply a rating to an image in LR, then save metadata to the file, what is the rating in Bridge?

What you have described does not make sense and doesn't happen in general. You will be doing something or not noticing an important detail.

Votes

Translate

Translate

Report

Report
LEGEND ,
Dec 03, 2017 Dec 03, 2017

Copy link to clipboard

Copied

Can you PLEASE post one of you images to a Dropbox public folder, area, so we can use one of your images.

If you don't want to share one of your work images take some shots around your house and post one of those.

Since you seem to be the only one that is having this problem it must be something to do with either your settings, your system, or the install of either LR or Bridge/ACR.

Where is your Bridge and ACR cache settings set to? Is it on a drive/folder that is writable?

If you take a few images, Copy them to your HD into a separate folder, import them to LR (use/start a New Catalog), then open bridge and edit one or more with ACR , making sure that ACR is set to Save settings to > Sidecar XMP file and then go into LR and Import settings from Disk. To see what you get.

Votes

Translate

Translate

Report

Report
Explorer ,
Dec 03, 2017 Dec 03, 2017

Copy link to clipboard

Copied

It's the same files.

No doubt about it.

Melissa (the Adobe employee that replied above) experienced the issue first hand and could not pinpoint a cause.

We really tried everything we could think of.

Votes

Translate

Translate

Report

Report
LEGEND ,
Dec 03, 2017 Dec 03, 2017

Copy link to clipboard

Copied

C.Cell  wrote

It's the same files.

No doubt about it.

Melissa (the Adobe employee that replied above) experienced the issue first hand and could not pinpoint a cause.

We really tried everything we could think of.

Is it ALL files or just some. From which camera, make and model.

Votes

Translate

Translate

Report

Report
Explorer ,
Dec 03, 2017 Dec 03, 2017

Copy link to clipboard

Copied

And it is not my system or my settings.

I opened a new Catalog, on a Mac (I have PC), first time LR was ever installed on that Mac.

I imported the photos, tried to edit them and LR rests them.

It happened to Adobe on their own machines as well so it's not just me.

Bridge is safe, bridge has zero problems with my files.

It's only LR.

Votes

Translate

Translate

Report

Report
LEGEND ,
Dec 03, 2017 Dec 03, 2017

Copy link to clipboard

Copied

If you edit a file in LR and then open Bridge do you see this icon in the upper right hand corner of the image in the film strip area.

Edit icons.PNG

Votes

Translate

Translate

Report

Report
Explorer ,
Dec 03, 2017 Dec 03, 2017

Copy link to clipboard

Copied

Yes I see in beige that edits have been done.

I am about to send you guys a link to a photo.

Votes

Translate

Translate

Report

Report
Explorer ,
Dec 03, 2017 Dec 03, 2017

Copy link to clipboard

Copied

Link to photo WeTransfer: WeTransfer

The photo is nothing, random one I took for fun BUT adjustments are the thing that matter.

They belong to another photo.

TEST:

In LR.

Import and then go into the brush panel.

Edit/select the first pin on top.

Add random brush stokes on the image, keep the mask/overlay active so you can see them as you do them, add as many as you can.

Can you guys add, let's say, 50 more brush stokes or it resets to zero?!

(carefully look at the history and when each brush stoke is registered there)

Votes

Translate

Translate

Report

Report
LEGEND ,
Dec 03, 2017 Dec 03, 2017

Copy link to clipboard

Copied

I don't know if it is all the brush strokes you have done or what but that image nearly locks up my system.

First image is after I made some more brush strokes in ACR and then read those edits in LR using the icon I showed in a previous post and Import setting from disk. My edits are outlined in red rectangles. I also show the history panel section showing I Read Metadata from disk.

From ACR to LR.PNG

Second image is deleting all your brush strokes in Bridge then again Reading/Importing settings from Disk in LR.

Import Settings From Disk 1.PNG

And the third is showing the brush stroke panel after those settings were imported from disk.

Delete Brush Strokes.png

This is on a Windows 7 Pro system with an older i7 CPU overclocked to 3.4 and 16GBs of RAM. All the latest version of LR, Bridge and ACR.

So I am not seeing what you are describing. It works properly on my system.

Votes

Translate

Translate

Report

Report
Explorer ,
Dec 03, 2017 Dec 03, 2017

Copy link to clipboard

Copied

@ Just Shoot Me

How many brush strokes can you add in LR?

Can you add 50 single new brush stokes or not?

Votes

Translate

Translate

Report

Report
LEGEND ,
Dec 03, 2017 Dec 03, 2017

Copy link to clipboard

Copied

This is what I get with only a few brush strokes.

Image changed.PNG

Is this the original color of this image?

Once it goes to this color all other adjustments are back to the default settings.

It is my opinion something is wrong with the image to begin with. Like I said in a previous post this image nearly locks up my system. While applying brush strokes my screen went all white, partially white (at the top) and random other things.

Votes

Translate

Translate

Report

Report
Explorer ,
Dec 03, 2017 Dec 03, 2017

Copy link to clipboard

Copied

Exactly you have experienced my issue, that's the original image/color not edited.

AFTER FEW BRUSH STOKES in LR all the edits are lost, the image is reset to zero

That is not even the original image to which the issue appeared first.

If you copy the original adjustments I had to one of your own images then add brush stokes it will affect your own images as well.

In ACR the issue does not appear as you could work on the photo so it's only LR.

You have performance issues but I tested the photo on a Mac and on my PC with zero performance issues.

Not your fault, it's more a general problem with LR

that many have encountered: On Lightroom Performance | Adobe Blog

Votes

Translate

Translate

Report

Report
LEGEND ,
Dec 03, 2017 Dec 03, 2017

Copy link to clipboard

Copied

Looking at the XMP that was uploaded, there are 283 "Dabs" containing a total of 521500 d and 345052 f elements so I'm sure it's just running out of memory internally and the XMP data is becoming corrupted so it is cleared.  If ACR can handle it ok then there is hope LR can be programmed to work correctly as well.

Votes

Translate

Translate

Report

Report
Explorer ,
Dec 03, 2017 Dec 03, 2017

Copy link to clipboard

Copied

I am not an expert in that, can you explain?

What are "dabs" "d" "f"?

What does the number next to them mean?

Consider this: in another photo I did many more adjustments and nothing happened.

And yes in ACR I don't have problems.

I was told by Adobe to try Lightroom CC because many bugs have been fixed there.

If I can work my photos in another app, be ACR or LR CC, but I loose everything once I look at the photo via LR Classic CC then what's the point.

Votes

Translate

Translate

Report

Report
LEGEND ,
Dec 03, 2017 Dec 03, 2017

Copy link to clipboard

Copied

In general English usage, the term "dab" is used for the motion of someone touching a paint-brush tip to a painting surface like canvas or paper and then bringing it back off the canvas or paper, to add a dot of paint.  There can be some motion but it is shorter than a stroke that is longer.  Since brushing was initially just spotting without a drag component I would guess Dabs is used to describe both a point and a drag where multiple ds and fs in a set are a drag whereas a single d within a Dabs element is a single spot.

I don't know what "d" and "f" mean but something about the individual movements and perhaps pen-force within a brush stroke.

Are you using a touch-screen, tablet/stylus, or mouse as your brush-stroke device?

Votes

Translate

Translate

Report

Report
Explorer ,
Dec 03, 2017 Dec 03, 2017

Copy link to clipboard

Copied

Ok a bit more clear but I still don't understand what is causing the problem.

In ACR I can continue working, the edits can be saved on the XMP and read by ACR...it's just LR that has problems.

I have retouched/worked countless of photos in LR and nothing ever happened.

Anyway I use Wacom tablet for the local adjustments retouch/brush.

Votes

Translate

Translate

Report

Report
LEGEND ,
Dec 03, 2017 Dec 03, 2017

Copy link to clipboard

Copied

My guess is that LR is running out of resources with the abundance of brushing activity, unless the same situation happens without any brushing.

If you're using a tablet maybe "d" is "dab" or "direction" and "f" is "force" or "flow".  It doesn't really matter what they mean, just that brushing requires storing and interpreting significant amounts of data and it's more than LR can handle, apparently.  You're not using up all 16GB of memory on your computer so obviously there is a much smaller resource that's being exhausted than raw memory.  I can't really guess what it might be, but Adobe programmers can investigate and determine what it is, I'm sure, now that they have your image and XMP.

LR CC/7 is supposed to be faster so they likely reworked quite a bit to speed things up and some of that reworked code is not perfect.  It could also be that LR and ACR are using the exact same code, but LR is using more resources for other aspects of itself so it runs out of resources sooner than ACR.

Do things work differently if you turn OFF (or ON) the Use Graphics Processor in LR / Prefs / Performance?

Votes

Translate

Translate

Report

Report
Explorer ,
Dec 03, 2017 Dec 03, 2017

Copy link to clipboard

Copied

Before I didn't even have a supported GPU. ( I bought a new PC because I was told by Adobe that my hardware was the problem)

Now that I have a way more powerful PC with a supported GPU it's the same: the issue is still there.

Turning on/off Graphic Processor doesn't change much, if anything.

I see some gains but really having better hardware with LR didn't bring the improvements expected.

The biggest gain is when I turn off "Automatically write changes to XMP".

That makes thing faster for sure during development (I turn it on again after having finished develop)

LCC Classic is faster, it is definitely better and I saw the difference BUT the performance issues appear again just like before.

If the issue is not due to lack of RAM or GPU then I really don't know what to do on my side to fix it.

Votes

Translate

Translate

Report

Report
LEGEND ,
Dec 03, 2017 Dec 03, 2017

Copy link to clipboard

Copied

I'll ask again.

Is this with every image or just a select few?

Votes

Translate

Translate

Report

Report
Explorer ,
Dec 03, 2017 Dec 03, 2017

Copy link to clipboard

Copied

I don't have an answer.

If it is a problem in those very files, because they are corrupted and whatnot, then Adobe should tell me.

if it is a problem in LR Adobe should tell me.

It's not an isolate case as I can replicate the issue on any photo just by copying the settings.

Votes

Translate

Translate

Report

Report
New Here ,
Feb 09, 2021 Feb 09, 2021

Copy link to clipboard

Copied

Hi!


After i use a brunsh and release the muse/pen pressure ALL of my edits on that photo resets!

Does anyone have the same problem and know how to fix it?


I use the following:

Lightroom Classic: V.10.11

Mac bookpro: macOS Big Sur 11.2

Wacomtablet: 6.3.41-2

Votes

Translate

Translate

Report

Report
Community Expert ,
Feb 09, 2021 Feb 09, 2021

Copy link to clipboard

Copied

In the first step i would reset the lightroom prefrences to the default settings

https://www.lightroomqueen.com/how-do-i-reset-lightrooms-preferences/


The next ste should be the deactivation of the GPU support

Go to Lightroom > Preferences > Performance tab > Uncheck "Use Graphics Processor" > Restart Lightroom. 

https://helpx.adobe.com/lightroom-classic/kb/lightroom-gpu-faq.html#troubleshooting 

https://helpx.adobe.com/lightroom-classic/kb/troubleshoot-gpu.html 


You should also installed the latest update of the Wacom driver (6.3.42-1)

https://www.wacom.com/en-de/support/product-support/drivers


My System: Intel i7-8700K - 64GB RAM - NVidia Geforce RTX 3060 - Windows 11 Pro 23H2 -- LR-Classic 14 - Photoshop 26 - Nik Collection 7 - PureRAW 4 - Topaz PhotoAI 3

Votes

Translate

Translate

Report

Report
LEGEND ,
Feb 09, 2021 Feb 09, 2021

Copy link to clipboard

Copied

There has been a report of this if you have LOTS of brush strokes.  How many edits do you have?

Votes

Translate

Translate

Report

Report
New Here ,
Feb 09, 2021 Feb 09, 2021

Copy link to clipboard

Copied

Thanks Axel for your tips and links. I will give them a try! 

Votes

Translate

Translate

Report

Report
New Here ,
Feb 09, 2021 Feb 09, 2021

Copy link to clipboard

Copied

Hi Bob,


Its between 3-4 brushes. But can be over large areas, if that can have an impact?

Votes

Translate

Translate

Report

Report