

- Home
- Lightroom Classic
- Discussions
- Re: Green noise in deep shadows.
- Re: Green noise in deep shadows.

Copy link to clipboard
Copied
I'm using Lightroom Classic CC to edit Panasonic RW2 RAW files and always do my best to ETTR (Expose To The Right).But on a very few occasions my camera still under exposes and when I boost the shadows I'm left with very obvious green noise.I know I can (and do) remove it manually with the adjustment brush.Is there a way to do it automatically without having to use the brush for the rare times I need it now?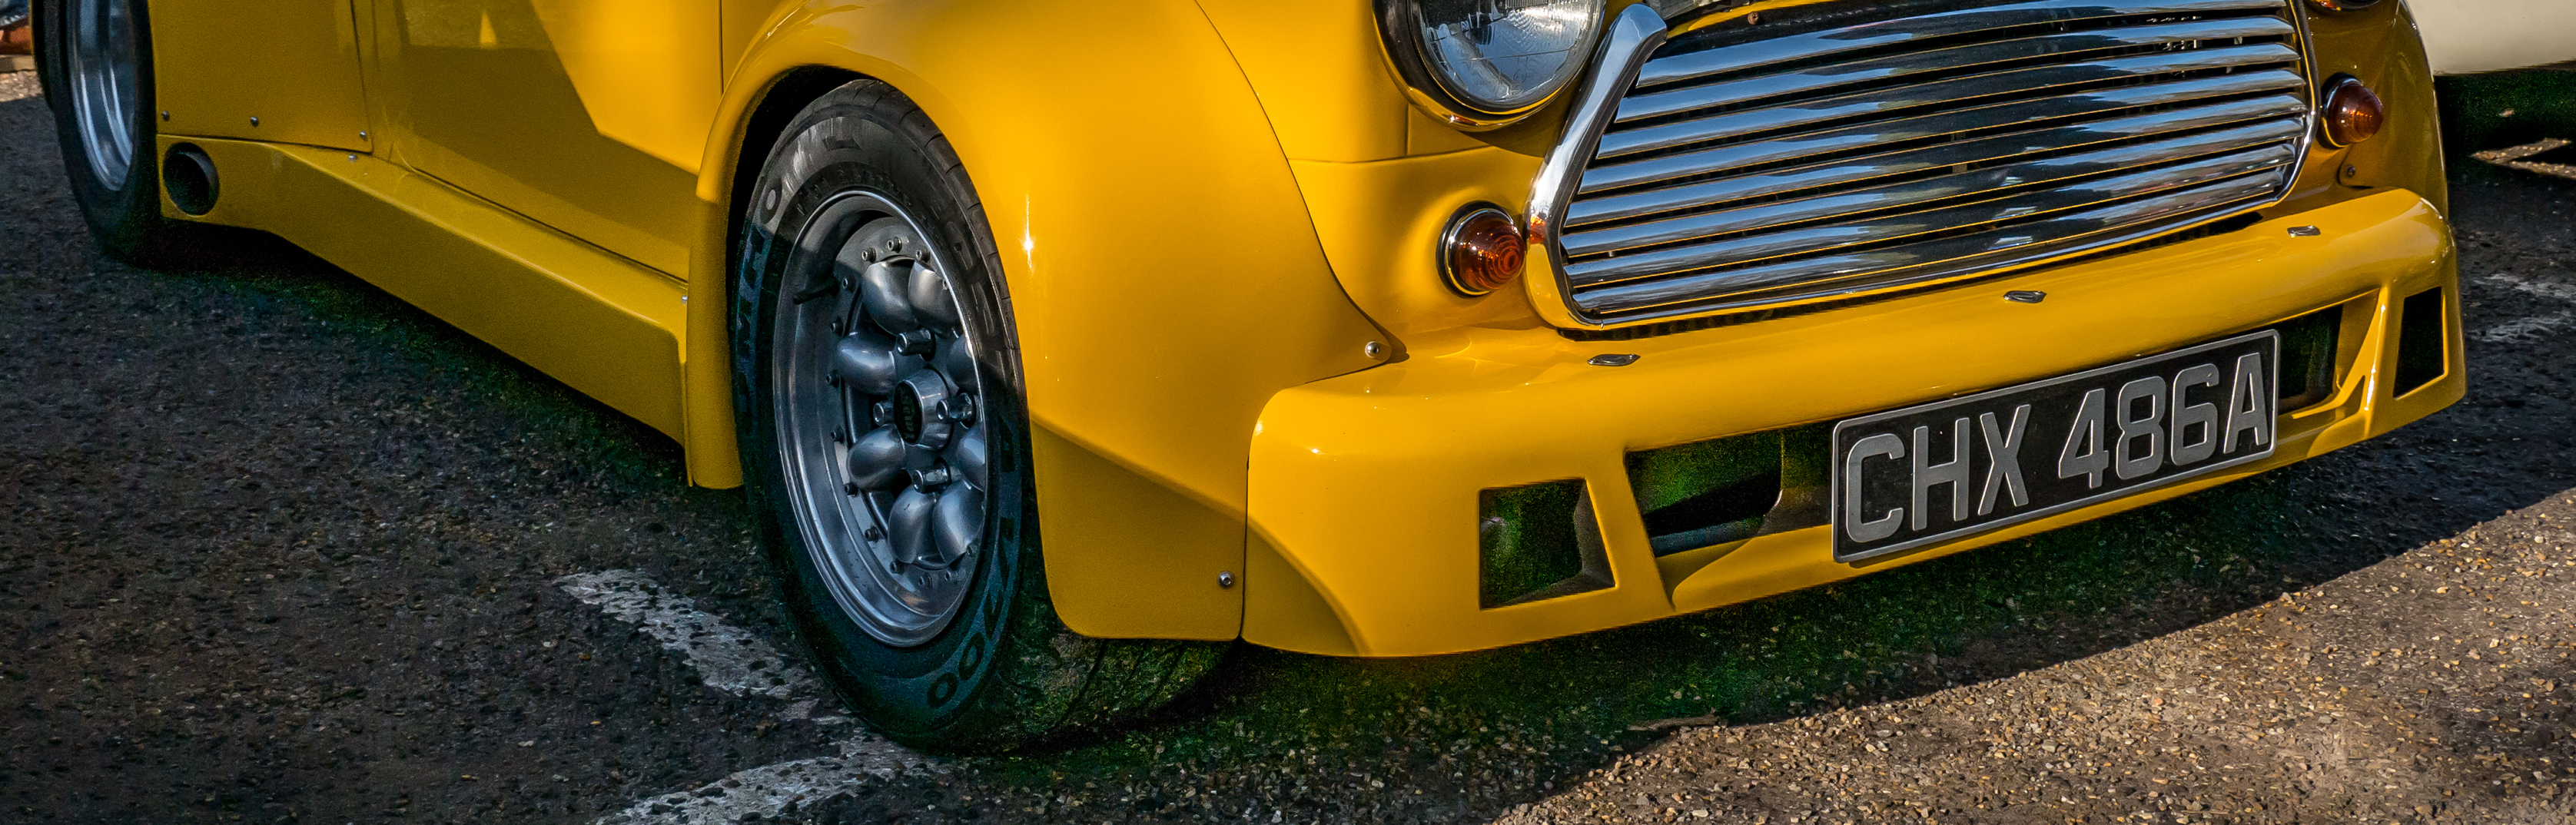


 1 Correct answer

The reason you have green in the dark areas is because to shadows are extremely clipped. Apparently most of the red and blue channels are missing so only the green is left. Most of this is not noise.
clipped areas
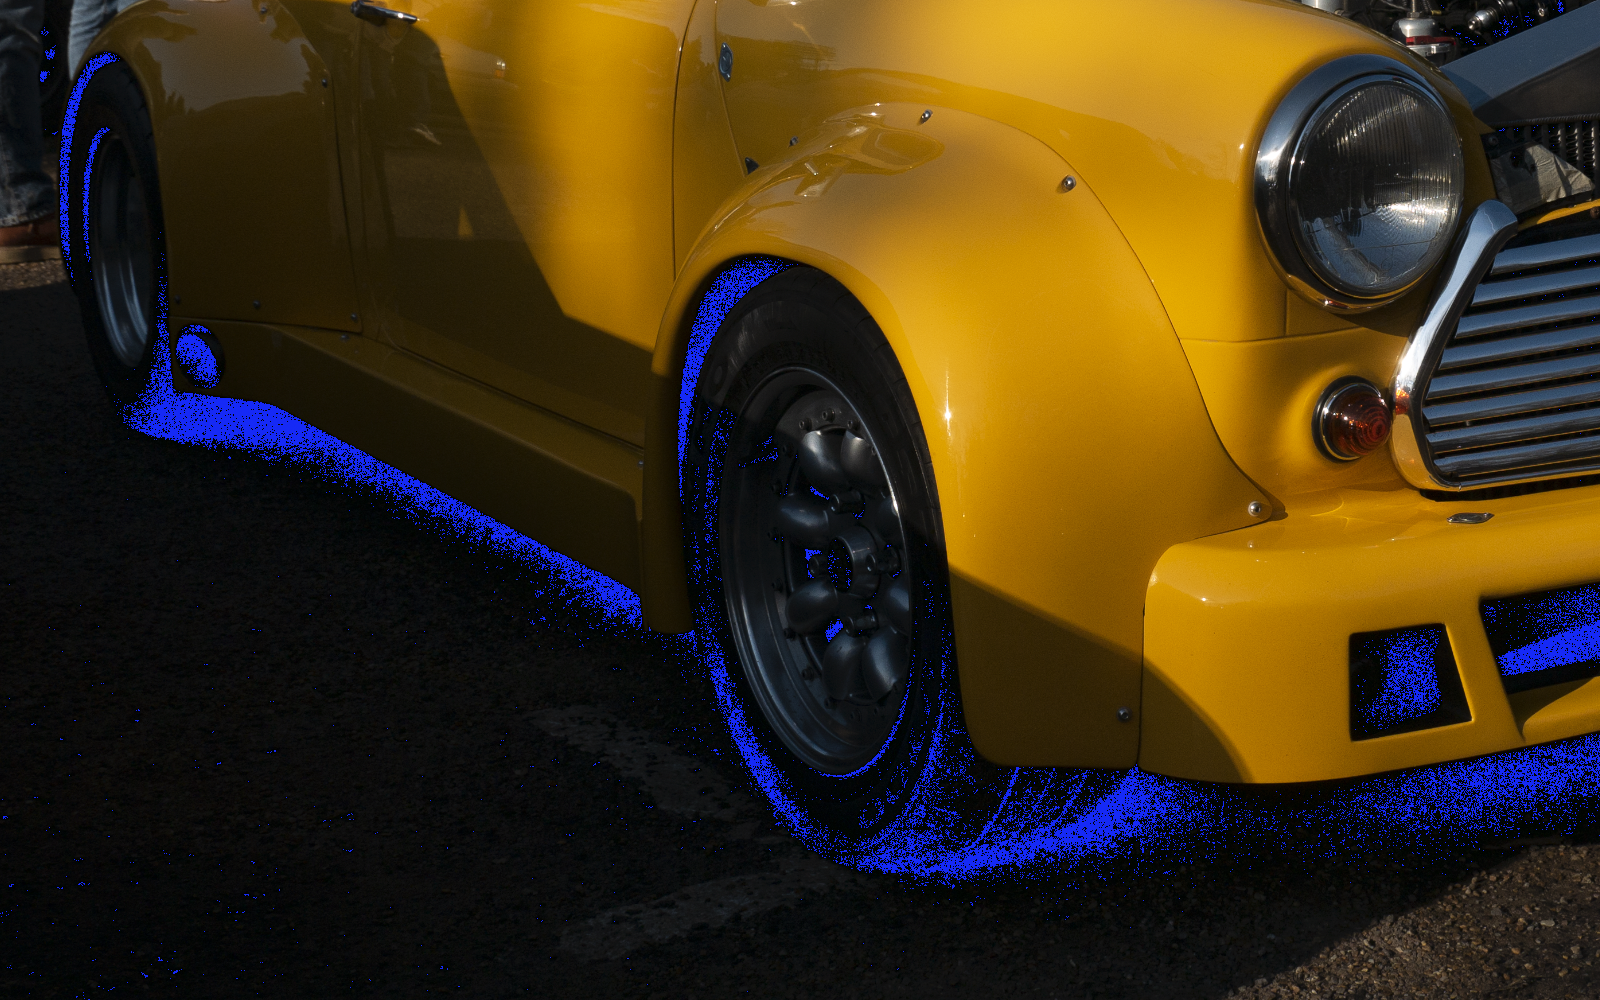
Histogram shows severe clipping.
 65
Replies
65
65
Replies
65

Copy link to clipboard
Copied
Have you tried using the Color Noise Reduction controls?
Copy link to clipboard
Copied
Yes I have and it doesn't make any difference.
Here is the original.......
https://www.dropbox.com/s/txm9ii8vk802boq/P1070919.RW2?dl=0http://
Copy link to clipboard
Copied
The reason you have green in the dark areas is because to shadows are extremely clipped. Apparently most of the red and blue channels are missing so only the green is left. Most of this is not noise.
clipped areas
Histogram shows severe clipping.
Copy link to clipboard
Copied
Thanks.I know what causes it,this is on the rare occasions the camera messes up the exposure and I have to try and rescue detail from the shadows.I just need to know if there's a quicker way than using the adjustment brush please.

Copy link to clipboard
Copied
My own position on things like this, is to always exhaust all global adjustments first, before starting on local. Surprisingly often no local adjustments are necessary after all (or very few).
So here I'd work with the blacks slider and the shadows slider first, perhaps curves if it's really tricky - and split toning to correct any shadow color cast. But I'm sure it should be possible to avoid this clipping without going into local adjustments.
Incidentally, there was another recent discussion on black clipping and whether it should be avoided. The conclusion was that it depends - but IMO this is a case where it should definitely be avoided.

Copy link to clipboard
Copied
https://forums.adobe.com/people/D+Fosse wrote
My own position on things like this, is to always exhaust all global adjustments first, before starting on local. Surprisingly often no local adjustments are necessary after all (or very few).
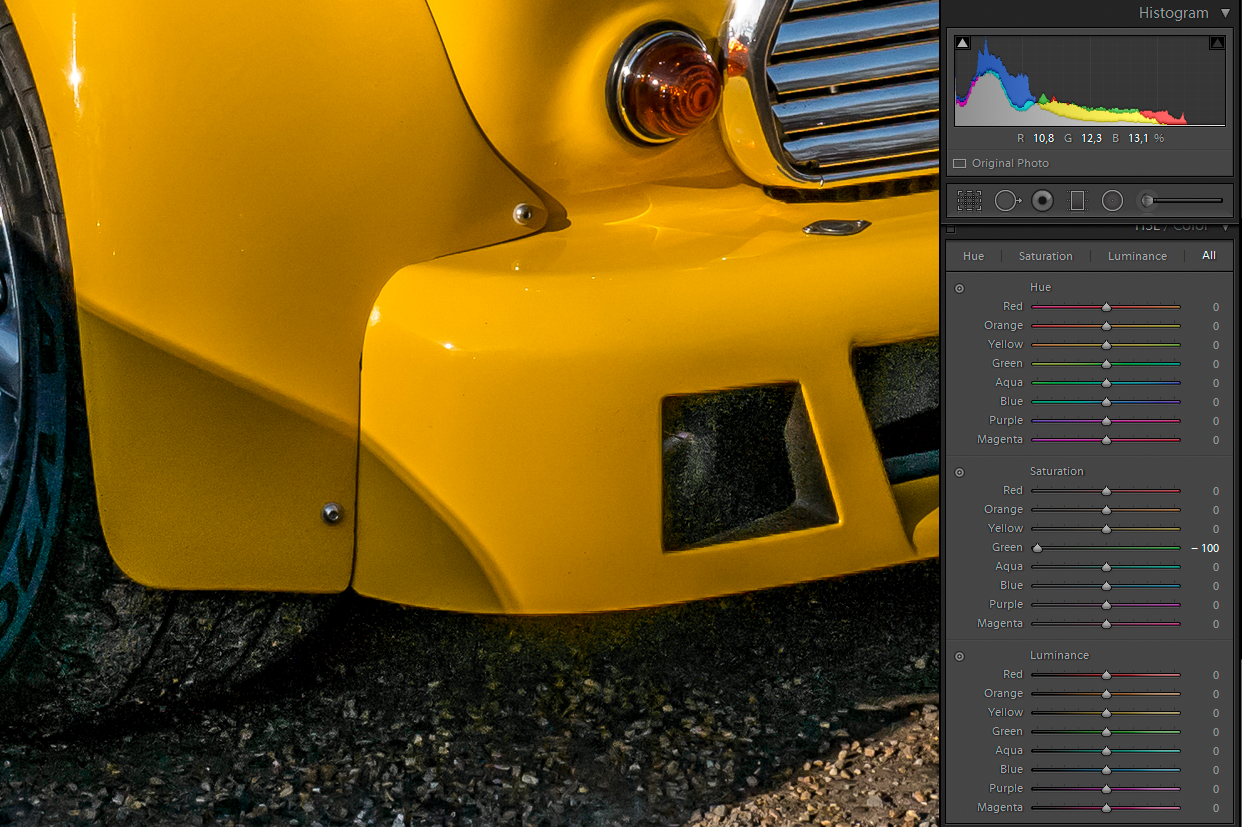
Reducing green saturation in the HSL panel worked well for this image, but could be problematic if there were other greens in the image.
Another possibility is to use an adjustment brush with a negative saturation setting.

Copy link to clipboard
Copied
For enhancements to small parts of the photo, the adjustment brush is the correct tool.
Keep in mind that when you have that much black clipping, there usually is no detail there to be recovered. Same with the white clipping.
Copy link to clipboard
Copied
ManiacJoe wrote
Keep in mind that when you have that much black clipping, there usually is no detail there to be recovered. Same with the white clipping.
In raw files, blacks are very rarely hard clipped. It's more like a soft taper - there's usually something there. Blown out highlights are gone, but murky shadows can usually be dug out and recovered.
It's different with RGB files, where both clipping points are final.
Copy link to clipboard
Copied
Imagewerx wrote
I'm using Lightroom Classic CC to edit Panasonic RW2 RAW files and always do my best to ETTR (Expose To The Right). But on a very few occasions my camera still under exposes and when I boost the shadows I'm left with very obvious green noise.
That may very well be the problem–How are you judging the exposure and correcting it?
Looking at the P1070919.RW2 file with ExifTool you have the camera's Exposure Compensation set to -.66 EV or -2/3 Stop. This is actually just the opposite (ETTL) and will increase noise. I suggest setting it to +0.33 and leaving it there, which will get you a lot closer to ETTR.

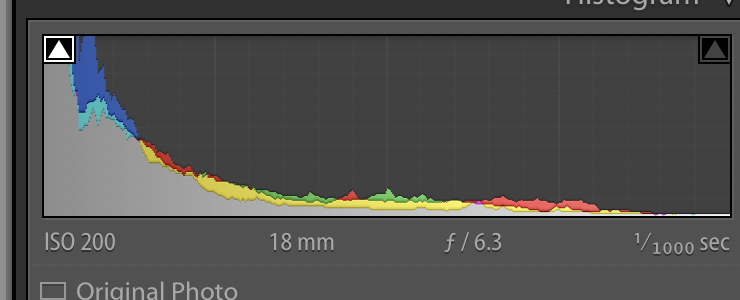
So how bad is the exposure in this raw file? The majority of the image data is clumped at ~500 out of 4096 maximum level, which is about level -3.0 EV. The shadows are obviously at even a lower level and down in the noise.
RawDigger Histogram Showing Actual Raw Data
(It's not possible to see the actual camera raw data using the LR Histogram!)

SOLUTION
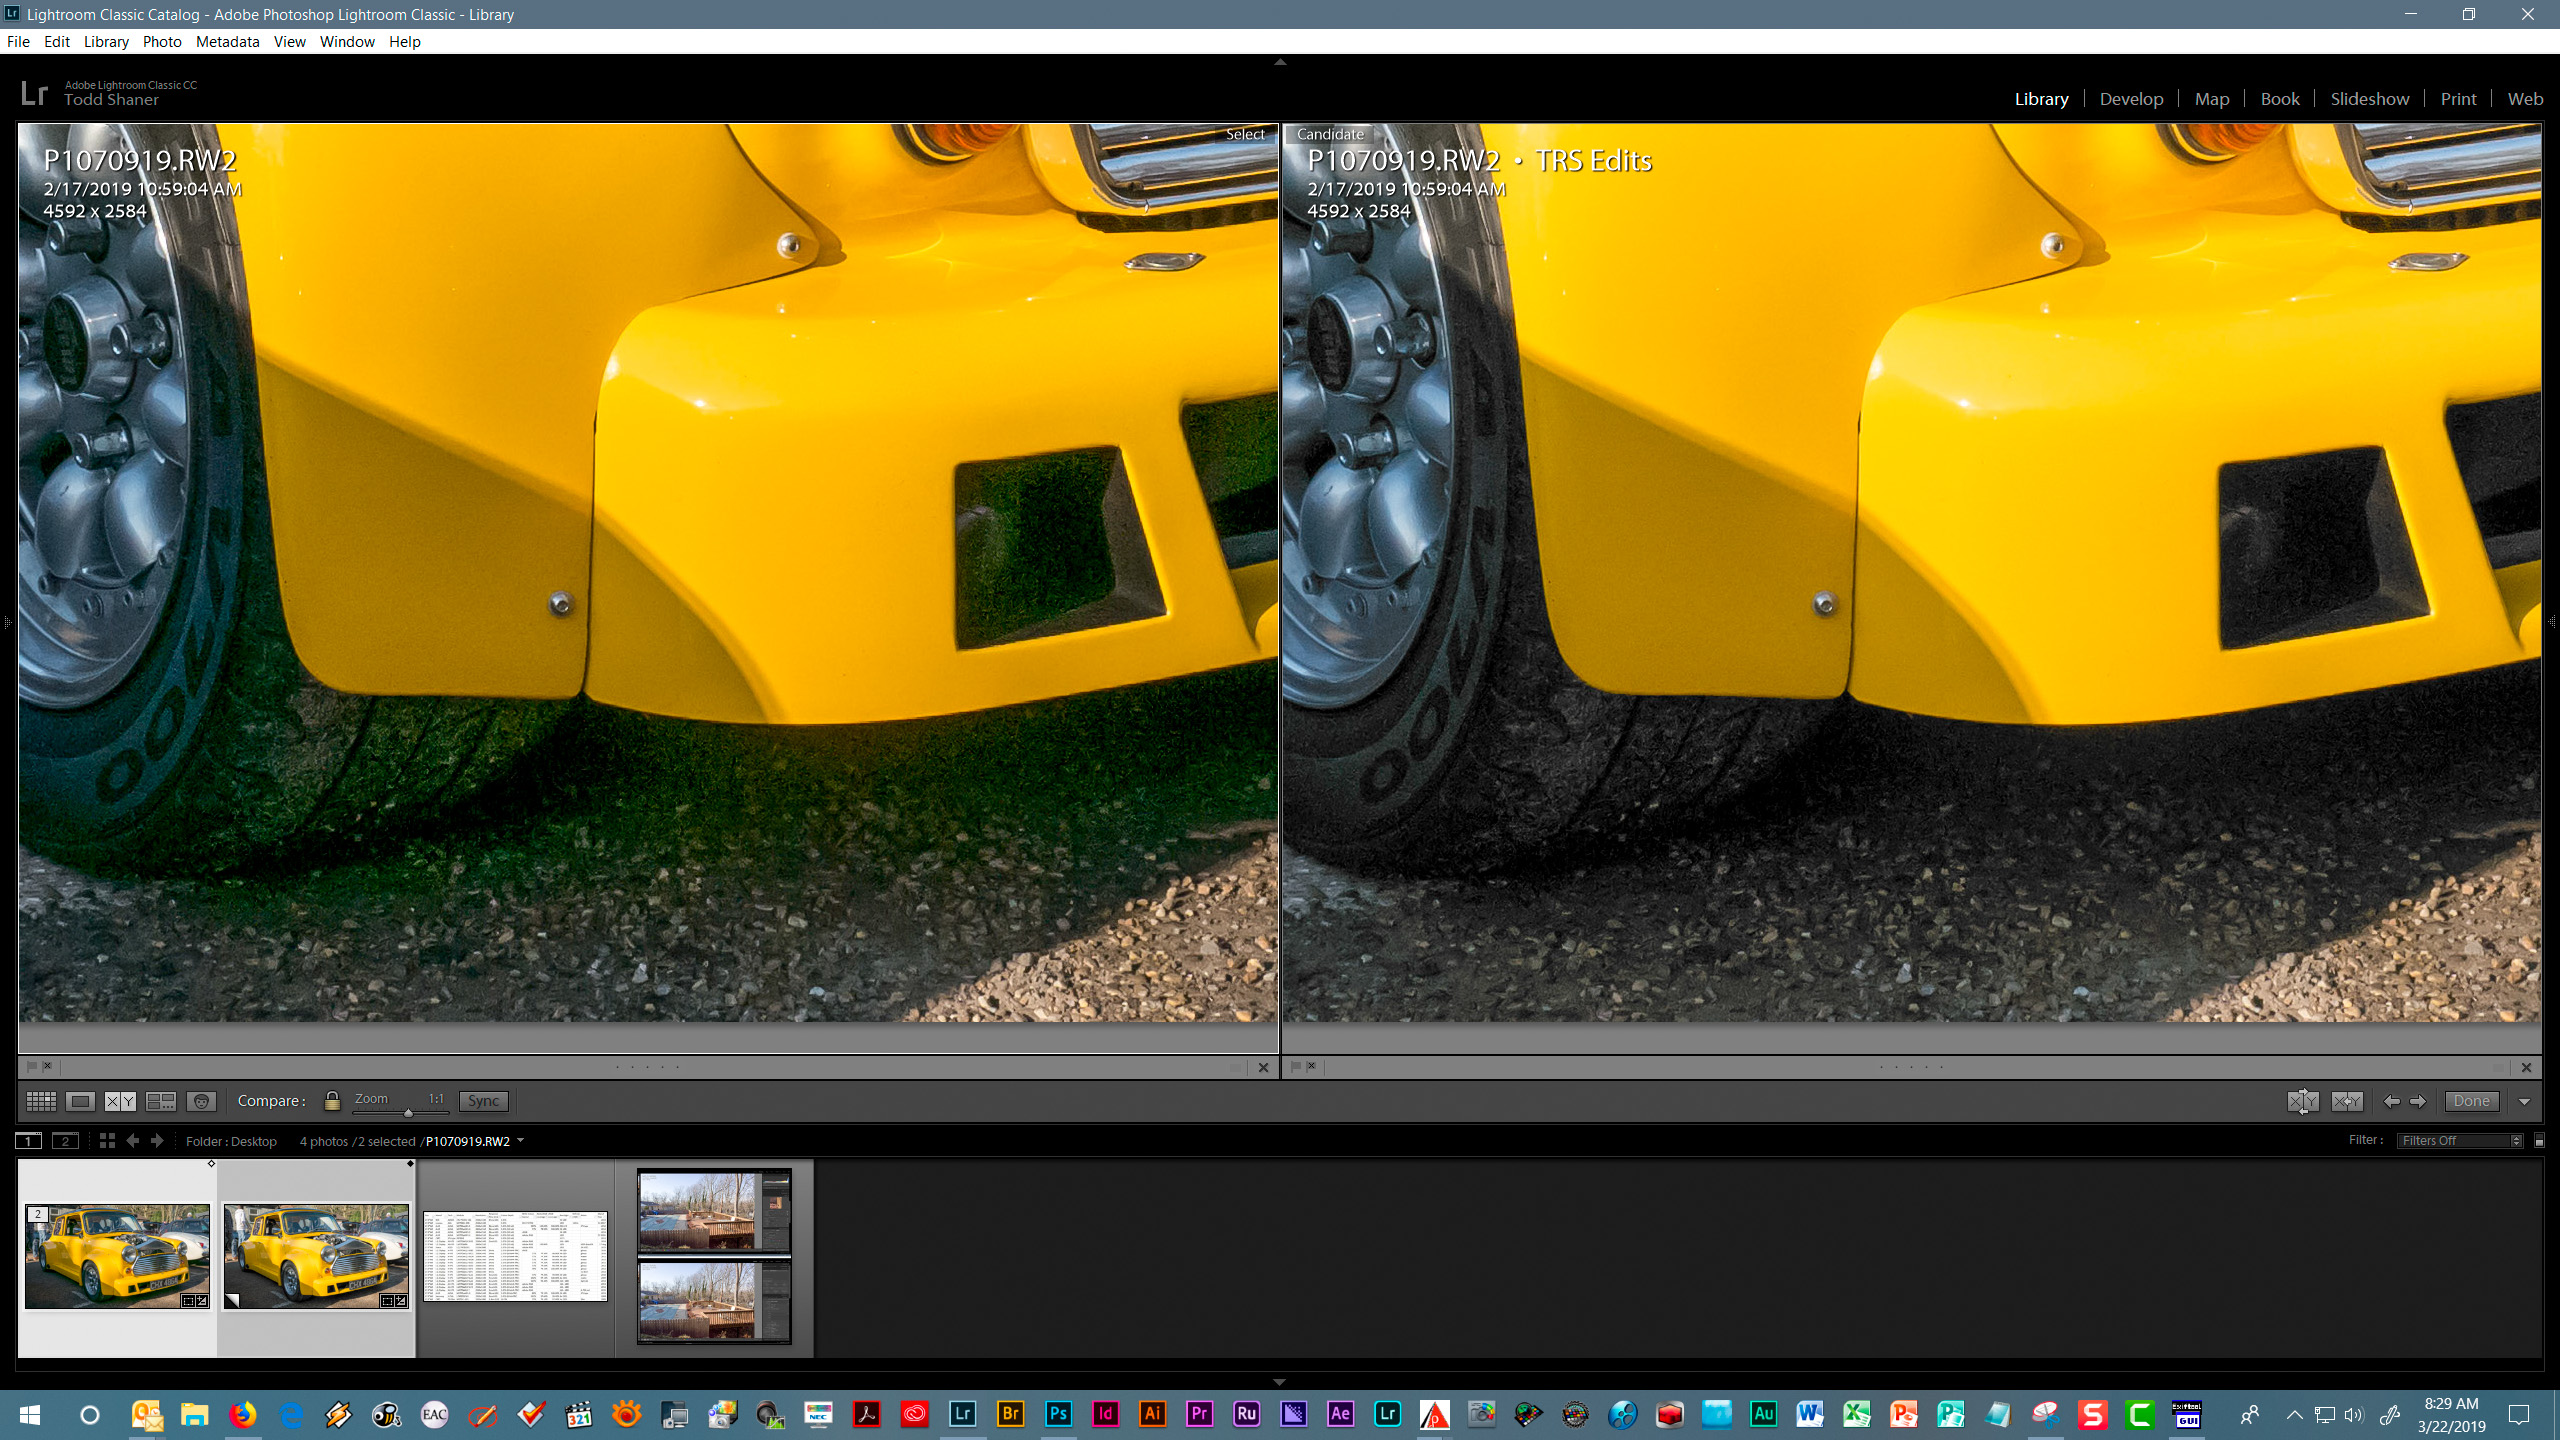
What can we do to salvage this and similar underexposed raw files? Some suggestions have already been given, but I'll add one more that appears to work quite well using the Color Range Mask control
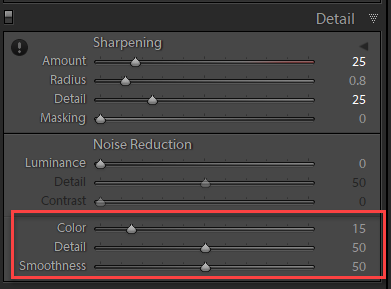
1) Adjust the Detail panel settings to reduce the Luminance and Color noise (see my settings below).
2) Add a Graduated Filter that is dragged off the image so it applies settings to the whole image, which is very quick and simple!
3) In the Graduated Filter panel set Saturation to -100.
4) Next select the Color Range Mask and use the eyedropper with 'left-click and drag' to sample an area that is noisy. I used the right side air intake as shown below and then adjusted the Amount control to 0, which restricts the -100 Saturation to the shadow areas.
5) If you see any areas of the image that have become unsaturated you can use the Graduated Filter Brush tool with the ALT key to remove the desaturation. However, it does not appear necessary with this image file using the above settings.
6) You can create a Develop Preset with just 'Graduated Filter' and 'Noise Reduction' checked. for applying it to other underexposed image files with similar green noise.

Copy link to clipboard
Copied
As Todd has shown, the big issue is the image is massively under exposed. The raw Histogram which we desperately need in LR/ACR show this and that's why there's noise. Nothing LR can do to overcome this, just 'mask/hide' it. So you really need a better tool to gauge actual exposure which ONLY takes place at capture, never after. I suggest:
https://www.fastrawviewer.com/blog/spot-meter-exposure
https://www.rawdigger.com/howtouse/exposure-for-raw-or-for-jpegs
http://digitaldog.net/files/ExposeForRaw.pdf
Copy link to clipboard
Copied
Ok thanks everyone,I will have a proper read through all the answers when I get time.
I should have said earlier that I chose that particular image as it was the worst of all of them,and back then (ok it was only a month ago!) I was purposely under exposing by the same amount because I was worried about losing the highlights.It seems this wasn't needed so I've gone the other way for now to see how that works out.
Copy link to clipboard
Copied
You don't under expose to avoid highlight clipping. The very idea of optimal exposure is not to clip what you don't wish to clip by targeting the raw exposure. To do so you need to evaluate the raw data initially.
Copy link to clipboard
Copied
Imagewerx wrote
Still under exposed (see stats) and Histogram. 
Copy link to clipboard
Copied
I'm sorry but I have no idea what I'm looking at above.Can you explain what I'm seeing please?
Copy link to clipboard
Copied
Imagewerx wrote
I'm sorry but I have no idea what I'm looking at above.Can you explain what I'm seeing please?
Both Todd and I have provided a raw Histogram. Both show under exposure but my screen capture is even easier to decipher if you're not good with Histograms; look at the stat's outlined in red upper right. You have zero pixels clipping; not even the specular highlights on the car's chrome or the headlights and worse, you have channels that show under exposure. So you're raw in both cases is under exposed. That's why you've introduced noise into the capture.
Copy link to clipboard
Copied
thedigitaldog wrote
Imagewerx wrote
Still under exposed (see stats) and Histogram.
Andrew that's not what I'm seeing using RawDigger with its default settings for Over and Under Exposure as shown below. The P1080230.RW2 file is actually slightly overexposed (7.7% Green/Green2) with very few underexposed pixels (1.0% or less). The white car in the background and pebbles have clipped highlights. The chrome and glass reflections are also clipped, which is OK since they are very bright and have no detail.


Two things are different with this image, 1) Exposure Compensation is set to +0.66 EV and 2) the primary central subject is dark green versus bright yellow. This will cause the camera to inflate the Exposure setting beyond just the camera's +0.66EV Exposure Compensation setting. You need to compensate for this when shooting. Andrew Rodney's links provide some good articles on ways to accomplish this objective.
I'm guessing the best ETTR setting for this image would be ~0.0 to 0.33 Exposure compensation so your camera's metering is pretty accurate. That's why I suggested using a +0.33 EV Exposure Compensation setting and leaving it that way in the camera! You can download a FREE RawDigger trial and run some tests with bracketed exposures to see what compensation works best with different subjects. https://www.rawdigger.com/download

Copy link to clipboard
Copied
My bad, I didn't have the auto-off set for 0.00 EV from last use. But I'm getting slightly different reporting than you, maybe a different version OS (I'm on Mac):

Edit, I have Sensitivity set for Full Well Limited camera not 1%, so that's why there's a slight difference.
Copy link to clipboard
Copied
thedigitaldog wrote
Edit, I have Sensitivity set for Full Well Limited camera not 1%, so that's why there's a slight difference.
Yes, I get the same readings with 'Full Well Limited Camera' Preferences setting, which is probably more accurate. I used 'Restore Defaults' just to be sure there wasn't some other custom settings being applied.

Copy link to clipboard
Copied
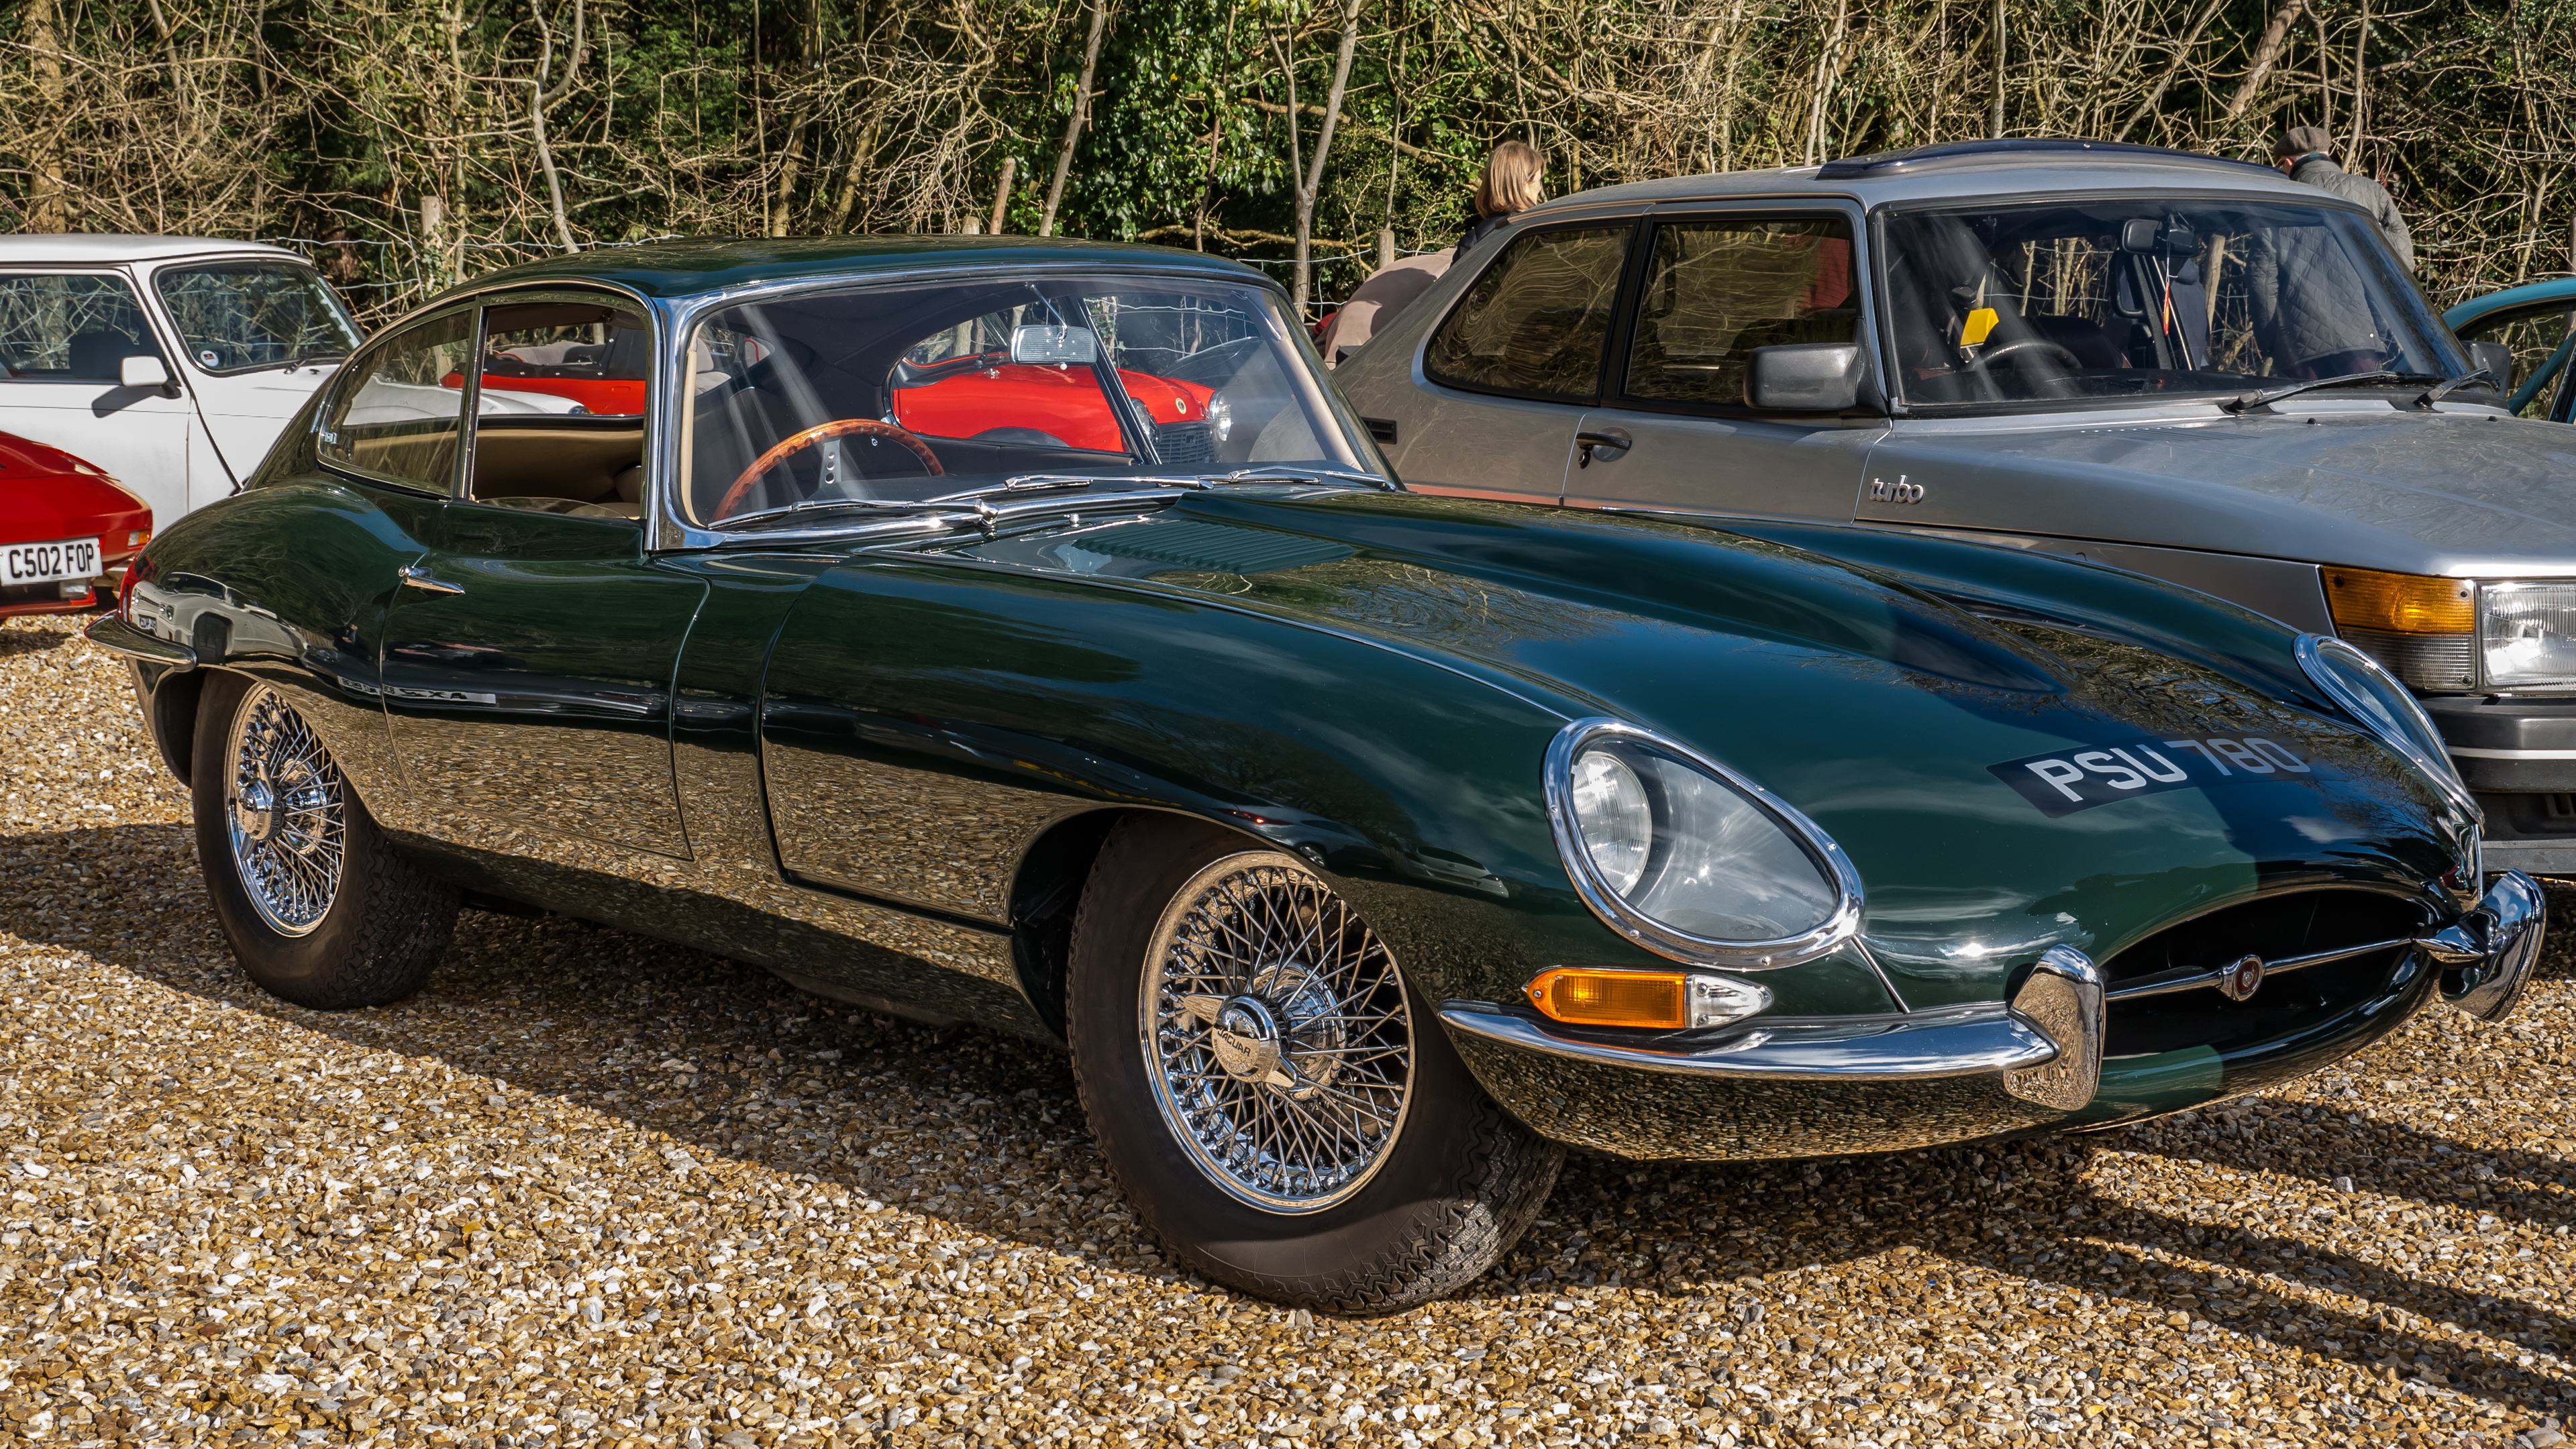
Ok then,lets do this the old fashioned way.If anyone's got the time,can they process the photo of the green E Type Jag above to get something that looks right to their eyes without reducing it to a science experiment please? I'll show you mine later when I get home from work.Ultimately I will always let my eyes be the judge as a computer program doesn't know how I see the world.
Copy link to clipboard
Copied
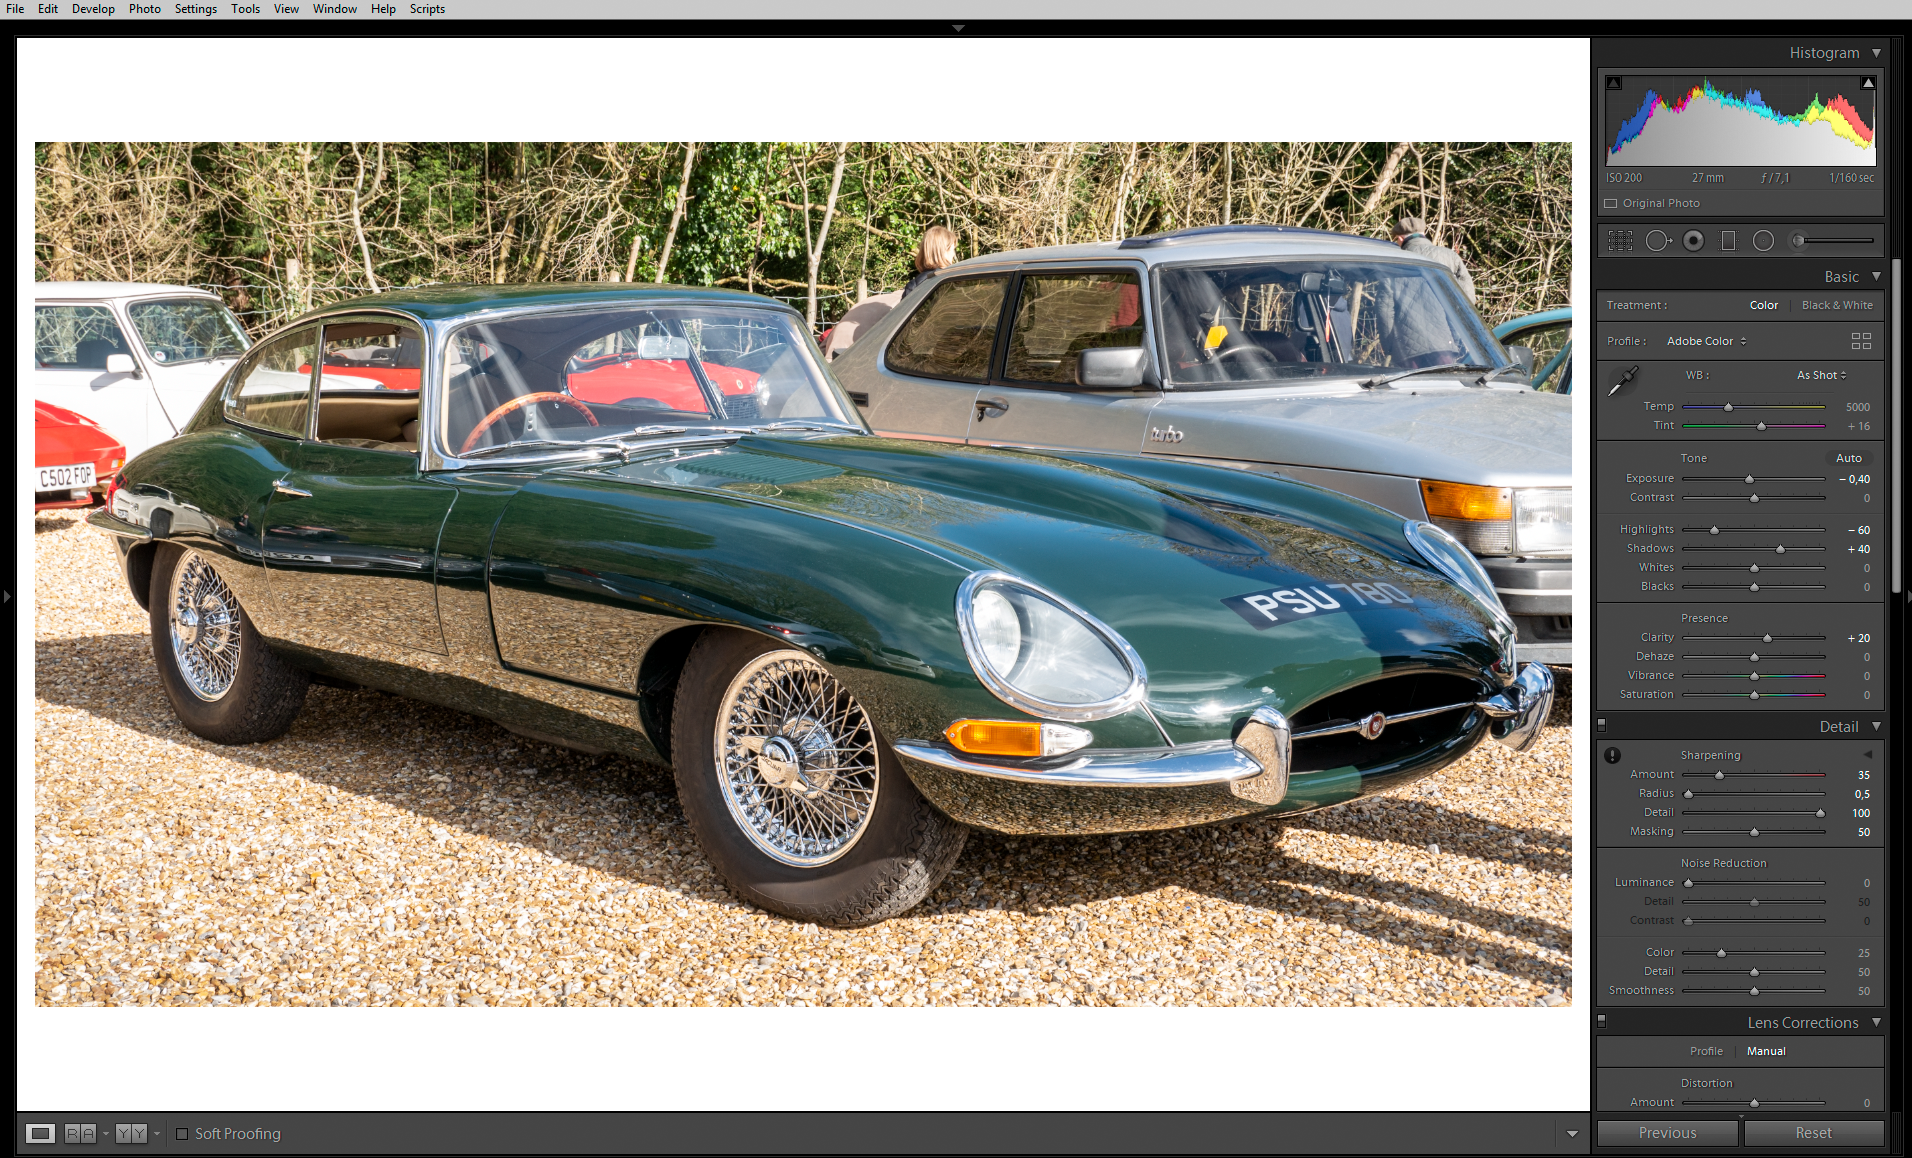
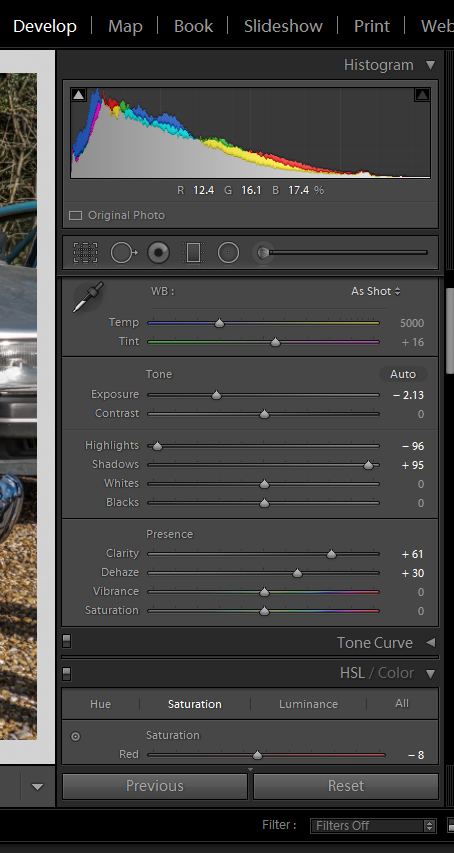
This is how I would edit this image. It is overexposed, but after reducing Exposure and Highlights, there are only a few specular highlights that are clipped.
In addition to the edits you see in the Basic panel, I have used two graduated filters in the bottom corners.
Left: Exposure -0.30, Highlights -30.
Right: Highlights -25.
Copy link to clipboard
Copied
Here's a refined version, where I painted the white car, the red car's number plate and the gravel below the red car with an adjustment brush set to Highlights -100.

Copy link to clipboard
Copied
Imagewerx as explained your first picture of the yellow car P1070919.RW2 was grossly underexposed causing the green shadow noise. We've provided LR adjustments to remove the green noise with suggestion in the future to monitor the exposure. thedigitaldog provided links to three articles on how to determine the best exposure setting (ETTR) to prevent underexposure.
The green jag picture P1080230.RW2 is slightly overexposed with some highlights clipped (white car in background and pebbles) and no other issues. The actual raw data is clipped causing some of the highlight areas to have no image detail, but areas with just one or two channels clipped are partially recoverable. You do this using LR's Exposure and Highlights controls.
Below are the settings I used, which produces good results despite the slight overexposure. Keep in mind some highlight clipping is unavoidable and OK such as bright sky areas and reflections off of glass and chrome. In the case of this picture the clipped white car in the background still looks OK and no one can tell that some of the pebbles are all white (but shouldn't be). It's of no consequence and helps lower shadow area noise (green noise).
Using the higher opposite and equal -70 Highlights and +70 Shadows settings produces results similar to applying the local Adjustment Brush or Graduated Filter with -Exposure to bright areas. The latter gives you more control over specific image areas, but requires extra time. More on the subject in an Adobe article I created here: Tone Control Adjustment Procedure Please let me know if you have other questions on using the LR global and local Tone controls. Enjoy!


Copy link to clipboard
Copied
Ok thanks everbody.This is what I came up with that looks close to perfect.This is NOT looking at histograms,but instead using the most accurate measuring instrument at my disposal-my eyes.
(For what it's worth,all of the above look over exposed to me!).
Copy link to clipboard
Copied
Imagewerx wrote
This is NOT looking at histograms,but instead using the most accurate measuring instrument at my disposal-my eyes.
(For what it's worth,all of the above look over exposed to me!).
Don't you find that strange? Three Adobe Experts (ACP & MVP) have provided suggestions and actual examples that your eyes say is all wrong!
I think we've come full-circle to discovering your "actual" problem–Your display is set too bright.
You've been trying to "compensate" for that overly bright display by using in-camera Exposure Compensation (-2/3 EV), which caused the image to be under-exposed with high shadow noise. Does that make sense?
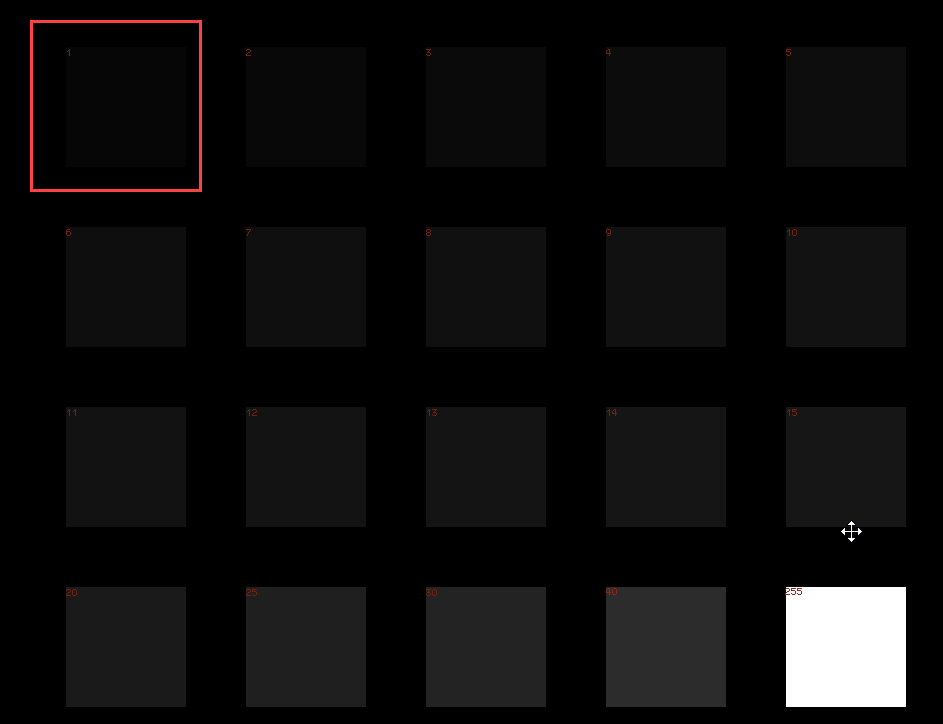
What type of display are you using and has it been calibrated? Take a look at the Black Level and White Saturation charts at the below link. Tell me what is the lowest Black level and highest White Saturation level you can see using your eyes with your display.
On my calibrated monitor I can see Black Level 1 and White Saturation level 254.


Find more inspiration, events, and resources on the new Adobe Community
Explore Now
 AdChoices