

- Home
- Lightroom Classic
- Discussions
- Re: Green noise in deep shadows.
- Re: Green noise in deep shadows.

Copy link to clipboard
Copied
I'm using Lightroom Classic CC to edit Panasonic RW2 RAW files and always do my best to ETTR (Expose To The Right).But on a very few occasions my camera still under exposes and when I boost the shadows I'm left with very obvious green noise.I know I can (and do) remove it manually with the adjustment brush.Is there a way to do it automatically without having to use the brush for the rare times I need it now?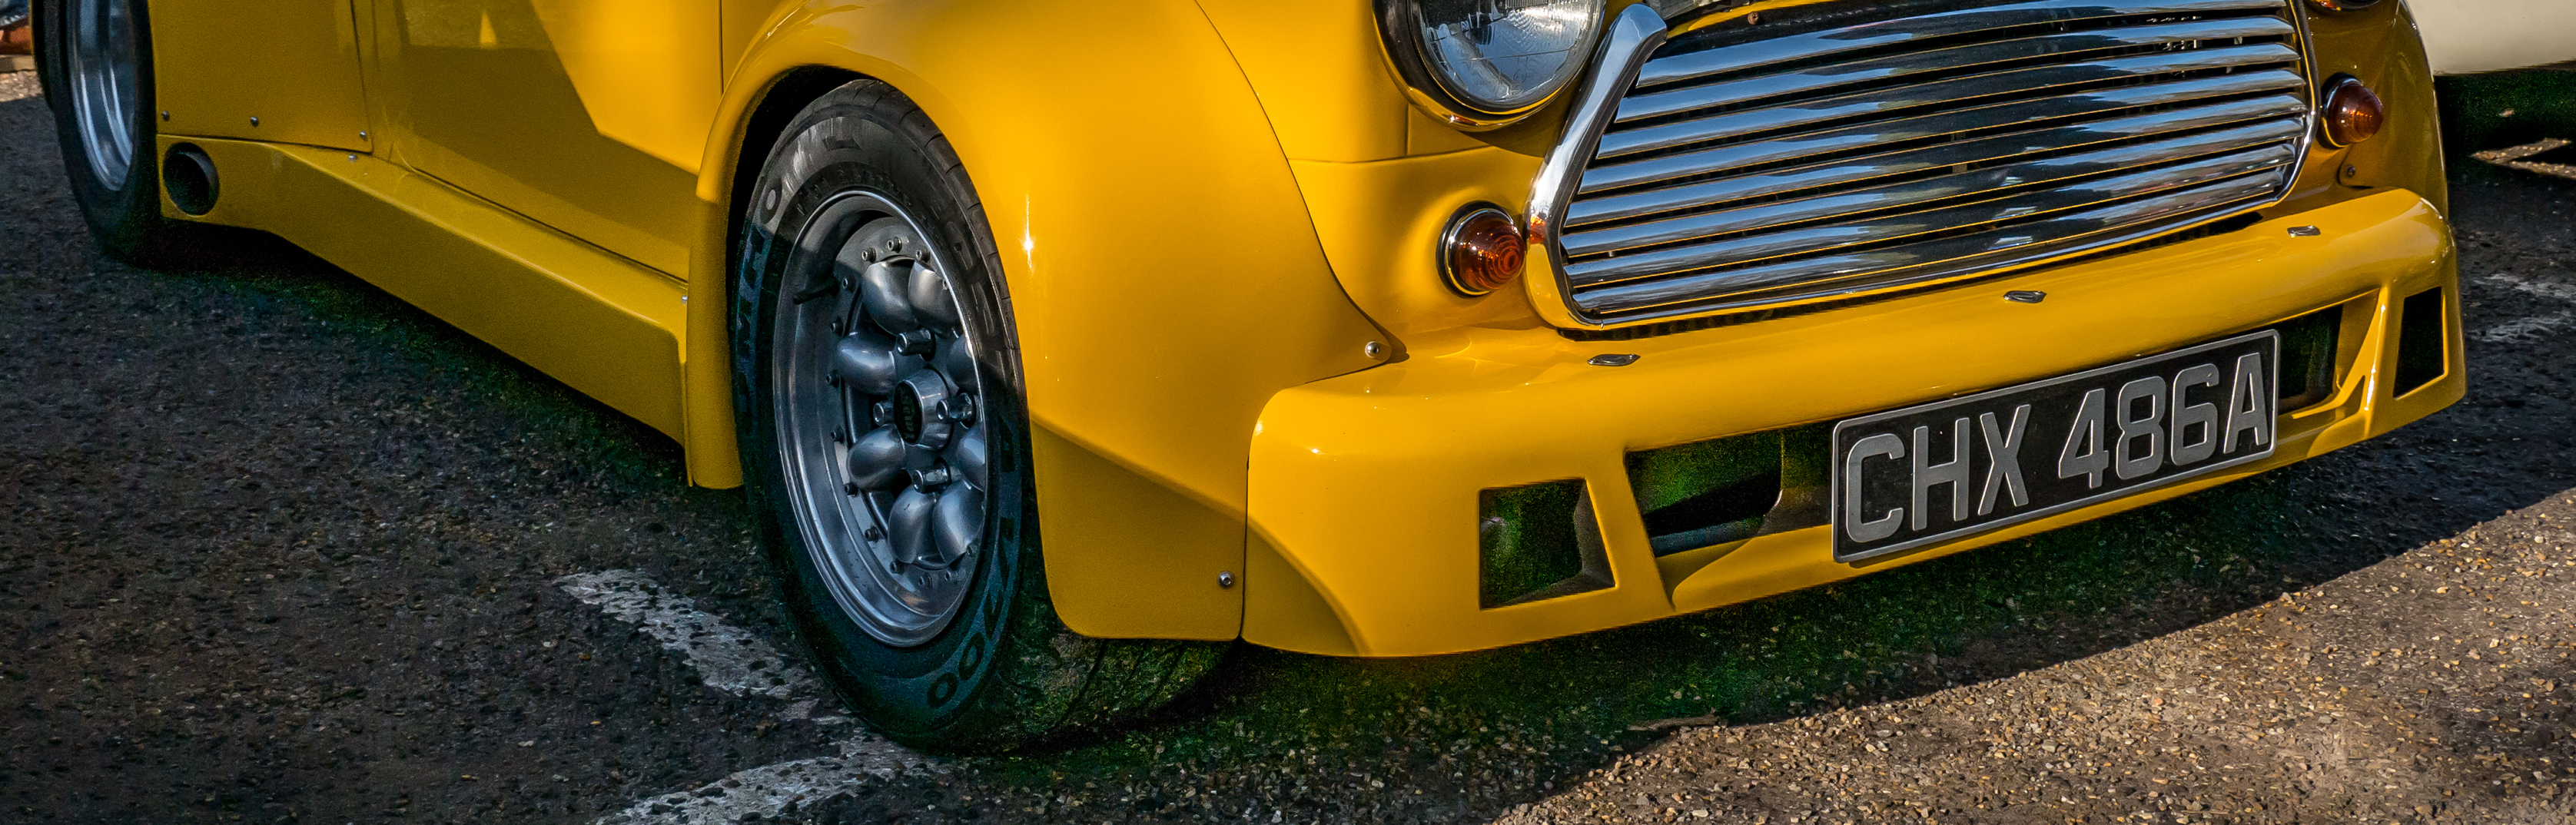


 1 Correct answer

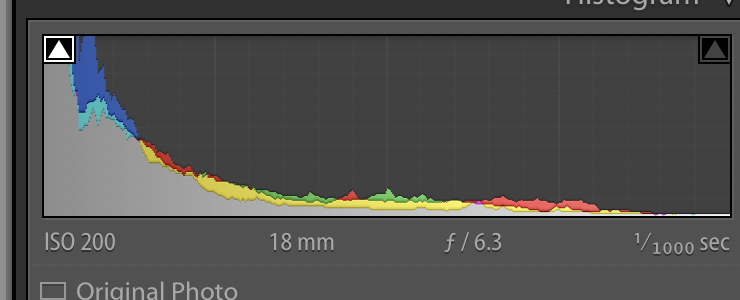
The reason you have green in the dark areas is because to shadows are extremely clipped. Apparently most of the red and blue channels are missing so only the green is left. Most of this is not noise.
clipped areas
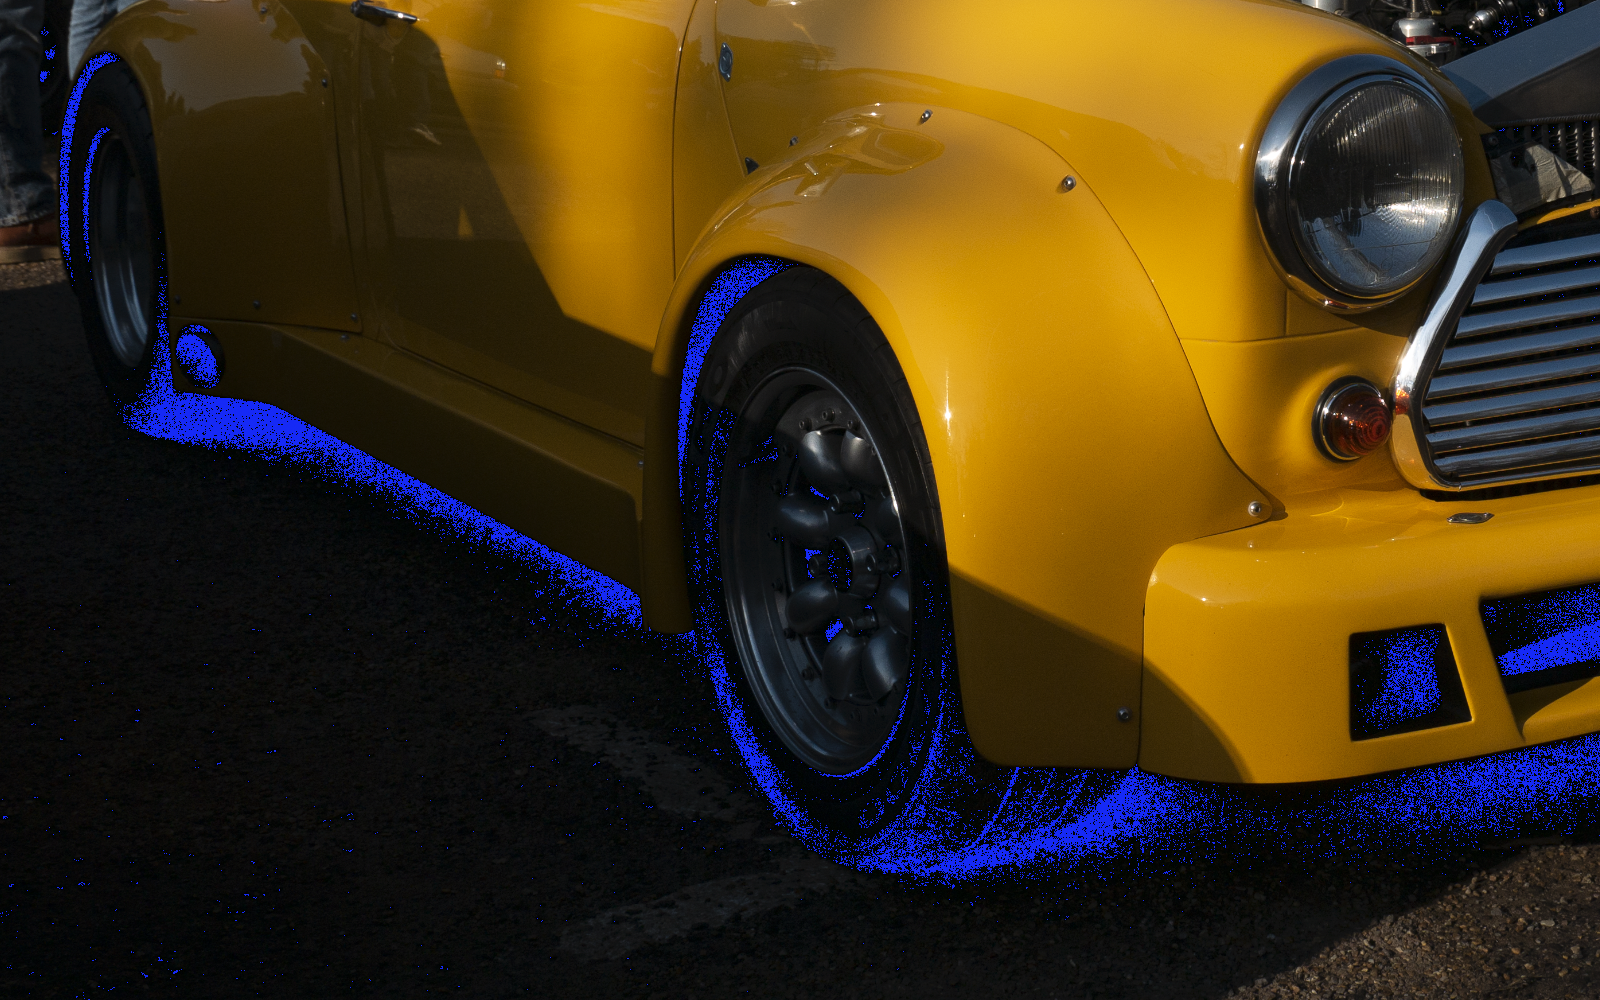
Histogram shows severe clipping.
 65
Replies
65
65
Replies
65
Copy link to clipboard
Copied
I don't know if anyone is still following this,but I thought I'd let you know what has happened since I was last on here.
The camera went away for repair under warranty.It's still got a month left to go,and luckily the only authorised and manufacturer trained Panasonic repair agent in the country is about ten minutes drive away from me,so easy to drop off and pick up in person.
The engineers report says they replaced the main circuit board,but weren't specific as to whether this also includes the image sensor as well.
Apart from losing the lens cap,they seem to have fixed it from the few sample images I've taken today around home.This one at random was purposely under exposed by five stops,then boosted by the sane amount in LR without any other processing applied such as noise reduction.
So hopefully the original question about how to get rid of green noise in deep shadows won't need to be considered any more.


Copy link to clipboard
Copied
Great you got it fixed just in time. The circuit board makes sense for this
phenomenology.
Copy link to clipboard
Copied
https://forums.adobe.com/people/Jao+vdL wrote
Great you got it fixed just in time. The circuit board makes sense for this
phenomenology.
I looked up the meaning of 'phenomenology' and am still none the wiser .
.
Copy link to clipboard
Copied
Phenomenological not in the philosophy sense but in the physics sense.
Basically it means the sum of all observations

Copy link to clipboard
Copied
Great news and glad you caught it in time before the warranty ended. Looks good!
Imagewerx wrote
So hopefully the original question about how to get rid of green noise in deep shadows won't need to be considered any more.
You can use the editing procedure outlined in my reply #9 for any previously shot underexposed files you run across with the green noise issue. It works fairly well.
Copy link to clipboard
Copied
https://forums.adobe.com/people/Todd+Shaner wrote
Great news and glad you caught it in time before the warranty ended. Looks good!
Imagewerx wrote
So hopefully the original question about how to get rid of green noise in deep shadows won't need to be considered any more.
You can use the editing procedure outlined in myRe: Green noise in deep shadows. for any previously shot underexposed files you run across with the green noise issue. It works fairly well.
Thank you for your help and advice.I generally tend to delete my RAW files once I'm happy with the JPEGs from them,but will keep it in mind!
Copy link to clipboard
Copied
"I generally tend to delete my RAW files once I'm happy with the JPEGs from them,but will keep it in mind!"
In my opinion this is a very bad idea since your raw files are analogous to film negatives. Sure you can use the JPEG export file, but what if you decide you'd like different editing or even simply want a smaller (resized) image file? This requires uncompressing the JPEG file to apply the new edits or resizing and can cause compression artifacts to appear unless you Export to the much larger TIFF file format. Also a camera profile and black and white points have been applied to the JPEG file's image data, which reduces the dynamic range. In short it's a poor choice for doing any further real editing!
Other options are 1) Install a larger internal hard drive, 2) Use an external USB drive, or 3) Export the raw file with your edits to Lossy DNG file format, which is approximately 1/4 to1/6 of the original raw file size. It's also near equal in size to a 90 Quality JPEG file. Use the lossy DNG file as the only file on your hard drive and delete all JPEG export files. If you need a JPEG file simply Export one using the lossy DNG file and delete it when done (printing, Email, Web share, etc.).
Use the below LR Export module settings to create the Lossy DNG file copies. More information here: Lightroom CC Lossy DNG Workflow Suggestion | Photoshop Family Customer Community

Copy link to clipboard
Copied
Ok thanks,I'll give it a go when I get the chance.
Copy link to clipboard
Copied
I've been using Lossy DNG Export files to reduce the file size of large LR Photomerge to Panorama DNG files with NO issues to date. They are about 1/6 the size of the original Panorama DNG file and single raw files are about 1/4 the size of the original raw file. Without question it's a better option than exporting to JPEG file format with very little file size difference and much better editing capability.
Copy link to clipboard
Copied
I get what you're saying and all the technical reasons behind it all,but my TV set will only display JPEGs and no other image formats.
Copy link to clipboard
Copied
No problem–Export to JPEG file format AND a 2nd export to Lossy DNG File. Delete the raw files and keep both the TV resized 1920x1080 WxH JPEG and Lossy DNG Export file. Use a LR JPEG Quality level of 80, which will reduce the file size with no "visible" loss in image quality.
In the below example the Lossy DNG file and 80 Quality JPEG Resized 1920x1080 file = 7,427 KB, which is still less than 1/3 the original raw file size. Just a suggestion to reduce storage requirements. Just a suggestion for keeping your future editing options open.


Copy link to clipboard
Copied
I must say I have learned more about underexposure, color, noise and corrections thereto, than I ever thought I needed, just by reading through this excellent thread 🙂 Thanks in most part to you, @Todd Shaner. You have outstanding patience and took time to painstakingly explain things. I came here looking for solutions to a similar issue I have with some recent images I took.
Copy link to clipboard
Copied
@Mark A. K thank you for the compliment and kudos to everyone else who contributed in this post. Glad to hear you found it helpful.

Copy link to clipboard
Copied
I bet you're glad we have denoise now lol

Copy link to clipboard
Copied
oddly enough, denoise has amplified the green noise on many of my photos. I do a lot of fire photography, so I have to expose for the fire, and the green noise has been a nightmare for me. I dont have a panasonic, but i may need to see how much longer i have on my warranty and check. I went from an 850 to a z7ii, and this has been a new issue for me.

Copy link to clipboard
Copied
Is your computer a Mac using Apple silicon?

Find more inspiration, events, and resources on the new Adobe Community
Explore Now
 AdChoices