Exit
  • Global community
    • Language:
      • Deutsch
      • English
      • Español
      • Français
      • Português
  • 日本語コミュニティ
  • 한국 커뮤니티
0

How to convert a colour negative to a colour positive

New Here ,
Sep 12, 2013 Sep 12, 2013

I have photographed some colour negatives in RAW.  I would appreciate an outline of a process as to how to convert these to positives using Lightroom v5.  I have tried and failed!

Hope some one can assist - Tony (New Zealand)

17.4K
Translate
Report
Community guidelines
Be kind and respectful, give credit to the original source of content, and search for duplicates before posting. Learn more
community guidelines
LEGEND ,
Sep 12, 2013 Sep 12, 2013

Film scanner software with negative film color profiles will give the best results, but you can get good results using just LR. Do a Google search using the two keywords Lightroom and negative.

Translate
Report
Community guidelines
Be kind and respectful, give credit to the original source of content, and search for duplicates before posting. Learn more
community guidelines
Guest
Sep 12, 2013 Sep 12, 2013

Seriously? Why bother writing a reply and not just telling him how to do it? This is another form of “It depends.”

Here's how to do it:

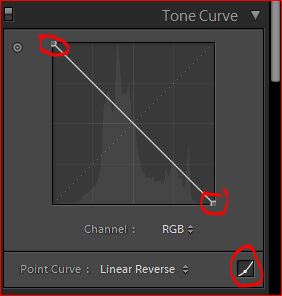
• Go to the Tone Curve and make sure that the curve is flat (linear).

• Drag the bottom left point of the curve to the top left. (Hold down the Shift key to make dragging easier.)

• Drag the top right point of the curve to the bottom right.

Done.

Side effect: After doing this, adjustments such as Exposure will have the opposite effect of what you expect.

Translate
Report
Community guidelines
Be kind and respectful, give credit to the original source of content, and search for duplicates before posting. Learn more
community guidelines
Adobe Employee ,
Sep 12, 2013 Sep 12, 2013

A workaround to the "side effect" is that you can round-trip the file.  That is, apply the "inverse" tone curve described above and then export the file as a TIFF.  Then, re-import that TIFF and do further work on that TIFF.  Basically the first step does the conversion from negative to positive.  Then after that you have a positive to work with, and the Develop controls behave normally.

Translate
Report
Community guidelines
Be kind and respectful, give credit to the original source of content, and search for duplicates before posting. Learn more
community guidelines
LEGEND ,
Sep 13, 2013 Sep 13, 2013

Thanks Eric that's the "missing link" and a very helpful tip! It wasn't mentioned in any of  articles at the Google link I posted or by Mark Alan Thomas. You can then continue to edit the exported "positive" TIFF image inside LR as a normal picture.

Perhaps someone at Adobe could add that tip to the Lightroom 'Help.' I use scanner software and PS for initial capture of my film scans and don't have the "negative" issue. But I still do most of my post-scan processing inside LR because it's faster, provides good results, and allows cataloging all-in-one application.

Translate
Report
Community guidelines
Be kind and respectful, give credit to the original source of content, and search for duplicates before posting. Learn more
community guidelines
New Here ,
Oct 04, 2013 Oct 04, 2013

I'm in Lightroom 5. It won't let me drag the points, even while holding shift. What am I missing? Thanks.

r/Bob

Translate
Report
Community guidelines
Be kind and respectful, give credit to the original source of content, and search for duplicates before posting. Learn more
community guidelines
People's Champ ,
Oct 04, 2013 Oct 04, 2013
LATEST

Click on the small curve icon - bottom right of the curve tool - and the behavior of the curve changes. Also, the sliders of the curve tool disappear.

Then you can drag the end points of the curve verticallu up or down resp. to create an inverted curve. Save it as a preset.

CurveInverse.JPG

Translate
Report
Community guidelines
Be kind and respectful, give credit to the original source of content, and search for duplicates before posting. Learn more
community guidelines