

- Home
- Lightroom Classic
- Discussions
- Re: Is it possible to edit a photo with this much ...
- Re: Is it possible to edit a photo with this much ...
Is it possible to edit a photo with this much light/dark range?

Copy link to clipboard
Copied
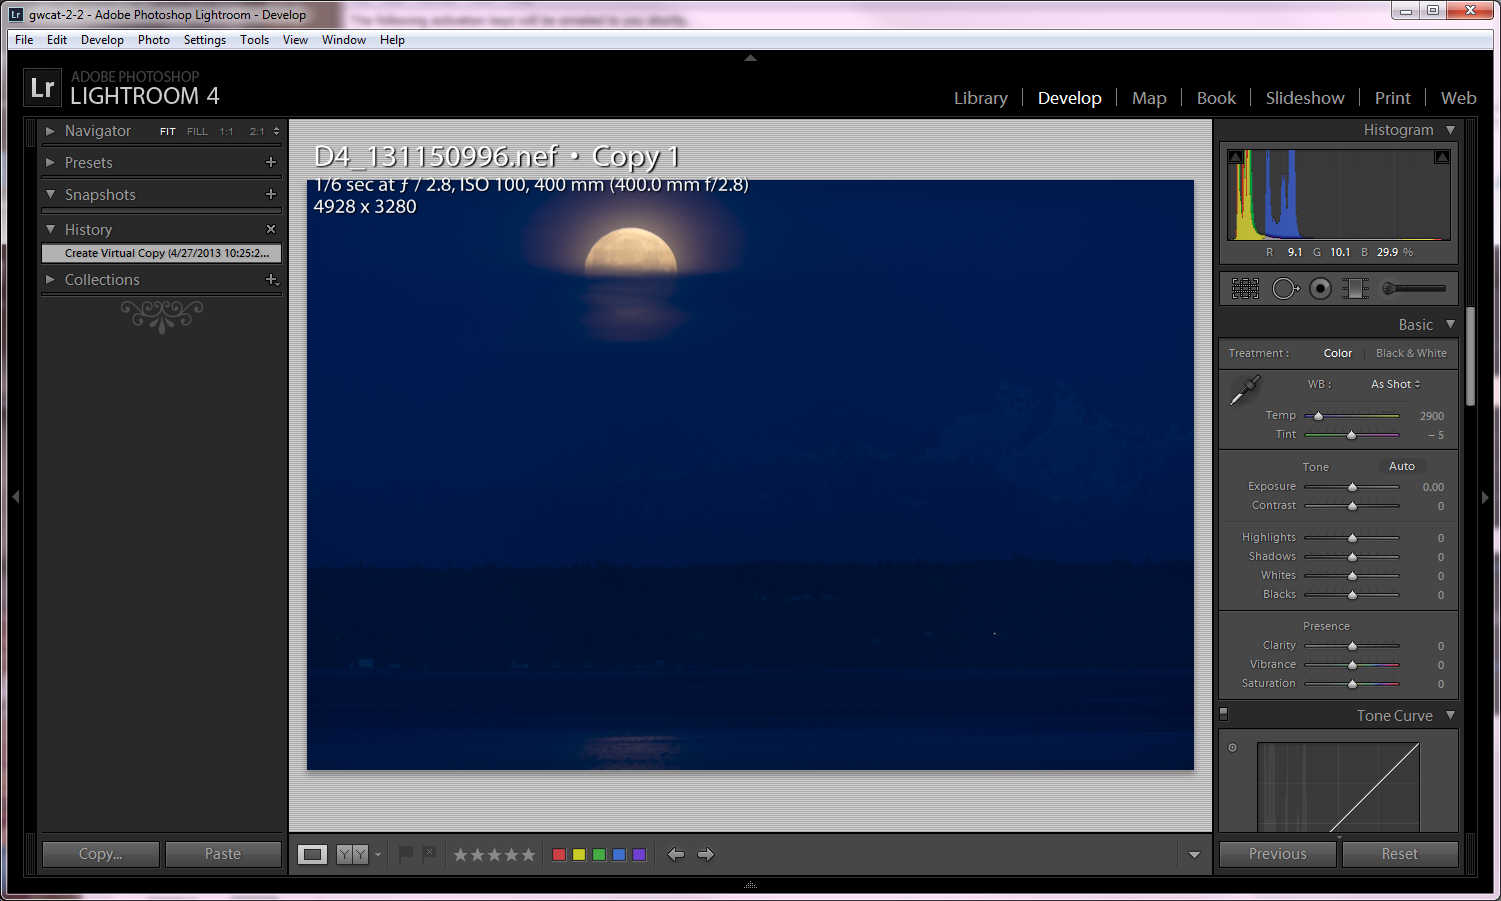
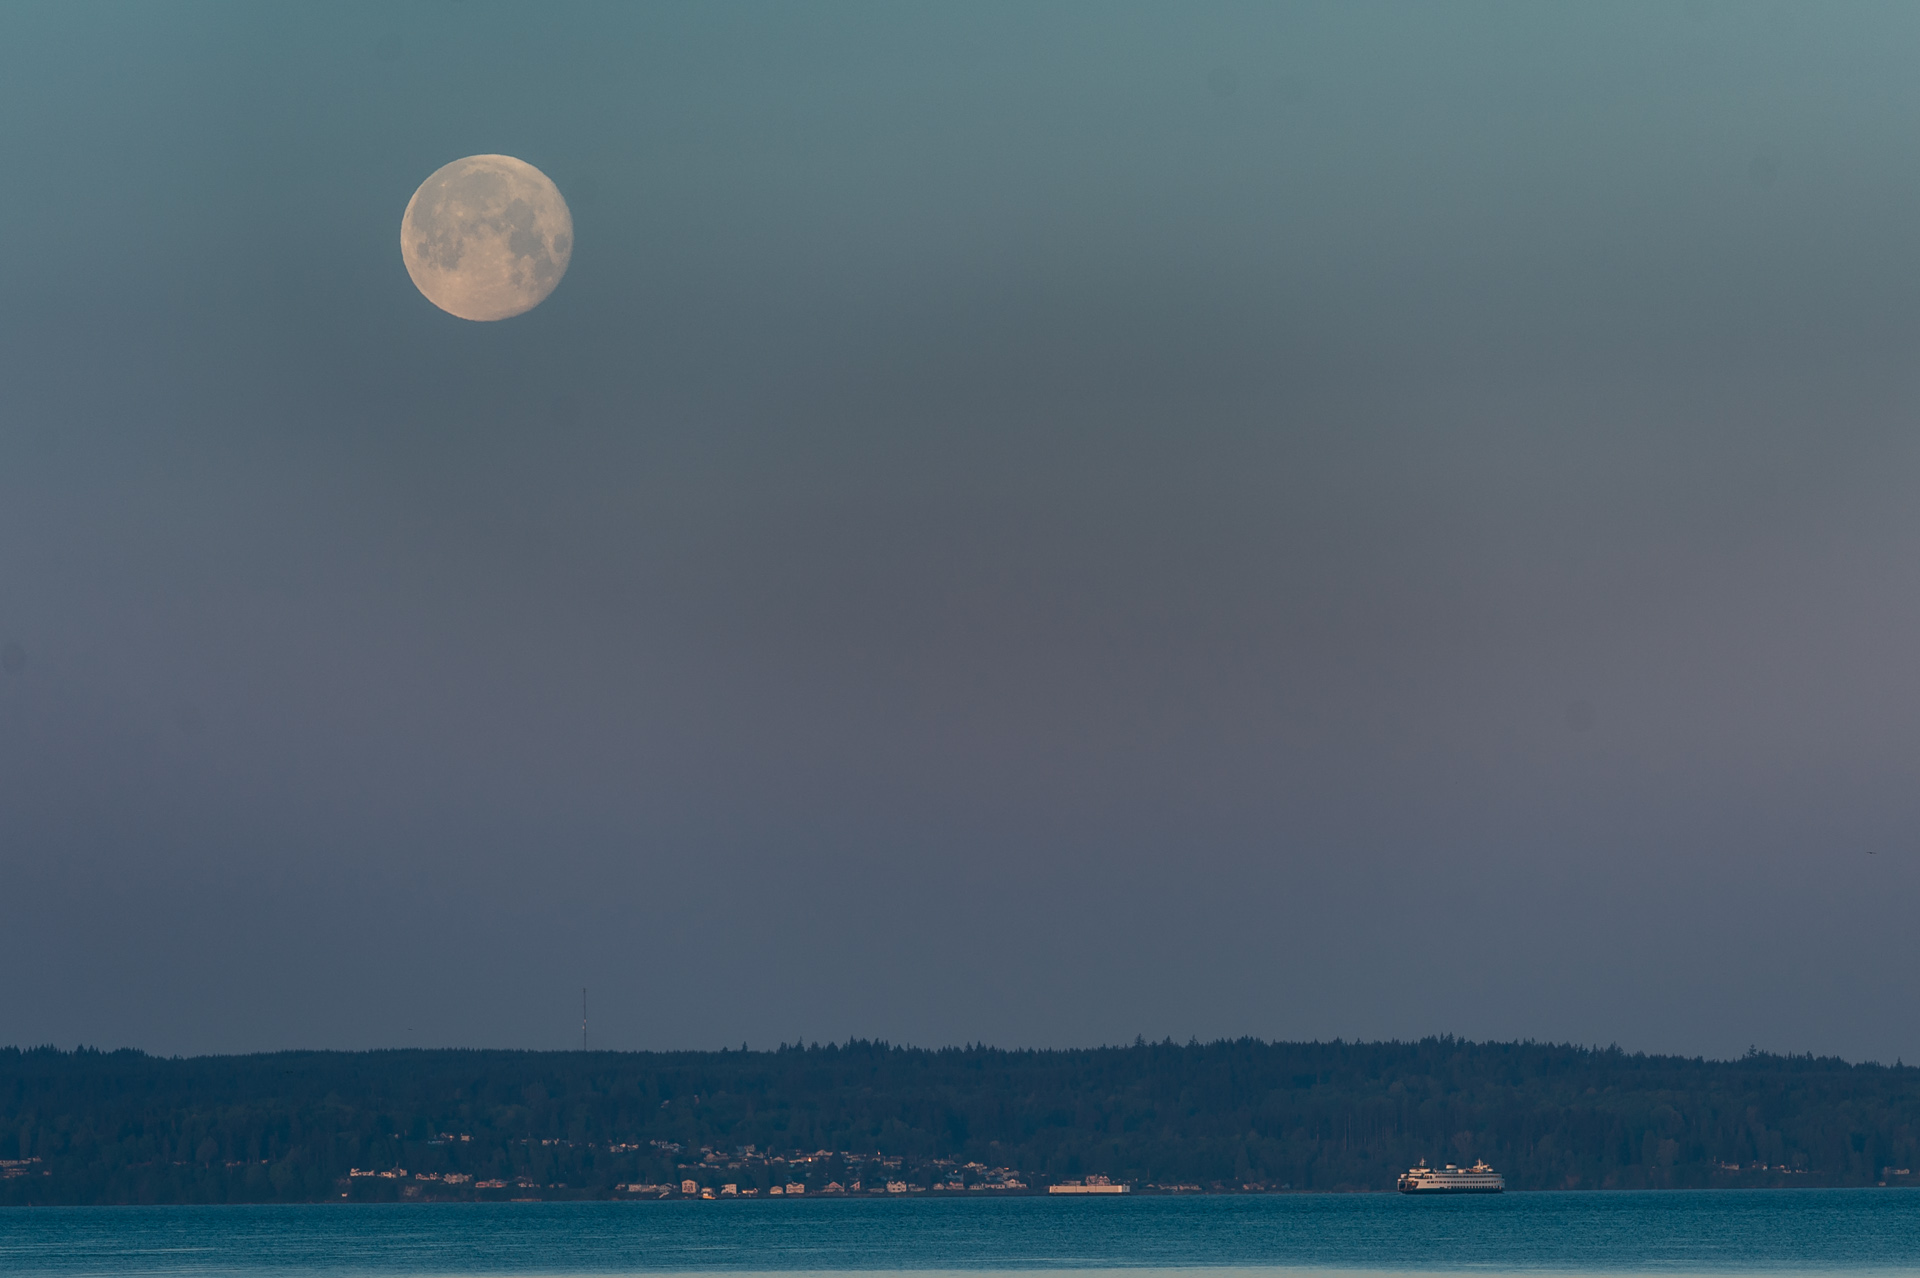
This is a "how to" question. See attached photo of the moon setting at first light "as-shot". The goal was to keep the moon from overexposing with the idea that the camera was capable of recording sufficient landscape information in the shadows. I have this scene bracketed quite a ways but the settings here seem to work best.
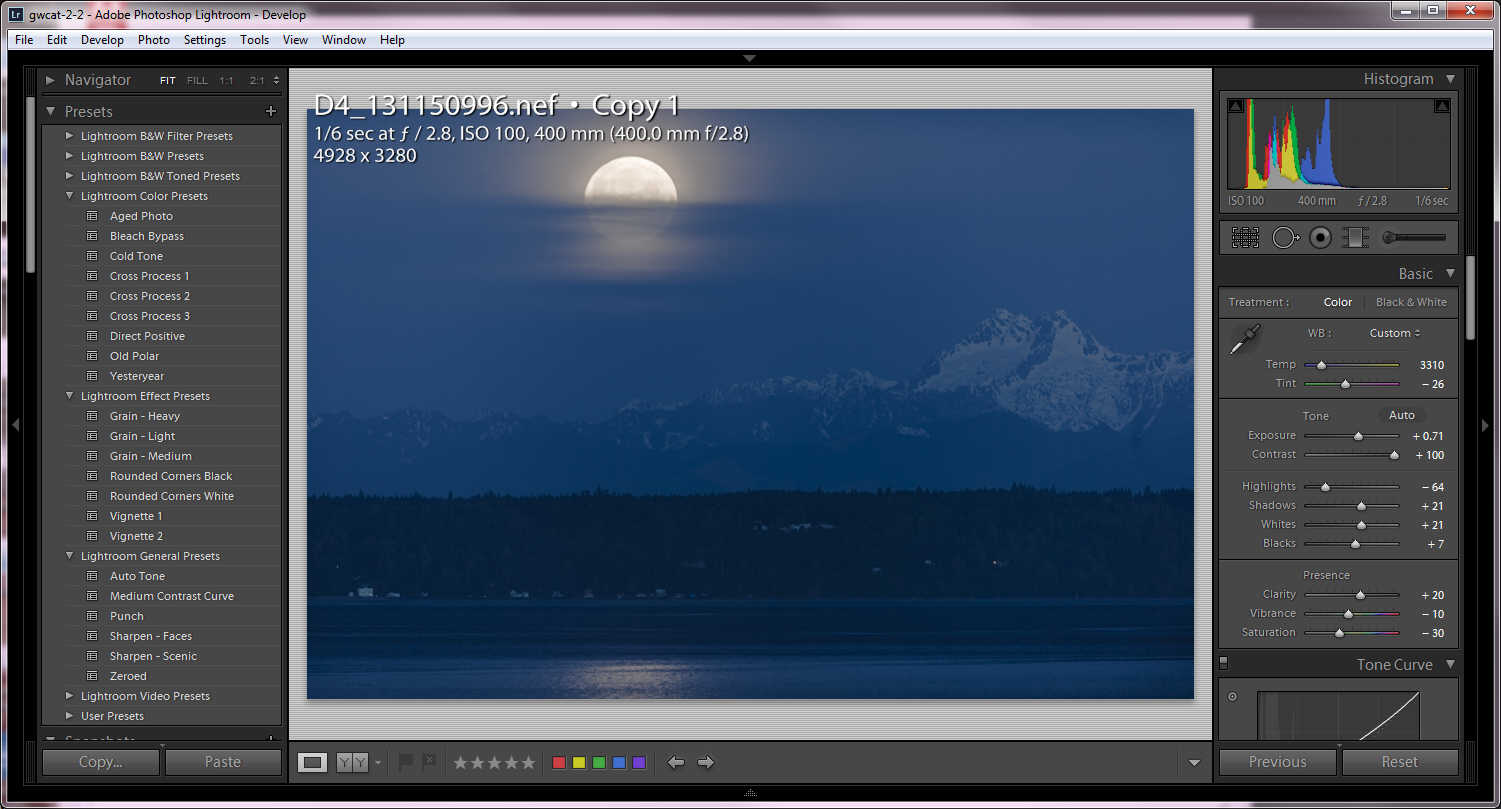
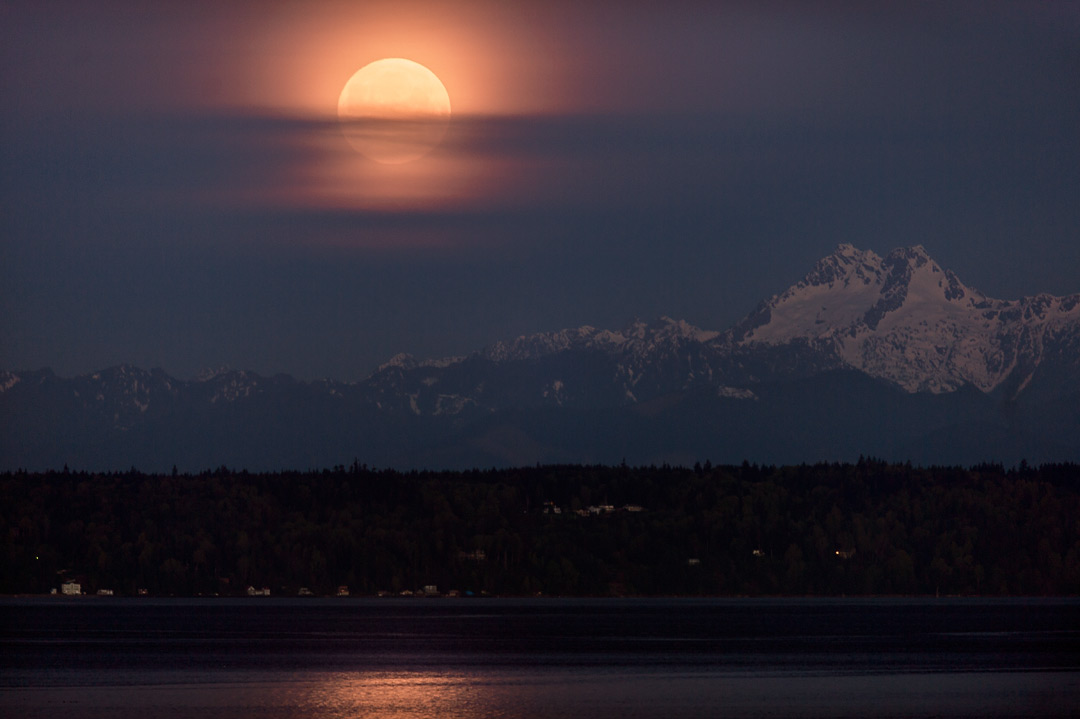
Here it is with the mountain brought out of the shadows and temperature adjusted. The mountain has good depth, but what it takes to do this, messes up the moon (as you can see).

After messing around with the controls I noticed the bleach bypass preset will actually preserve most detail, but at the expense of most color. The orange reflection on the snow gives extraordinary depth to the mountain (especially for predawn). The instant I try to add more color, the moon turns bad.
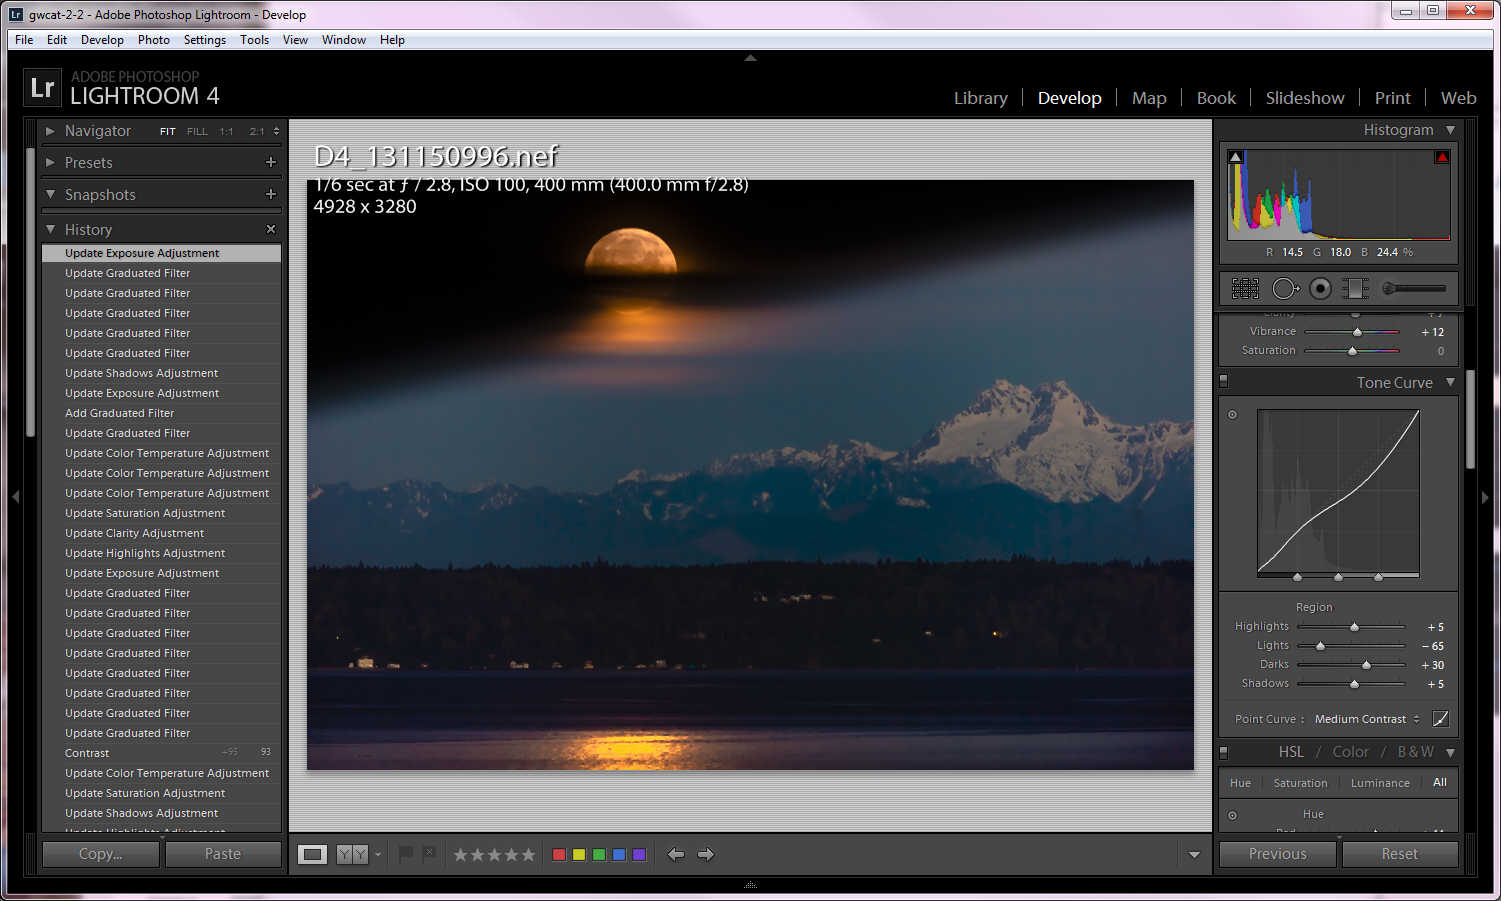
For illustrative purpose, this is the closest I can get both subjects on the same photo using LR, graduated filters and some controls cranked. I run out of control trying to recover the black around the moon, and lowering its saturation. Obviously this is unacceptable except that it shows that since detail at both extremes got recorded to the same raw file, it should be theoretically possible to make it look like I want. Or not? That's the question.
What appears to destroy the moon the most is correcting the temperature to get the orange snow reflection. Another way of looking at it: since my eyes had no trouble seeing this scene live, and the camera was able to record this detail, there should be a way to render it. I don't take a lot of landscapes so I don't know. Any ideas? or am I out of luck?
Thank you in advance for any input.


 78
Replies
78
78
Replies
78
Copy link to clipboard
Copied
After thinking about moon photos that have impressed me, I think Rob's #4 is as good as I could expect from this photo. The the surrounding glare caused by the haze interferes with "improving" it any further (to my concept). This limitation is baked into the photo, At least without seriously photoshopping it, which I don't like to do. But the weather looks promising for a repeat opportunity in the next few days. If not, I will have to wait another 5 moons for the snow to return to the mountain, and then get lucky with Seattle weather. This is why I spent the time on this shot.. hard to get.
I can think of a lot of new tools for LR, but I didn't think of *that* one! What do I need to consider before using the beta? For example, should it have it's own catalog? Would the history steps be importable to the actual release? Etc..

Copy link to clipboard
Copied
Adobe and most others in this forum suggest NOT using you original image files and your LR4 catalog can not be imported onto LR5 beta. I created copies of a select few of my current folders for "testing" and placed them inside a new main folder titled 'Lightroom 5 Beta.' On launch of LR5 beta you will create a new catalog. You can then import the top level folder 'Lightroom 5 Beta' with your "test" image files into the new catalog.
I suggest not using LR5 beta for any production or serious work, since Adobe does not guarantee it will import the same into LR5 final release. I never import any files with work done in a LR beta to the final release and I have had very few problems transitioning to a new version using this procedure.
Copy link to clipboard
Copied
George in Seattle wrote:
I think Rob's #4 is as good as I could expect from this photo.
Hey George - I appreciate the vote of confidence for lack of better words, but I'd still be curious to see some of those moon shots that have impressed you, especially those that look more like what you'd like in the subject photo of this thread  .
.
George in Seattle wrote:
I can think of a lot of new tools for LR, but I didn't think of *that* one!
*which* one?!  (sorry for being dense
  ).
).
George in Seattle wrote:
What do I need to consider before using the beta? For example, should it have it's own catalog? Would the history steps be importable to the actual release? Etc..
Lr5 will be out soon, but you can use Lr5b to edit whatever photos you want in the mean time, granted you may need to set up publish services or whatever to make use of them in the manner you are accustomed to... (you must start a new catalog in Lr5b - it won't open any pre-existing catalogs).
You will be able to transfer Lr5b work to Lr5 when it's released (edit history will almost certainly be preserved...) - very low risk of anything particularly bad (or insurmountable) happening, although worth heeding the words of caution issued by Adobe and others...
Cheers,
Rob
Copy link to clipboard
Copied
Rob Cole wrote:
Hey George - I appreciate the vote of confidence for lack of better words, but I'd still be curious to see some of those moon shots that have impressed you, especially those that look more like what you'd like in the subject photo of this thread
Took a while to find one, but this moon is something like what I was trying for. Sort of just hanging there with a slight 3D look That would look great next to that mountain. This was taken with a 300mm lens and the one with the mountain, 400mm.
Copy link to clipboard
Copied
Got it - thanks.
Copy link to clipboard
Copied
Update to this thread: This is another attempt from a few days ago incorporating suggestions in this thread. Not perfect but not much I can complain about either.
As shot:
After edit:

Notes:
• It was taken with about 20 minutes more daylight which actually reversed the above problem of getting lunar detail. This is the most lunar detail from several bracketed manual shots.
• There is far less bright snow to deal with but at the cost of a less interesting photo.
• There is no cloud reflection to deal with, but that problem was replaced by a yellow green Seattle pollution layer that I could not entirely remove without messing up the sky color and the sun reflection color. The radial filters helped with that.
• It was taken with a lesser quality 70-200mm f/2.8 zoom lens than the 400 fixed used in the first example so it was predisposed to less clarity at the shadows and a vignetting ring that had to be cropped out.
• It was edited with V5 which made a HUGE difference.
Copy link to clipboard
Copied
Sweet - you're gettin' the hang of it George! (yippee  ).
).

Copy link to clipboard
Copied
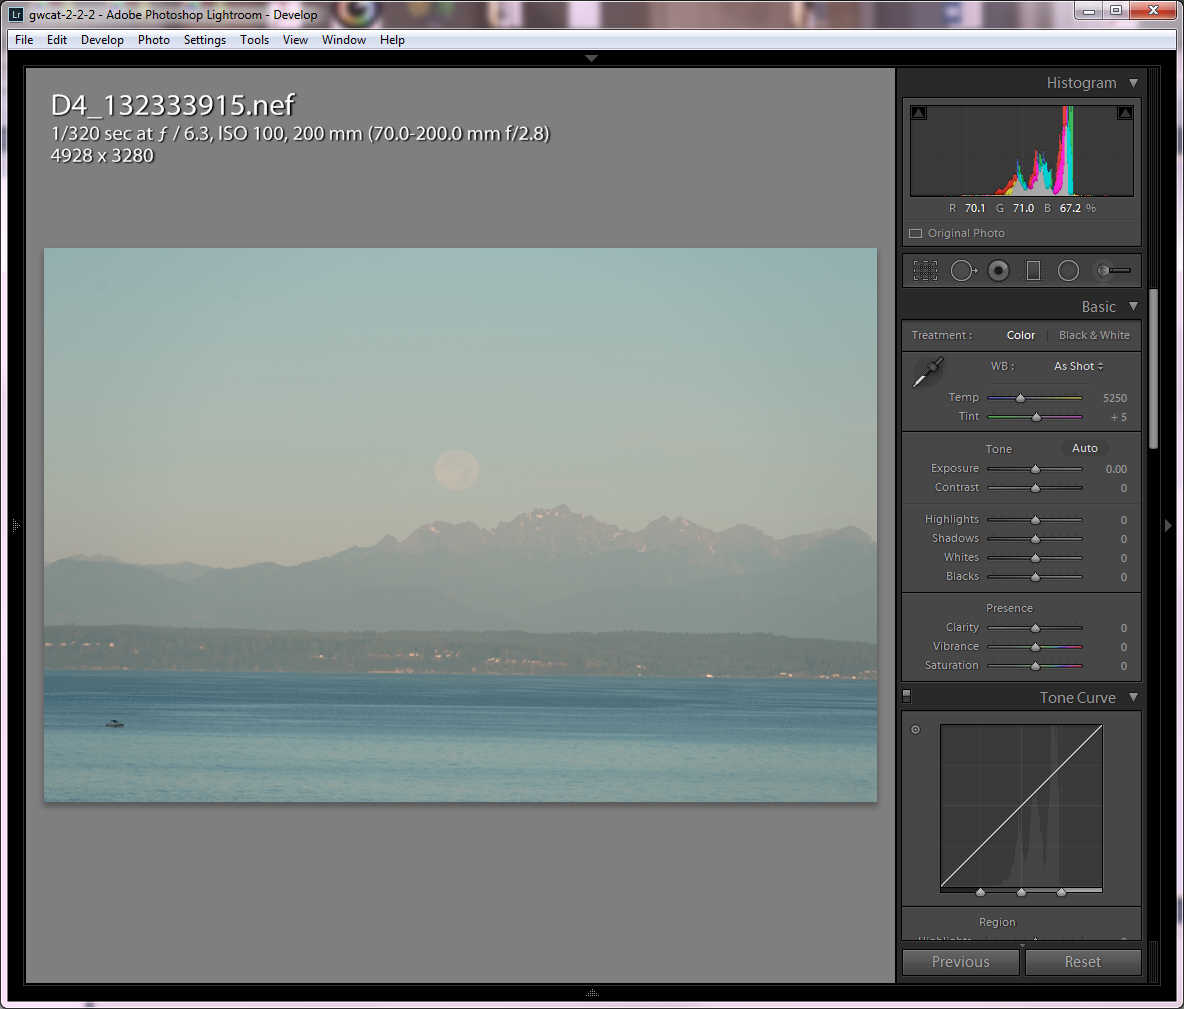
It's great. Is there a way you can share screen capture of the adjustments and curve? Thanks in advance.
Copy link to clipboard
Copied
Thanks  - and here's the xmp w/snaps:
http://www.robcole.com/LrForumSupport/D4_131150996.xmp.zip
If you don't know what to do with such xmp zip - feel free to ask.
one possibility: make copy of raw, and rename xmp from zip to match, then import raw copy.
Note: Lr5 beta, or better - required.
Warning: combination of global adjustments and heavy locals may yield slow performance in Lr5b (whacks 2 & 3).
R
Copy link to clipboard
Copied
elie-d wrote:
This is two exports, one at +5 Exposure, HDR blended and the 32 bit tiff edited in LR5 with a couple Radial filter applications, 1 Grad filter on bottom area and some brush work on the sky.

This is interesting, especially the idea of multiple exports from LR. Thanks, because I doubt that would have crossed my mind before giving up.
Message was edited by: George in Seattle (correction: "exports from LR" was what I meant.)
Copy link to clipboard
Copied
twenty_one wrote:
Now I'm curious to see how others will interpret it...
I'm in a sort of purple mood today, so...what the heck. I'll probably hate it tomorrow.

Be careful what you ask for...  .
.
Looks nice. And is actually pretty close to my 2nd version. A little purpliness can be fun, albeit not 100% natural (to be clear: I realize 100% natural was not your goal). Some detail in the upper half of the moon has been lost - dunno if that was intentional, but I suspect not - in my experience, preservation of detail in the moon was quite a challenge in this photo.
PS - I like this one better than the follow-up. To me, the feel of this photo does not warrant so much blacks, and I prefer to be able to seem more trees in the forest... Granted, I may not see exactly what you see, due to viewing differences between machines across the internet...
Rob

Copy link to clipboard
Copied
I've made a 2nd version also.
I've tried to keep it as natural as possible (pale moon with details), and overall rather dark.

Frans

Copy link to clipboard
Copied
Yeah, I lost some detail in the moon. Probably because I made a point of not bringing this into PS, where it's easy to fix (all done in ACR 7.4).
I like frans' pale moon version too (except the too-obvious burning in the lower half of the moon). Just thought I'd do something slightly different.
Copy link to clipboard
Copied
twenty_one wrote:
Yeah, I lost some detail in the moon. Probably because I made a point of not bringing this into PS, where it's easy to fix (all done in ACR 7.4).
If you're up for the challenge, see if you can wring out moon detail in Lightroom too. That's a big part of what this thread was originally about: How to satisfy the needs of the moon, atmosphere, and mountain etc., without resorting to external editor.
I'm not saying that's how you would do it. In fact some people's workflow involves starting in Lightroom, doing the basic raw conversion to tiff, then processing *every* photo in Photoshop. But in the spirit of the original post, what does it take to do the whole job in Lightroom proper?
PS - Both of my versions were done all in Lightroom (no Photoshop etc) too.
Copy link to clipboard
Copied
Whoa...very weak black level in the one I posted above. It was done with blazing sun outside. Forget that one, here's how it was meant to be:
Copy link to clipboard
Copied
The original:
Can everybody see the mountain in this one? - Note: its not anywhere near clipped in the blacks.
George in Seattle wrote:
Here it is with the mountain brought out of the shadows and temperature adjusted. The mountain has good depth, but what it takes to do this, messes up the moon (as you can see).
It's really amazing you were able to get the mountain looking as nice as you did in this shot. Proof that, in Photoshop, or the right tool for the job, it would be salvageable, and then some...
George in Seattle wrote:
After messing around with the controls I noticed the bleach bypass preset will actually preserve most detail, but at the expense of most color. The orange reflection on the snow gives extraordinary depth to the mountain (especially for predawn). The instant I try to add more color, the moon turns bad.
Yes, this photo is a challenge both tonally and color-wise...
George in Seattle wrote:
For illustrative purpose, this is the closest I can get both subjects on the same photo using LR, graduated filters and some controls cranked. I run out of control trying to recover the black around the moon, and lowering its saturation. Obviously this is unacceptable except that it shows that since detail at both extremes got recorded to the same raw file, it should be theoretically possible to make it look like I want. Or not? That's the question.
George, this is the result of something discovered by trshaner and others (not me, I was incredulous and had to be beaten over the head with a 2x4 before I would believe it).
* Locals are applied BEFORE globals (in the pipeline). Thus, if you darken to the point of clipping using locals, no amount of global correction will resurrect. Likewise at the other end of the histo...
So, to answser your question: yes, maybe, I think - you can normalize exposure of mountain and moon, but it will be very tricky, since you'll need to blend/match the inbetween, carefully, and in both color and tone, the former (color) being perhaps the greatest challenge. The secret will be to not underexpose anything when dropping exposure, locally, and not over-expose anything when raising exposure, locally. I may give another whack and post it, if successful (if unsuccessful, I'll probably just wander back into the shadows, with my tail between my legs, and keep quiet... 
 (mostly joking).
George in Seattle wrote:
Thank you in advance for any input.
You're welcome, to the extent that I actually helped  .
.
Rob
Copy link to clipboard
Copied
Rob Cole wrote:
George in Seattle wrote:
For illustrative purpose, this is the closest I can get both subjects on the same photo using LR, graduated filters and some controls cranked. I run out of control trying to recover the black around the moon, and lowering its saturation. Obviously this is unacceptable except that it shows that since detail at both extremes got recorded to the same raw file, it should be theoretically possible to make it look like I want. Or not? That's the question.
George, this is the result of something discovered by trshaner and others (not me, I was incredulous and had to be beaten over the head with a 2x4 before I would believe it).
* Locals are applied BEFORE globals (in the pipeline). Thus, if you darken to the point of clipping using locals, no amount of global correction will resurrect. Likewise at the other end of the histo...
So, to answser your question: yes, maybe, I think - you can normalize exposure of mountain and moon, but it will be very tricky, since you'll need to blend/match the inbetween, carefully, and in both color and tone, the former (color) being perhaps the greatest challenge. The secret will be to not underexpose anything when dropping exposure, locally, and not over-expose anything when raising exposure, locally. I may give another whack and post it, if successful (if unsuccessful, I'll probably just wander back into the shadows, with my tail between my legs, and keep quiet...
Rob
The fact that the sky went completely black using the Graduated filter confirms the raw image file is heavily underexposed. As Rob describes using the Locals in the wrong way can create problems. Locals take precedence over Globals and pixels that become clipped in one or more channels are not recoverable using the Global controls.
Copy link to clipboard
Copied
trshaner wrote:
The fact that the sky went completely black using the Graduated filter confirms the raw image file is heavily underexposed. As Rob describes using the Locals in the wrong way can create problems. Locals take precedence over Globals and pixels that become clipped in one or more channels are not recoverable using the Global controls.
Thanks. That is good to know about the locals. I need to write that down! It explains some of what I've noticed about their behavior over the years. I knew there was a pattern and I learned sort of what to expect out of them without knowing why.
I'm working on a few more attempts based in these comments and I have longer exposures to try them on which I'll post here. I'm pretty sure I can get closer in LR. I honestly was not expecting much from this shoot and was surprised to see that level of depth in the mountain. The angle of the moonlight had to be the reason since I've shot these mountains many times in different sunlight with flatter results. And since this is cloudy Seattle, I'm not ready to give up on the shot quite yet.

Copy link to clipboard
Copied
George...I don't see a link to the priginal raw file anywhere (the image on Rob's website ain't raw). So, I can't really take a whack at it. But, I'm pretty good at this stuff, so if you want me to give it a try, give me a link where I can download a raw version. I'm pretty sure I can wrangle a pretty good version given the base file and histogram...
Copy link to clipboard
Copied
Jeff Schewe wrote:
George...I don't see a link to the priginal raw file anywhere (the image on Rob's website ain't raw). So, I can't really take a whack at it. But, I'm pretty good at this stuff, so if you want me to give it a try, give me a link where I can download a raw version. I'm pretty sure I can wrangle a pretty good version given the base file and histogram...
While assuming it was too big to embed here, it didn't occur to me that I could just post the link:
www.gwoodard.com/D4_131150996.nef
Copy link to clipboard
Copied
George in Seattle wrote:
Thanks. That is good to know about the locals. I need to write that down! It explains some of what I've noticed about their behavior over the years. I knew there was a pattern and I learned sort of what to expect out of them without knowing why.
Indeed, it does not explain all of what you've noticed... - see related thread:

Copy link to clipboard
Copied
I have no advice at all but I enjoy playing with other peoples pics. Though I might have tried a grad filter. Or if the shutter was open long enough with a narrow aperture, I'd waggle my fingers in front of the top half of the lens.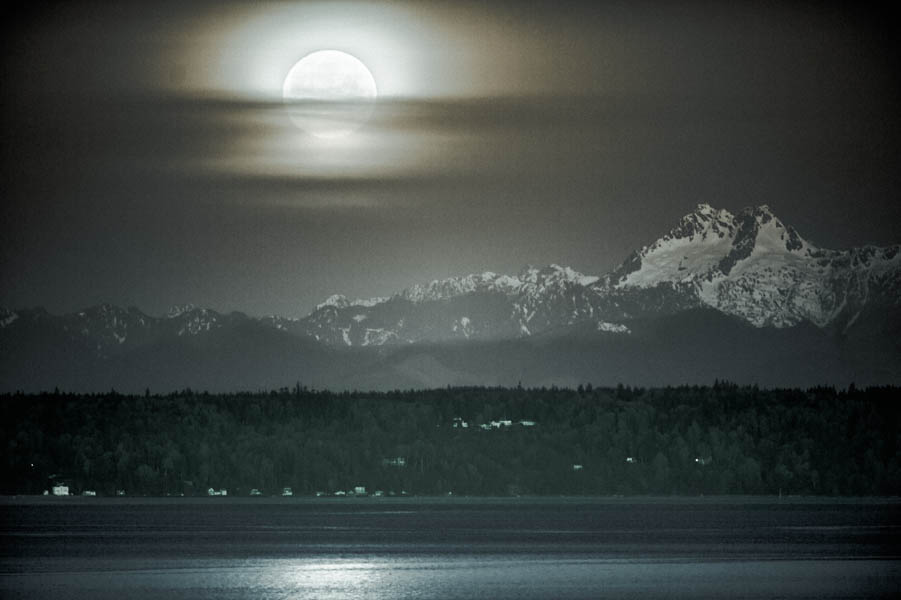
Edit: I used LR5b though without any of the new features. Ideally, I'd prefer to work this kind of thing through Photoshop. wher it might look better depending how much time I spent.

Copy link to clipboard
Copied
I would just like to say I have found this thread, and the techniques discussed, very informative. My only concern would be for whatever noise was introduced while bringing up the darker areas.
Copy link to clipboard
Copied
PV2012's shadow recovery capability may show visible noise in properly exposed images shot at even ISO 100. The solution is to increase your Noise Reduction and perhaps Sharpening settings to compensate. Lightroom does a good job with most DSLRs. Also keep in mind that noise you see at 1:1 view may not be visible in print or resized screen output, especially when shooting at very high ISO settings. The best way to determine this is to Export or Print an image at your target size and then examine it for visible noise. You'll develop (pun) a better correlation between noise in the onscreen 1:1 view and what you'll likely see in the final output image.
With noisy high ISO images LR's down-scaled view (<1:1) may be very inaccurate when using insufficient Luminance NR and/or over-sharpening. If that's the look you want then your only option for previewing in LR is to use 1:1 view. I suggest using sufficient Luminance NR and moderate sharpening, which will provide more accurate down-scaled views inside LR.
If interested there's more information here on LR's down-scaled view issues:
http://feedback.photoshop.com/photoshop_family/topics/afm8rbh6tnc31
NOTE: The above report is marked 'Not a problem' because there is a work-around." Adobe currently has no solution other than the suggestions provided.
Copy link to clipboard
Copied
There was slight noise in the dark areas of this shot as there always is, the difference here is that I needed to use those levels. But it was not anything that would be noticeable for most purposes. The noise reduction tradeoff is most noticeable on the rock face. I corrected it very slightly.
In general I found that setting sharp and noise correction at 2x works for avoiding over-correction. I find it easier to find the acceptable tradeoff between noise reduction and detail this way. I apply the effect so that it is just noticeable at 2x with an acceptable tradeoff. This makes for a conservative setting at 1x, and mostly it keeps my eyes from playing tricks when using 1x.
I zoom to a place in the shot with good focus and a smooth background. Dog whiskers work perfect for sharpening because they are cylindrical with sharp outlines. I set the Radius and Detail settings so the whiskers appear to have circular depth. Then I back down the Amount to where it is just noticeable at 2x. That tends to make everything else look good.

Find more inspiration, events, and resources on the new Adobe Community
Explore Now
 AdChoices