

Magenta Cast

Copy link to clipboard
Copied
Hi,
With my Sony a9 and Sony A7iii raws (didn't test JPGs) I do have in bright sunlight a magenta cast. It's awful strong. I just can get rid of it tuning the yellow tint very much into it or turn it black and white.
It seems like a bug to me with lightroom. I have installed the latest v7.5.
Anybody with the same experience? Is it a lightroom problem or me?
Thanks!
Greets Fionn


 24
Replies
24
24
Replies
24

Copy link to clipboard
Copied
Hi Fion,
As you're experiencing a magenta cast on the images, could you please check the tint slider in the develop module and see if that's not on the magenta side?
If that doesn't work then please try calibrating your monitor color profile and let us know if it helps.
Regards,
Sahil
Copy link to clipboard
Copied
Thanks for your reply!
No, it's not the problem with the tint slider. Tried it already fixing that way.
The monitor isn't the problem, checked on several monitors including smartphones.
And it's just on some parts of the photo. So the white balance is right, but some parts of the photos do have a magenta cast 
Greets
Fionn
Copy link to clipboard
Copied
Have you tried turning off the Graphics processor from the Lightroom preferences? Go to Lightroom > Preferences >Performance tab > Uncheck GPU > Restart Lightroom
Copy link to clipboard
Copied
Good idea! Tried it out but it didn't work out
Copy link to clipboard
Copied
Could you please try posting a screenshot of the issue, so that we can review it at our end?
Copy link to clipboard
Copied

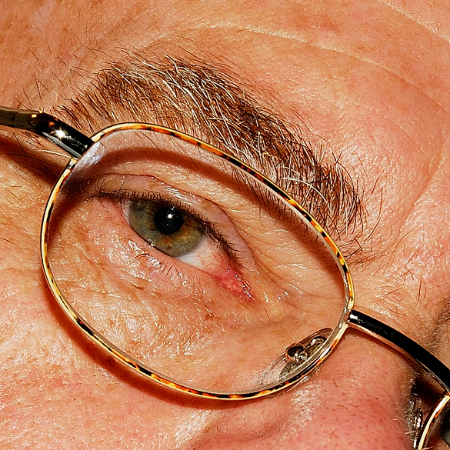
Look at the hand on the top left.
Here it is before the fix, before the yellow white balance:

This looks good to mee with the white balance, but it has magenta casts.
And here I changed the white balance in order to get rid of the magenta cast but ended up with a too warm picture:

I would send you the raws if you just use it internally to check it.
Greets Fionn

Copy link to clipboard
Copied
Are you applying a Develop Preset (during import or afterwards) that adds magenta to highlights in Split Toning?
Copy link to clipboard
Copied
Checked it with presets and wibtowi. Both turned the same. And with Nikon raws it isn't a problem.

Copy link to clipboard
Copied
Please post a screenshot of the entire Lightroom window with an image open in Develop, and the histogram and Basic panel visible.

Copy link to clipboard
Copied
There is a known issue with the Sony A7R III 'Camera' named profiles (Standard, Portrait, etc.) creating a yellow-green tint.
Sony a7rIII rendering is awful
However, you are seeing just the opposite (Magenta tint). Do you see the tint when using Adobe Standard or Adobe Color profiles? I suggest posting an ARW file that exhibits the issue to a file sharing site and posting the link in a reply here.
Copy link to clipboard
Copied
thanks for the link. Looks similiar indeed!
I tried the differend profiles, didnt make any difference
Copy link to clipboard
Copied
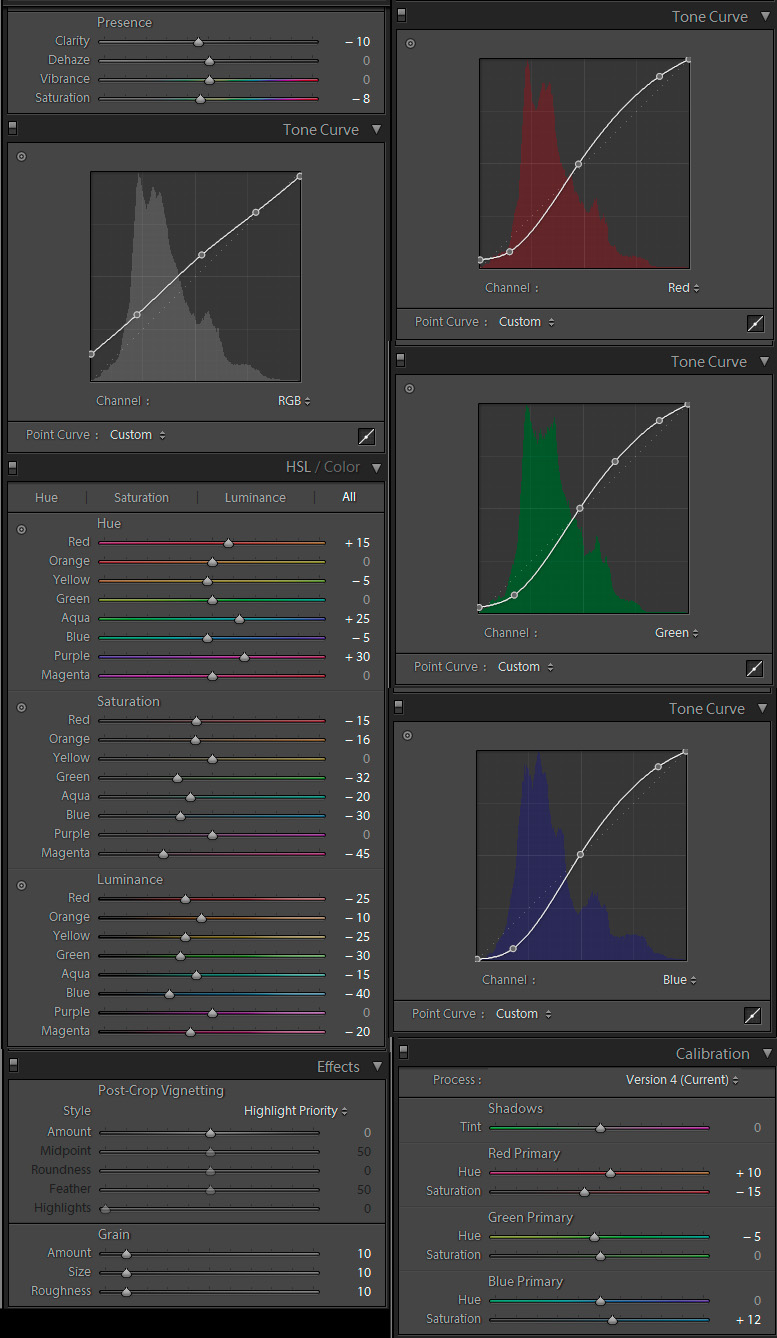
I do have an example with the sliders:
Sure, I could add a bit of a warmer tone to it. Then the magenta tone would disappear in the face, but the hair and shoulder of him would still have a magenta cast (tried it out).

Copy link to clipboard
Copied
Would you mind sharing the raw file for this photo on Dropbox?
I don't think the magenta cast on the man's shoulder can be caused by a camera profile.
Also note that magenta is a warm color, and adding yellow will not fix a magenta cast. To do that, drag the Tint slider towards green (which is the opposite color of magenta). But I'd say that this image also has a blue cast, and needs some yellow as well.
Copy link to clipboard
Copied
Please share the RAW file with Dropbox or other. Try tapping the Auto white balance setting and see if that doesn't move the slider to a standard Daylight setting.
Copy link to clipboard
Copied
Here it is: (it wont be permant online, but probably for a few weeks):
https://drive.google.com/open?id=1W5l1gE-12gHF6B8AFUgKYy07ggKetjdO
(the filename is FG702462.arw)
When setting the wb setting to cloudy eliminates the magentas, but also makes it far to warm,yellowy for me.
To be honest, on the screenshot above, even the skin is to magenta due the bad wb, but even if I make it more yellowy -more natural, the magenta appears on the jacket of the man.
But with the raw you can tweak it now by yourself a bit.
Thanks a lot for your help and ambition to help!
Copy link to clipboard
Copied
by the way it tried it to open it with the latest photoshop cc version and its rawconverter and did not apply anything on the raw editor and look how it turned out:
crazy big difference! adjusting the settings a little bit and it will turn out wonderful.
I hope its just a setting in LR I need to change, cause it seems that adobes RAW Converter is able to handle the files!
Copy link to clipboard
Copied
Yes, that's what the image looks like when I import it in Lightroom.
When Lightroom and Photoshop don't match, it's usually caused by a defective or incompatible monitor profile.
Try setting the monitor profile to sRGB (or Adobe RGB if you have a wide gamut monitor).
Make sure to restart Lightroom after changing the profile.
If this this fixes the problem, you should ideally calibrate your monitor with a hardware calibrator.
Copy link to clipboard
Copied
And setting Temp to 4700 and Tint to +21 makes it look even better.

Copy link to clipboard
Copied
IMHO that looks a little cool. I used Auto and let LR decide on Temp & Tint.
5750 temp +30 tint no other adjustments as you can see.

Copy link to clipboard
Copied
>>"I used Auto and let LR decide on Temp & Tint.
5750 temp +30 tint no other adjustments as you can see."
I agree. In any app you can't overly rely on automated settings, but in this case LR-ACR's Auto calculation did a much better job than the camera's Auto WB (as shown in "As Shot") which was overly influenced by the leafy green background and (apparently) the out-of-focus yellow-green smear in the foreground. The fact that the LR Auto setting produced a Temp/Tint that provides a good skin tone despite the other "distractions" in the scene makes me wonder if Auto WB is now incorporating some Sensei AI face detection.
One of the features that I always liked in Capture One was the ability to set a "Skin Tone WB" with an eyedropper probe and have long thought that LR should have the same thing (it would be easy to implement - instead of adjusting to neutral grey at the probe point, the adjustment is to a preset skin tone). However, the art of manually adjusting WB, Exposure and Saturation for "skin tone by the numbers" is something that every LR user should learn. ACR with its separate Color Sampler probe does make it easier. Now maybe Adobe is making Auto WB better.
Copy link to clipboard
Copied
Well the LR "As Shot" means exactly that. Whether the operator of the camera set a Fixed WB, kelvin or used one of the cameras Presets, or used the cameras Auto WB option LR will show "As Shot" in the WB: line. So we have no idea whether or not the OP dialed in a WB or used Auto WB on the camera.
Copy link to clipboard
Copied
https://forums.adobe.com/people/Just+Shoot+Me wrote
Well the LR "As Shot" means exactly that. Whether the operator of the camera set a Fixed WB, kelvin or used one of the cameras Presets, or used the cameras Auto WB option LR will show "As Shot" in the WB: line. So we have no idea whether or not the OP dialed in a WB or used Auto WB on the camera.
Metadata (Maker Notes) in the ARW file indicates that the camera was set to Auto WB, so I'd say it was Sony that dropped the ball.

Copy link to clipboard
Copied
Thanks a lot! If Im not using my preset, I'm able to replicate your results! thanks a lot! the color profile changed a lot!
but in the past I used the preset on nikon and sony cameras and had no problems, therefore i share the preset with you asking politely if you could apply it on your computer and show me how it looks on your end? that would be great!
here it is:
https://drive.google.com/open?id=12-Anaj9BLoba9mud1dwgBW9c_5lcsew8
thanks a lot in advance!
It works alright! Thanks a lot for helping me out!
Copy link to clipboard
Copied
fionn-gorilla wrote
Thanks a lot! If Im not using my preset, I'm able to replicate your results! thanks a lot! the color profile changed a lot!
but in the past I used the preset on nikon and sony cameras and had no problems, therefore i share the preset with you asking politely if you could apply it on your computer and show me how it looks on your end? that would be great!
That posted Develop Preset you are applying (C - Fuji FP-100c) has settings that are going to cause multiple issues! I'm not sure what you are trying to do, but the image looks horrible and similar to your reply #12. Applying these settings as a general starting point for "normal" image processing makes no sense! Sorry, but that's about as polite a reply I can offer.
As you said below. If you need advise on creating settings for a better "starting point" with the Sony A7R III ARW files we'll be glad to help.
fionn-gorilla wrote
Thanks a lot! If Im not using my preset, I'm able to replicate your results! thanks a lot! the color profile changed a lot!

Find more inspiration, events, and resources on the new Adobe Community
Explore Now
 AdChoices