
New Participant
June 13, 2025
Answered
Missing Develop Module in LRC 14.3.1
- June 13, 2025
- 4 replies
- 1099 views

The Quick Develop panel is available only in the Library module, so you need to switch to the Develop module.
If you don’t see any way to get to the Develop module, it is possible that the Module Picker at the top is hidden. If so, you can reveal the Module Picker by clicking the tiny triangle at the top center of the application window, or by choosing the menu command Window > Develop (keyboard shortcut F5).
However, even when the Module Picker is hidden, you can still use the command Window > Go to Develop (single-key shortcut D).
If the menu bar is hidden, Lightroom Classic is in a full screen mode, so exit full screen mode to reveal the menu bar again.
Also, is there a dust and scratch remove tool? Or do I just use Generative AI remove? I'm working with old photos. Thanks.
By @bbkseminole
I have edited probably thousands of scans of film. Lightroom Classic doesn’t have a “dust and scratches” filter as in Photoshop, although that Photoshop filter isn’t all that great either.
If there are a small number of spots and dust and scratches to fix, in Lightroom Classic you can drag the Remove tool over them. The Remove tool is in the Develop module and has several Fill modes of its own:
Remove. Cover up something you don’t want.
Heal. Cover up something you don’t want using pixels from another part of the image, merging the edges of the heal spot with the image.
Clone. Cover up something you don’t want using pixels from another part of the image, but don’t adjust the edges (so the edges of the cloning spot could be visible).
Generative Remove. Cover up something you don’t want using new content invented by AI to make the edit look seamless.
I think you should usually use Remove and Heal first because they are easy and fast. However, they often don’t look as good as doing it in Photoshop. If that fix doesn’t look good, leave the spot edit selected and change the Fill mode to something else, then click Refresh.
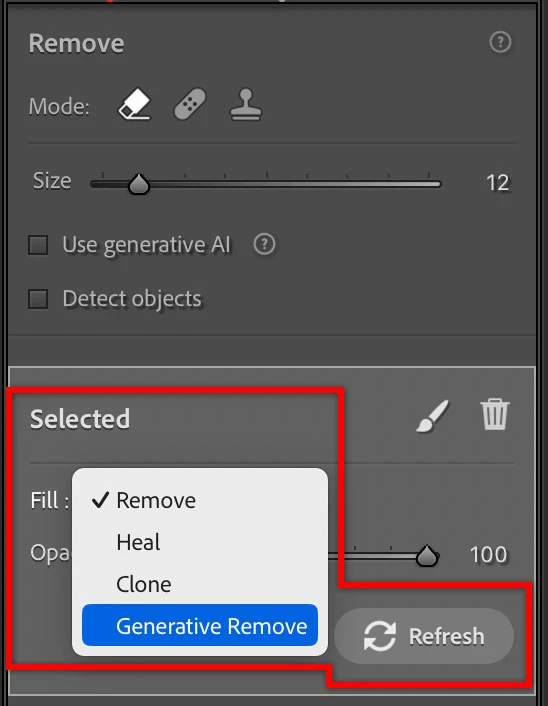
The one that will probably create the best-looking repair most often is Generative Remove. So why not use Generative Remove all the time? Because…
So I use the simpler Fill modes first (usually Remove or Heal), and if they look good enough then that’s done and I move on. If they don’t look good enough then I switch that spot to Generative Remove and that usually is good enough to not have to take the image to Photoshop. Remember that Generative Remove offers three variations to choose from, so if the initial Generative Remove fix doesn’t look good, try the other two variations before refreshing the fill.
Now, if the image has a very large number of dust spots or scratches, removing them one by one in Lightroom or Camera Raw can take a lot of time and slow down the program. So for the most damaged scans, I edit large numbers of image defects more quickly using the heal/remove tools in Photoshop, and catalog that version in Lightroom Classic as a replacement original, my new starting point for Lightroom Classic edits.
(Advanced tip, if you’re comfortable with the Develop module and the Masks panel)
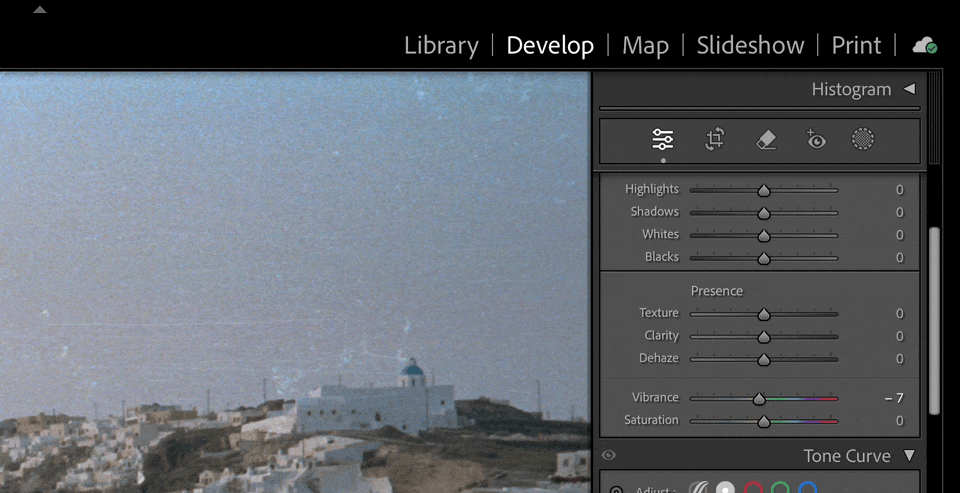
The old, basic, and not very effective Photoshop Dust & Scratches filter is largely built around blurring details based on a Threshold setting. In the Develop module in Lightroom Classic you can try getting a similar effect by reducing the Texture and Clarity values across the entire image, which should make dust and scratches harder to see, but it would also remove fine image detail you probably want to preserve. To avoid that, you can also try painting in your negative Texture/Clarity dust and scratch removal with a brush mask, or isolating broad areas to apply that to using AI masks such as Select Sky and Select Background, or preserving detail in the subject by subtracting an AI Select Subject or AI Select People mask. For some images it might help to control the detail removal using parametric masks such as Luminance Range or Color Range.
The demo below is an example of using negative Clarity and Texture on a damaged film scan. You can see how they can remove unwanted details, but they also blur out details you want to keep. That’s why you have to know how to use masks to control where the details are removed. In this example, I might use Select Sky to create a sky mask and apply broad detail removal to that without affecting the buildings and landscape. Then I might use the Remove tool to precisely fix specific areas of damaged film in the buildings and landscape.
Also be aware that any broad or image-wide removal of detail is also going to kill all the film grain, so if you want to preserve the look of the grain, only edit individual film defects using the Remove tool or the heal/remove tools in Photoshop.
Already have an account? Login
Enter your E-mail address. We'll send you an e-mail with instructions to reset your password.