

- Home
- Lightroom Classic
- Discussions
- Re: Normalising image within Lightroom.
- Re: Normalising image within Lightroom.
Normalising image within Lightroom.

Copy link to clipboard
Copied
Hello to everyone!
This is something which has been bugging me for quite some time (like years) and I would really want to know the correct way to do this... how would one normalise picture within Lightroom without any external tools (like without color checker, without neutral card or point, etc..).
What is the industry correct way?
By ”normalising” I mean getting WB right, getting skintones, tones, contrast, whites and darks right.
Getting it as close as possible to “what I saw” and thus creating a base for my following edit (creative color correction).
Or do I think too much as a colorist?
I know how to do these things in Photoshop or Davinci. But in LR it feels like guessing and going by what feels right Or what you like...
Hey! Thanks in advance for anything!
Either answer or pointing me in the right dirrection.
Thanks!
All the best!
Kryštof


 20
Replies
20
20
Replies
20

Copy link to clipboard
Copied
If I'm understanding your dilemma, this is what I would suggest. Regarding raw images, Lightroom is programmed with a set of default settings that it will apply for each camera that it supports. Those default settings may not be exactly right for your camera or for your style of shooting. My suggestion for you would be to take a photograph that is "typical" all what you normally photograph, or that represents what you would want Lightroom to recognize as an image containing everything that you would want adjusted properly. Import that image into Lightroom and adjust it to exactly the way you want that photograph to look. I'm referring to every possible adjustment including profile, color balance, white balance, detail adjustments, anything that you feel you would want to be part of that image. When you have that image looking exactly the way you would want it to look when it is first imported, save new camera defaults. These settings will now be applied whenever you important new raw images, or whenever you click the reset button on images that have been previously imported.
If your work always involves people and skin tones those skin tones can be part of your default settings. Or you can create additional presets for different skin tone settings as the need arises.
Copy link to clipboard
Copied
Hello JimHess,
First of all thank you for your time and for your input. Unfortunately this is not addressing my dilemma... but english is not my first language and I just might have not explained my self that well.
I am not looking for automatisation of "the process".
What I want to know is how "the process" should be addressed / dealt with.
I will drop couple examples/scenarios:
1) when you work with film, you first colour correct the footage (normalize the image), then you colour grade the footage (adjust it to your liking or accordingly to the context). I am want to know how to do the image colour correction as it seams that every photographer immediately skips to colour grading the picture
2) another example: I know how to read histogram and the scene. I know how to adjust blacks, whites and I know where +- skin should reside. So I believe I can get very precise exposure. I want to know how to do this for colours and skin tone (=skin colour)
3) yet another example. I know how to in Photoshop get a read out on RGB values under cursor. Based on those values you can calculate if your image has correct skin colour and tweak the values accordingly. I don't know how to do that in Lightroom.
Basically my issue is that I don't know how to colour correct an image in LR. Everything I do (and most of the people I believe do) is just guessing or editing to their liking (which should be the next step)
I just want to get more technical and understand things and have consistency. Not within one shoot, but within my whole portfolio.
I hope I explained myself better.
Thank you
All the best
Krystof
Copy link to clipboard
Copied
KRSTF wrote
1) when you work with film, you first colour correct the footage (normalize the image), then you colour grade the footage (adjust it to your liking or accordingly to the context). I am want to know how to do the image colour correction as it seams that every photographer immediately skips to colour grading the picture
1.Film too is output referred as outlined in the ICC white paper. Each film stock differs. It's not colorimetrically a rendering of the scene. In still film, Ektachrome differs from Agfachrome and Fujichrome. If you pointed three cameras at the scene, you'd get three differing renderings. The manufacturers produce the films 'looks' based on what they hope their customers will prefer.
Raw is like unexposed film to some degree. But LR and all raw converters produce a rendering that's subjective and that differ. LR is no different and setting the sliders at zero doesn't change this initial rendering which is also affected by camera profiles who's qualities differ and are based on the illuminant used (Daylight, tungsten, metal halide etc).
So the first thing you have to accept is, when you see a preview in any raw converter, it's some rendering that subjectively may or may not be what you desire. It's been graded.
2.The Histogram doesn't represent the raw data. It represents the current rendering of all the settings in the converter.
3. Ditto for RGB values. In LR, when not soft proofing, it defines a color space you'll never use anyway. At the very least, examine Lab values which are device independent values. RGB is never such a device independent color space; it's based on some profile (an RGB working space, an output color space etc).
Copy link to clipboard
Copied
Hello thedigitaldog
You must tell me how do you mention whole block of text?
Btw there is no app for this forum is there? I have really huge problem with the amount of notifications I am getting into my email.
Anyway thanks again for your response.
I really appreciate it but I don't think we are on the same page. Or maybe I just don't understand...
When I said film I don't speak about film as in analog picture but film as in motion picture. That I think was the first misunderstanding.
I do undestand that different stocks have different looks, but as you wrote those are looks and I would apply those after I have solid base. As you would do when colour correcting and colour grading a movie clip.
I understand that different softwares (Lighroom, Capture One or whatever) will interpret my raw files differently. And I am okey with that, that is not the issue. I am not trying to fight the windmills. I even think that the solution I am looking for doesn't really need to be raw file exclusive. It should work with JPEG to some extend as well I guess...
But thats why is it called colour correction
You correct camera specific attributes.
You correct when the camera reads the scene wrong.
You correct that the interpretation of your raw file in your software of your choice.
I am not looking for some holy grail that doesn't exist.
I believe I am asking quite basic question, that plenty of us maybe overlook, or is not standard in photography while it is in video making.
Questions like:
How to get the white balance just spot on without reference?
How to know ho much saturation should you add or remove to have faithful image?
How to get my skin tones perfect and without any tint of that or that. Because there is an equation for that in Photoshop.
And then there is the whole thing with exposition, but since I can read and work with histogram, I know how to approach this I guess. Still I would be happy to hear your take on it.
I hope this clears thing out.
Thanks again
All the best.
Copy link to clipboard
Copied
KRSTF wrote
Questions like:
How to get the white balance just spot on without reference?
How to know ho much saturation should you add or remove to have faithful image?
How to get my skin tones perfect and without any tint of that or that. Because there is an equation for that in Photoshop.
You work on a calibrated and profiled display and you subjectively alter the tools (sliders, WB tool etc) to produce a rendering you visually and subjectively desire. There is NO faithful. There is a desired rendering. For print or display:
http://www.lumita.com/site_media/work/whitepapers/files/pscs3_rendering_image.pdf
Copy link to clipboard
Copied
You can shoot say a Macbeth 24 patch target and produce a colorimetric (faithful) match: Lab values of each patch equally Lab values in final rendering. Move the camera (usually to a different illumination), capture something else or that target, use the identical LR settings and end up with a mismatch colorimetric and perhaps subjectivity undesirable.
Copy link to clipboard
Copied
KRSTF wrote
By ”normalising” I mean getting WB right, getting skintones, tones, contrast, whites and darks right.
Getting it as close as possible to “what I saw” and thus creating a base for my following edit (creative color correction).
The short answer is, you really can't. Read this first to see why (and what you really would need is to start with scene referred color; difficult to produce in LR/ACR but not 'impossible):
http://www.color.org/ICC_white_paper_20_Digital_photography_color_management_basics.pdf
White Balance isn't an attribute of the raw data. You render WB as you render the raw. IOW, the settings you see for the camera for WB first define a range of possible colors and, they have absolutely no effect on the raw.
The contrast ratio of a scene, one you can see, can greatly exceed the DR of the capture. The next piece to read is this:
http://www.lumita.com/site_media/work/whitepapers/files/pscs3_rendering_image.pdf
Lastly, it's kind of important to consider what raw data really is and 'looks like'; here's one example:
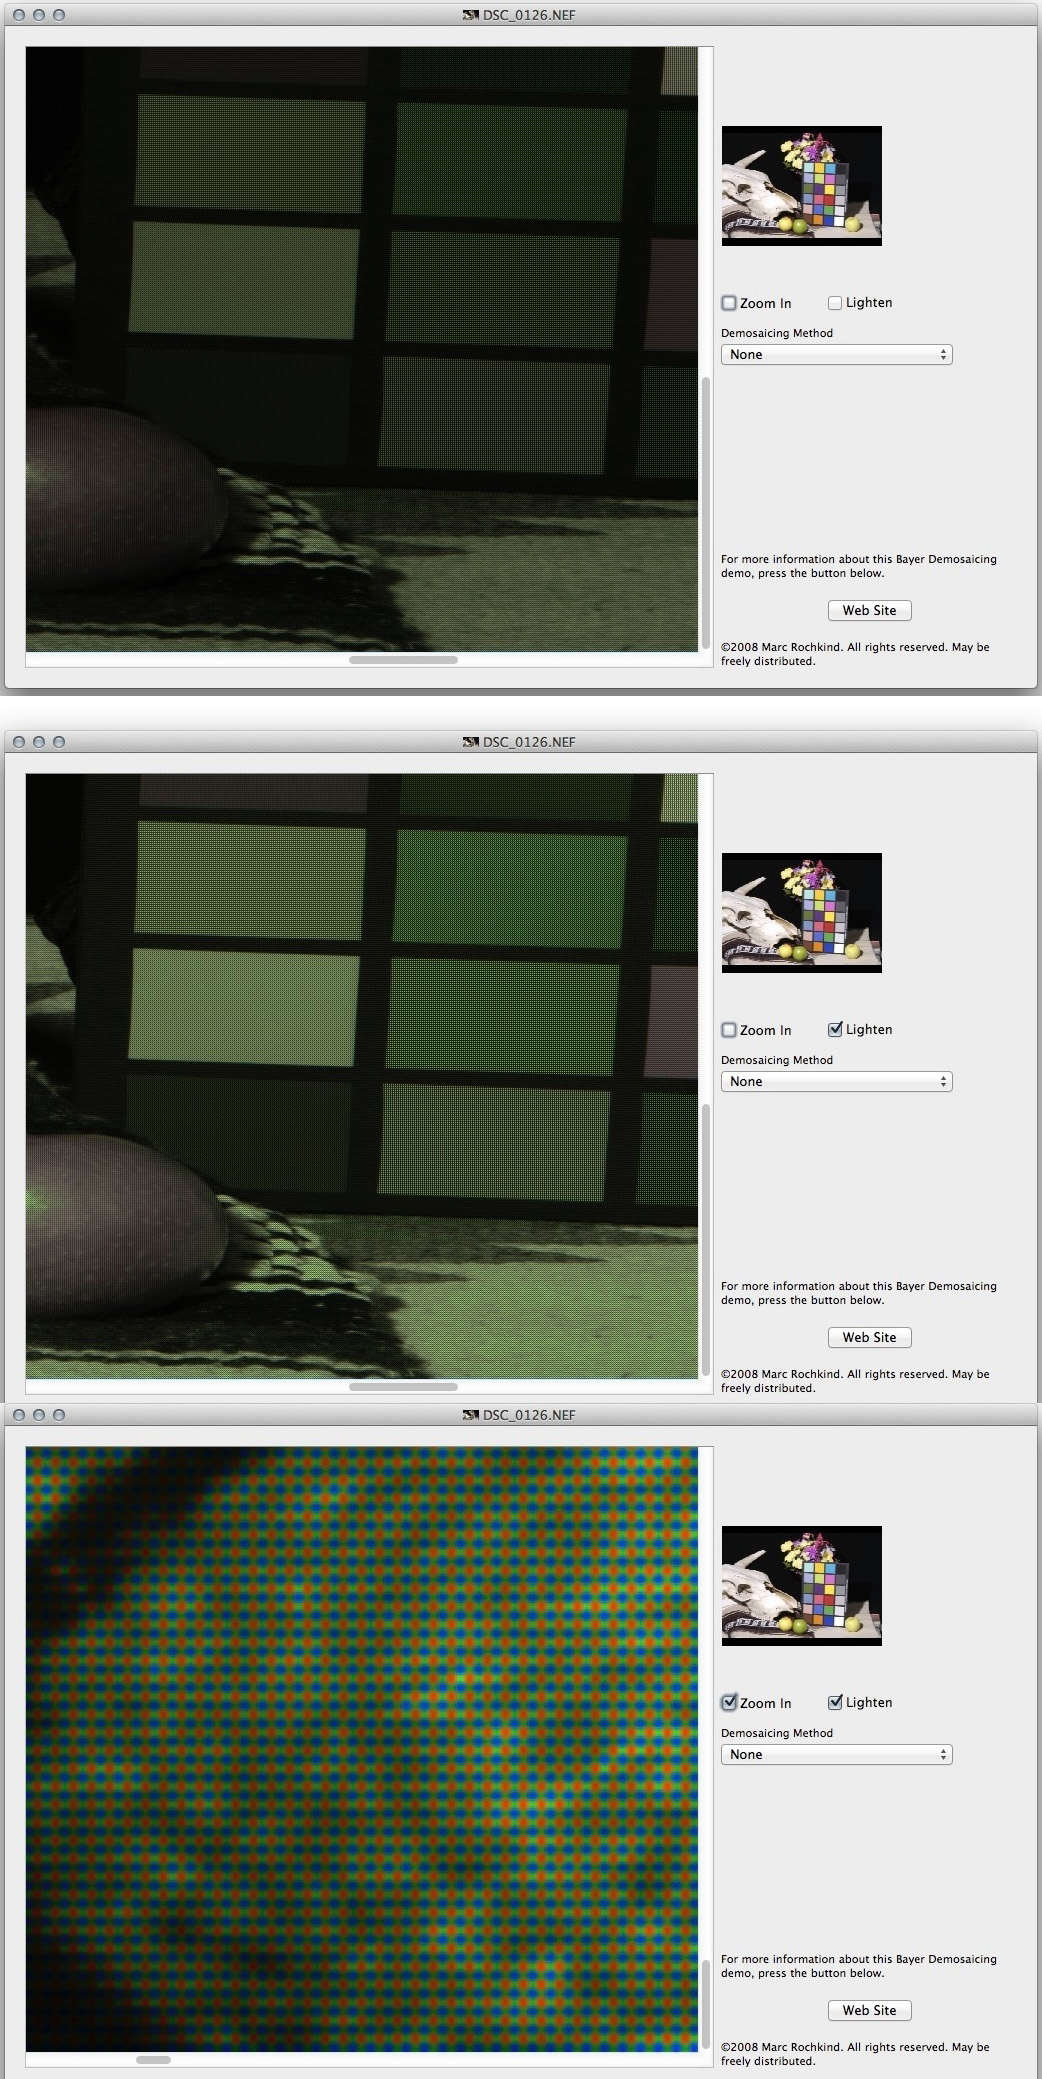
No, it doesn’t look anything like what you saw.
Copy link to clipboard
Copied
Hello thedigitaldog,
I must admit I got little lost in your reply! 
So basically what you are saying is that I need a colour checker?
I have a colour checker for portraiture, products and stuff... I am looking for a solution for my documentary photography, where I can't use those.
However I haven't read your links just yet, so maybe it will all come together when I will. But at the moment I am little lost. However thanks for those links as it is not easy to find solid study materials.
Btw would it be possible to determine the contrast, saturation, colour and etc. deviations for a specific camera model and it's raw interpretation in specific software (LR) and save it for later use? It doesn't solve my issue, but it would get me a step closer I think. But it still leave out the most important part thou... skin tone, colours, etc... 😞
Thanks for your time! Cheers!
Krystof
Copy link to clipboard
Copied
And that's why you have to create a good starting point, but there always has to be additional work to create "perfection". That's why Lightroom Classic provides all the tools.
Copy link to clipboard
Copied
KRSTF wrote
I know how to do these things in Photoshop or Davinci. But in LR it feels like guessing and going by what feels right Or what you like...
What would be your steps in Photoshop or DaVinci? Similar tools should be available in Lightroom.
If you are thinking like a colorist, does that mean you are thinking in terms of color grading? Because that's a separate step that comes after color correction.
But Photoshop, Lightroom, and DaVinci Resolve all have tools for both color correction and color grading. That's why it would be interesting to hear about your color workflow in the other two applications.
Copy link to clipboard
Copied
Hello Conrad!
Since you have the space between "d" and "C", I don't know how to mention you...
btw guys, all of you, I am new to this forum, so please let me know if I am breaking the etiquette or something.
I think you understood me very well! I am speaking in terms of "colour correction", I want to get the base right, then move onto the next step.
And to answer your question:
For example Photoshop workflow for skin tones:
1) duplicate layer
2) apply blur (just a to even skin tones out and to get better read out)
3) hover over midtones part of skin tones (like in not highlights or not blacks)
4) get read out of CMYK values in the "info" tab
5) the CMYK read out must be as follows:
C = something (doesn't matter)
M = C x 2
Y = M x 1.25
6) if they are not, you get Curves adjustment layer and you tweak each RGB curve independently to tweak the CMYK read out to match the formula above.
7) you are done when they do.
Another example for Davinci would be really long to explaine, but if you follow this video from 8:44 to 23:13
DaVinci Resolve 15 - The Art of Color Grading - YouTube
That is about some 15 minutes, so I understand if you don't really want to watch it 
Basically it is based on having more than just histogram... mainly waveform scope and vectorscope.
Then the ability to get exact readout through eyedrop
And then just knowing correct values and the context.
I hope that helped?
Thanks so much for taking your time with this!
All the best
Krystof
Copy link to clipboard
Copied
The workflow in Lightroom Classic (and Adobe Camera Raw) is similar to Photoshop. Like many photo editing applications, Lightroom doesn't have a waveform/vectorscope.
In Lightroom, you can get color value readouts of the pixels under the pointer by looking under the histogram when in the Develop module. However, these are RGB values, so you must know the typical RGB values for subjects such as skin tones.

You can then approach your overall and local corrections using any set of color tools in Lightroom, such as:
- Tone curve
- Individual RGB tone curves
- HSL sliders to target specific color ranges and adjust their hue, saturation, luminance
- Graduated Filter, Radial Filter, and Adjustment Brush to apply a local color correction
- Range Mask to limit corrections to a range of tones or colors within a local adjustment
For example, you could correct skin tones in Lightroom by doing the following:
- Check RGB values under the histogram
- Adjust RGB curves until they are correct
If you wanted to apply corrections only to the skin tones and not the rest of the image, you could apply a Radial Filter or Adjustment Brush to the areas with skin, then apply Range Mask to isolate and automatically mask the skin tones, then make your color corrections using the local adjustment options. This is similar to the secondary color correction feature in video editing applications. Unfortunately, RGB curves apply only to an entire image and are not available as a local adjustment, so you'd have to use the Temperature, Tint, and Color options to make color changes to a local adjustment.
If your display is calibrated or at least profiled, and you have a profile for your final output conditions, you can use the soft-proofing feature to simulate how the final colors will look. Unfortunately, only RGB profiles can be used at this time, so you can’t soft-proof CMYK output. If you need to work in CMYK most of the time, you’ll need to edit images using Photoshop.
Copy link to clipboard
Copied
Conrad you are a legend!
And I am an idiot, because I totally forgot that there is this pixel read out. : (
Now I guess I can't have those values in CMYK, can I?
Would you happen to know how to transcribe the said formula which I have in CMYK into RGB values if that is even possible? That would really sort my biggest issue.
With the rest of what you wrote I believe I know my way around (I hope I don't sound pretentious here : )
The only issue I can think of is that I would most likely use curves which I also use in presets I use for my "looks".
But I will find workaround or just make my presets from scratch while trying to avoid touching curves at all...
The thing with CMYK is that I know the skin formula in CMYK read outs. I don't work in CMYK and I very rarely hand in anything in CMYK. It is just that I don't know any similar formula for RGB values.
All the best
And thank you so much! This got me somewhere!
Kryštof
Copy link to clipboard
Copied
KRSTF wrote
The thing with CMYK is that I know the skin formula in CMYK read outs.
You do, for one kind of CMYK output. The numbers, depending on the recipe of CMYK and it's black gen is all over the map. Moot as LR doesn't nor needs to provide CMYK but again, CMYK is highly device dependent, a really inappropriate color model for this kind of work: Lab isn’t' and is supported in LR.
Here's a video on correcting skin tones without having to resort to CMYK:
Low Rez (YouTube)
http://www.youtube.com/watch?v=dWaFDKrNrwc
High Rez
http://digitaldog.net/files/SkinToneVideo.mov
A visual too:

http://digitaldog.net/files/SkinToneLAB.jpg

Copy link to clipboard
Copied
It sounds too me like your simply asking how to get a basic neutral rendering of your image. If you can't use a grey card or color checker, first choose a neutral profile for your raw - something like camera standard or neutral or if you don't have that for your camera, Adobe standard. Then if the auto white balance in your camera didn't get it right when you shot, jigger your white balance until it looks right and dial in any necessary exposure compensation. Don't touch any other sliders yet. It helps if there are neutral areas on your image that you can use the WB eye-dropper on but otherwise the process is visual. It helps to use a reference image on screen for what you consider normal skin tone if you have people in the image. After that you have a neutral looking starting point for further editing. After that comes your creativity. You can select other profiles for a quick look change or play with the other sliders.
Copy link to clipboard
Copied
Hello Jao!
What you are describing is exactly how I approach it at the moment.
But that doesn't sound like the proper way and you will always end up with a colour cast, incorrect saturation and might also end-up in situation, where there is just no reference for eye-dropper.
So at the end I alway take it to PS, but that is time and storage consuming.
But I believe you do understand my issue precisely!
All the best.
Thank you so much for your energy
Krystof
Copy link to clipboard
Copied
KRSTF wrote
Hello Jao!
What you are describing is exactly how I approach it at the moment.
But that doesn't sound like the proper way and you will always end up with a colour cast, incorrect saturation and might also end-up in situation, where there is just no reference for eye-dropper.
So at the end I alway take it to PS, but that is time and storage consuming.
But I believe you do understand my issue precisely!
All the best.
Thank you so much for your energy
Krystof
Krystof,
if you choose a neutral profile and don't touch the saturation sliders, you will get consistent saturation as long as your white balance is good. In Lightroom this is most accurately done by eye if you don't have a white reference and your camera tends to misjudge white balance. It is helpful to use some reference images on your screen to do this. The CMYK trick that people used to do in Photoshop doesn't work as there is no CMYK readout in Lightroom. That method is fraught with major issues anyway (it doesn't work for anything but caucasian skin). I know digitaldog is an expert in this field and is not a fan to say it mildly. Personally I have not really been in a situation in which doing this by eye is a problem. I see problems when I shoot with two different cameras that judge white balance differently and in that case I often just select all images from one camera that is off a bit and warm or cool all images and that takes care of most of it. I then refine individual images if necessary.
the best way to approach what you want is to calibrate your camera using a color checker chart and generate a new standard profile based on the camera. Typically you would do this under two lighting conditions - tungsten and daylight - and combine them in a single camera profile that you call in Lightroom. I use a color checker passport and use its built-in software to generate profiles that work well in Lightroom. The difference with the standard profiles is very minor though in my experience and I only do it when accurate color rendition is essential. That rarely happens in landscape photography which is more my bailiwick. Then if you have profiles such as that, you want to always shoot a grey card in the conditions that you are shooting and sync the white balance over your images in Lightroom from the same shoot location and light condition. This will get you consistent color at least as a starting point.
Copy link to clipboard
Copied
Hello Jao!
Thanks for your response! And I don't know where to start... : )
Thanks for the info about custom made colour profiles. I too have passport colour checker but I still have to make my own profile... I should have already. I won't bother you with questions about that as at the moment I know nothing and my wild guess is that the basics are already well covered on the net.
Just do I understand it correctly, that once you made this profile you can use it for all sorts of situations/pictures? The profile is camera based not scenario based?
About the CMYK trick / formula... I beg to differ here. I had only great results with it and for all ethnicity so far... I had no issues.
I definitely get better results than doing it by eye especially because of how easily my eye is cheated or misguided. Then when I compare with older edits, everything is different, just because before the edit I went through a colour book or something with my son.
And so there is no "trick" or anything for correct white balance is there? Either have grey board, passport or hope someone wore something grey or have really white scera, etc..?
Back to the profiles and just to be sure.. it is better to be using custom made (through xrite) then what LR offers?
Is there a reason why you suggest neutral over either standard or landscape which are those that I use the most...
Was your point mainly to have just one profile for all the pictures to ensure consistency?
Lastly thank you so much for describing your workflow.
Would you recommend any tungsten/daylight profile creation tutorial?
Thakns again!
All the best
Kryštof
Copy link to clipboard
Copied
KRSTF wrote
Back to the profiles and just to be sure.. it is better to be using custom made (through xrite) then what LR offers?
Everything you thought you wanted to know about DNG camera profiles:
All about In this 30 minute video, we will look into the creation and use of DNG (.dcp) camera profiles in three raw converters. The video covers:
What are DNG camera profiles, how do they differ from ICC camera profiles.
Misconceptions about DNG camera profiles.
Just when, and why do you need to build custom DNG camera profiles?
How to build custom DNG camera profiles using the X-rite Passport software.
The role of various illuminants on camera sensors and DNG camera profiles.
Dual Illuminant DNG camera profiles.
Examples of usage of DNG camera profiles in Lightroom, ACR, and Iridient Developer.
Low Rez (YouTube):
High Rez (download):
http://www.digitaldog.net/files/DNG%20Camera%20profile%20video.mov
Copy link to clipboard
Copied
KRSTF wrote
Thanks for the info about custom made colour profiles. I too have passport colour checker but I still have to make my own profile... I should have already. I won't bother you with questions about that as at the moment I know nothing and my wild guess is that the basics are already well covered on the net.
Just do I understand it correctly, that once you made this profile you can use it for all sorts of situations/pictures? The profile is camera based not scenario based?
The profile you generate is both camera and scenario based. Strictly it is only valid for the specific condition you shot the color checker in. However, in general and certainly if you create a dual illuminant profile, the profile will work quite well for all but the most extreme conditions. In practice there is not much metamerism except if you are dealing with very different type of illumination sources with very monochromatic light which is rare. Note that this is only relevant if you are looking for reasonably accurate color. This is generally only true for people photographing artworks or historic objects/documents for reproduction. In most other cases you are looking for a certain look and that means there is no point in looking for accurate color reproduction as by definition applying a look implies throwing accuracy out of the window.
About the CMYK trick / formula... I beg to differ here. I had only great results with it and for all ethnicity so far... I had no issues.
I definitely get better results than doing it by eye especially because of how easily my eye is cheated or misguided. Then when I compare with older edits, everything is different, just because before the edit I went through a colour book or something with my son.
If you have raw files and a good white balance for whatever light is hitting the skin either because you shot a grey reference or your camera is doing a good job of estimating correct white balance, you do not need the cmyk trick. It is a thing that was used way before raw capture became popular and is now an anachronism. This is true not in the least since there is no single cmyk. Digitaldog explained that above and he is right that the cmyk trick is completely dependent on what cmyk space is chosen and what conversion settings. It is also really problematic if you do any edits after it because any curves, profile, saturation, etc. adjustment will throw it out of the window. Even in video there is now so much use of extreme color grading everywhere with scenes looking completely green or blue depending on the mood being conveyed (i.e. not accurate at all concerning skin color!) that the guidelines just stop you from being creative and will make the images look pedestrian. Visual editing on a calibrated monitor is probably the most accurate way of doing white balance adjustments. Just throw a reference such as digitaldog's linked image above up on the same screen to compare. The bottom line is though that you can't do it using the CMYK rules in Lightroom because it won't display any values that way and the numeric display is based on a Lightroom-unique color space (prophotoRGB primaries and a sRGB gamma curve) that doesn't translate to any common color space.
And so there is no "trick" or anything for correct white balance is there? Either have grey board, passport or hope someone wore something grey or have really white scera, etc..?
No trick. Either your camera is good at estimating it from the image or you shoot a card. Otherwise you have to do it by looking at the image or from experience with the type of light you encountered. Nowadays cameras are quite good at doing this right and I haven't used my passport in years.
Back to the profiles and just to be sure.. it is better to be using custom made (through xrite) then what LR offers?
Is there a reason why you suggest neutral over either standard or landscape which are those that I use the most...
Was your point mainly to have just one profile for all the pictures to ensure consistency?
I only mentioned the custom profiles as a way to get consistent and more accurate rendering between cameras and in varying light conditions. They will give boring renderings therefore. The neutral profile will similarly give a neutral/flat rendition that allows you to white balance without bias and won't be wrongly saturated. It will not be as accurate as a custom profile if you care about that. If you most commonly choose camera standard or camera landscape, you are choosing to use the very subjective rendering the camera manufacturer (or Adobe's if you use Adobe standard/landscape) generated to have their cameras creative attractive images. They are NOT accurate in any way. There is nothing wrong with choosing those but realize that they all have their biases and will affect skin tones and such. So whatever you choose as profile, change to it before you fix white balance. If you are interested, here is a 10-year old review of using the passport with Lightroom: Jao's photo blog: Colorchecker passport minireview that has a little mouseover that shows the effect of white balancing on the grey patch and of using a custom profile that shows that there are subtle differences between the built-in standard profiles and custom profiles in color rendition. The differences are really large if you use non-standard profiles such as landscape.
P.S. if you shoot a lot of landscape, do not get hung up on grey reference as you will limit your creative vision. With landscape for sure, white balance is a creative decision, not an absolute: Jao's photo blog: The importance of the right white balance.

Find more inspiration, events, and resources on the new Adobe Community
Explore Now
 AdChoices