

- Home
- Lightroom Classic
- Discussions
- P: Generative Remove Feedback (Lr Classic & Lr Eco...
- P: Generative Remove Feedback (Lr Classic & Lr Eco...
P: Generative Remove Feedback (Lr Classic & Lr Eco)

Copy link to clipboard
Copied
-
App version
-
System details
-
Example image(s) if you wish to share
Our team continually monitors this thread to track issues for future improvement. Thanks!
Posted by:


 1 Pinned Reply
Update (Dec 2024): With the new release, it is no longer necessary to perform Generative Remove Operations prior to Cropping.
Update (August 2025) With the new release, the Generative Remove Engine has been updated.
See this video for details: https://www.youtube.com/watch?v=YwpUX4b6igY
 1405
Replies
1405
1405
Replies
1405

Copy link to clipboard
Copied
@C.Cella: "The soruce of the problem is the way LrC and CameraRaw handle Remove Refienments."
Also see my post about this back in July:

Copy link to clipboard
Copied
photographer using Lightroom and Photoshop from ages and I create tutorials
on the same. I have also been Lightroom evangelist for some time.
I understand how it has to be done rightly. For once pls don't get into
explanation and justification mode and stop putting blame on users. Instead
get into correcting the major flaw that is in Lightroom remove tool. You
get great results in same tool in Photoshop.
Copy link to clipboard
Copied
@Jasminder Singh_Obero8336: "I have selected every bit. ... I understand how it has to be done rightly."
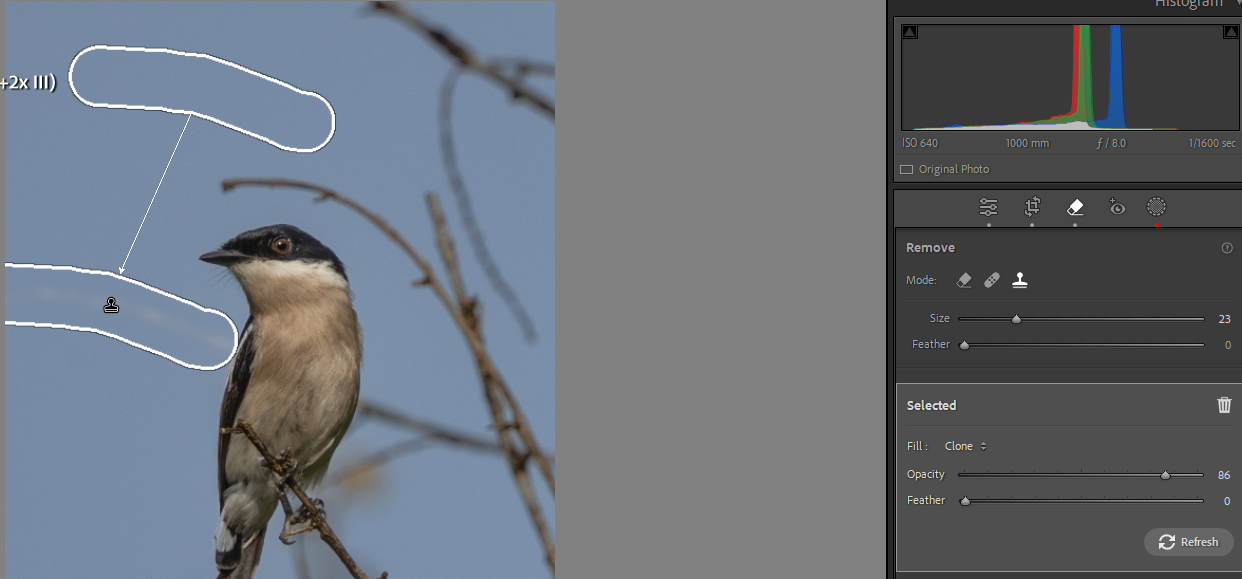
Your screenshot indicates you didn't select all of the person's arm, and it also indicates that you didn't select the two disconnected parts of the person with a single connected selection and then subtract the parts you didn't want removed, which is unfortunately necessary in this case to replace the person with background. If you disagree, please attach a full-resolution JPEG exported from the unmodified original photo, not a screenshot. Then we can all see and agree on what's happening.
I don't work for Adobe, and I'm not "blaming users" or justifying anything -- I'm just trying to help people use the tool as it currently exists most effectively. If you read my posts here, including my reply to you, you can see I often criticize the current version of Remove.
Copy link to clipboard
Copied
The AI remove tool in LR Classic is insanely useless.
It is so bad that I don't even want to risk wasting time to try it.
It seems to work in about 10% of cases but almost always it replaces the object it's supposed to remove, with a similar object.
Want to remove a straight street lantern from an image? Here's a weird looking street lantern in a different style
Copy link to clipboard
Copied
@Patrick22616748c1sx: "almost always it replaces the object it's supposed to remove, with a similar object. Want to remove a straight street lantern from an image? Here's a weird looking street lantern in a different style"
See this article for how to remove objects more reliably:
https://www.lightroomqueen.com/generative-remove-replace/
Most complaints about Remove are addressed in the article. But if it doesn't help, please attach a full-resolution JPEG exported from the unmodified original photo, so we and Adobe can see the issue in detail. With nearly everyone who has posted a problem photo, we've been able to show how to quickly remove the desired objects.
Copy link to clipboard
Copied
Thanks for trying, but this article isn't helpful at all.
It's basically saying "make the selection bigger" which I already did.
I've been working with photoshop for 20 years now, using LR heavily for my job of 3 years and I love how I rarely need to open Photoshop in order to get the desired look/edit.
I have experience in selections, masking, removing objects and everything, I have never complained about a specific tool before, so I think it's fair to say that when a lot of people, including me, say it doesn't work as it's supposed to, you have people that are experienced with the way they use tools within Adobe software.
I've tried several times with all kinds of different images and issues and I am not going to touch the tool again until I see 80-90% of the people saying it's working now.
It's often amazing to see what the various remove tools in PS are capable of but at the same time really frustrating and surprising to see how bad the LR equivalent works.
Copy link to clipboard
Copied
@Patrick22616748c1sx: "this article isn't helpful at all. It's basically saying "make the selection bigger"
That's a highly inaccurate summary, which points to why you're not getting good results. That article describes a number of other things to be aware of: select shadows and reflections; apply Remove before cropping with Crop, Lens Correction, and Transform; apply Remove before masking;select all the disconnected parts with connected strokes and then subtract; brush extra wide across the edges of the photo.
Experience with other older tools in Photoshop isn't relevant to Remove, since it behaves so much differently.
Your feedback won't carry much weight without posting actual examples. Attach a full-resolution JPEG exported from the unmodified original photo (not a screenshot). With nearly everyone who has posted a problem photo here, we've been able to show how to quickly remove the desired objects.
"I am not going to touch the tool again until I see 80-90% of the people saying it's working now."
You'll never see 80-90% of the people posting in this forum saying that Remove works for them. You're ignoring that posts in this forum, and this thread, have a strong selection bias to people who have problems. The tens of thousands of people who don't have problems usually don't post. Very few people for whom Remove works well bother click the Feedback button (which brings them to this thread) .
Copy link to clipboard
Copied
I'm not gonna look in here for the 80-90% of positive feedback about the tool but look for real live real world experience by people who work with LR daily.
It feels like you list 20 things you have to make sure and check if they're turned off/not touched yet in order to use the tool. That is one part of the uselessnes about this tool.
Doesn't work with a workflow where you synch your setting across hundreds of photos, because you would have to reset all settings.
Doesn't work with lenses that automatically have lens correction turned on, once imported.
What you also didn't understand is that I mentioned prior experience so you don't try telling me to select the shadow as well or try making the selection bigger.
And lastly, I don't care if my feedback carries much weight to you personally.
I just see countless other people saying the same thing - Instead of removing, it adds a variation.
And if I have to come to the forum, complain, get the link to the other thread, read it, make sure I follow all the steps to make the tool work, it's neither intuitive nor usefull on a broader scale.
Your support won't carry much weight, if you can't see that, because the workarounds you're describing are just not applicable in most real world situations

Copy link to clipboard
Copied
Doesn't work with a workflow where you synch your setting across hundreds of photos, because you would have to reset all settings.By @Patrick22616748c1sx
What do you mean?
When I sync Gen Remove to other images the the other settings don't need to be reset.
.
Copy link to clipboard
Copied
[This post contains formatting and embedded images that don't appear in email. View the post in your Web browser.]
@Patrick22616748c1sx: "you list 20 things you have to make sure and check"
Another large inaccuracy -- I listed 5 things.
"Doesn't work with a workflow where you sync your setting across hundreds of photos, because you would have to reset all settings."
You haven't replied to C.Cella's inquiry about what you mean by this -- neither of us understands.
"Doesn't work with lenses that automatically have lens correction turned on, once imported. "
No, that's inaccurate, it usually works well. In very infrequent cases, if you're trying to remove an object against the edge of the photo and it replaces rather than removes, it could be that the lens correction is cropping out a small border of pixels that you need to select by brushing wider at the edge. Alternatively, you can just toggle off the lens correction, apply Remove, then toggle it back on:

It would be better if Remove did this automatically, as it does with Lens Blur, but it's a misleading exaggeration to say simply "doesn't work".
"I just see countless other people saying the same thing - Instead of removing, it adds a variation."
With nearly everyone who has provided an example of that here, we've shown how to quickly and easily remove rather than replace the object. There are such examples -- Remove is hardly perfect -- but there have been only a few in this thread and it's predecessor during "early access".
"the workarounds you're describing are just not applicable in most real world situations"
There are lots and lots of posts here to the contrary., and you still haven't posted even a single example to the contrary.
As the article I referenced says, "Like any tool, you need to know how to use it properly to get the best results." You're determined not to attach a full-resolution example where it's hard to get good results, so it's easy to assume you don't want your premature conclusions to be proven wrong.
"I don't care if my feedback carries much weight to you personally."
I don't care either. I do try to help people on this forum provide meaningful, actionable feedback that will be most likely to influence Adobe, by including examples, explaining in detail what's going wrong, and filing bug reports. I've helped a number in this thread and its predecessor identify places where Remove goes wrong. (I'm one of the most persistent critics of LR Classic here and I've filed the most bug reports by far.)

Copy link to clipboard
Copied
"Edge" has nothing to do with the problem. I had a person in the middle of a picture. I used AI to remove it. No, it replaced it with another person. I reiterated this a number of times. It eventually replaced the adult with a child. Then that child with another smaller child. Then after a few more times, the child was replaced with a CHICKEN! A few more times and the object was finally actually removed.
Copy link to clipboard
Copied
@jimbessette: ""Edge" has nothing to do with the problem."
An object on the edge very often is the cause of people's problems reported in this thread and the previous early-access thread. If you've cropped the photo before applying Remove, Remove will try to match the pixels outside the crop, replacing the selection with another object.
"I had a person in the middle of a picture. ... t replaced it with another person. I reiterated this a number of times. It eventually replaced the adult with a child. Then that child with another smaller child. Then after a few more times, the child was replaced with a CHICKEN! A few more times and the object was finally actually removed."
This often happens when you've missed a bit of the original object, including a bit disconnected from the main selection, or you haven't selected a shadow or reflection of the object. In all these cases, Remove tries to match the unselected bits. There are several examples of this in previous posts in this thread and the early-access thread. See this article for more details and examples:
https://www.lightroomqueen.com/generative-remove-replace/
Most complaints about Remove are addressed in the article. But if it doesn't help, please attach a full-resolution JPEG exported from the unmodified original photo (not a screenshot), so we and Adobe can see the issue in detail. With nearly everyone who has posted a problem photo, we've been able to show how to quickly remove the desired objects.
Copy link to clipboard
Copied
useless, way b ehind other apps

Copy link to clipboard
Copied
Copy link to clipboard
Copied
Copy link to clipboard
Copied
@DhandaNot your screenshot shows you need to Update Ai Settings for Masking i.e. Red Dot under Masking panel icon.
If you have a Sky Mask apllied it might be the cause of the smudges.
Consider also there is a bug when trying to clone/heal a Sky affected by ANY type of Masks.
.
Copy link to clipboard
Copied
All the tips and tricks to use Gen Remove should be available in LrC, via the help section or via an icon in the Remove Panel.
We have now a new revamped "What's New" secrion and we could have a similar section dedicated to "How To Use Gen Remove" with explanations, images, videos, gifs, etc...
So many users would NOT have problems if only this "manual" was made available within LrC.
Praise must go to @johnrellis which seemingly all alone is sharing the good knowledge on the forums.
Perhaps John we should create a "Gen Remove Guide" Plug-in 😉
.
Copy link to clipboard
Copied
The Lightroom Queen article is a good reference and Victoria and Paul are keeping it updated:
https://www.lightroomqueen.com/generative-remove-replace/
Copy link to clipboard
Copied
The Lightroom Queen article is a good reference and Victoria and Paul are keeping it updated:
https://www.lightroomqueen.com/generative-remove-replace/
By @johnrellis
Yes but it's not widely known.
Personally I think that it should be Adobe to provide the info, available offline in LrC.
But thats just me probably.
Copy link to clipboard
Copied
[This post contains formatting and embedded images that don't appear in email. View the post in your Web browser.]
@DhandaNot: "Generative Remove does not work well LR CLassic 14.0.1 I tried to use Heal and Clone. But that too leaves a trace of what I am trying to remove."
Your screenshot shows two issues:

1. You've applied Remove on top of masking (as C.Cella pointed out). Do Settings > Update AI settings to recompute the masks after applying Remove, or do as Adobe recommends, appy Remove before masking (which doesn't match many people's workflow).
2. You've applied Remove to a cropped photo, and if the selection extends to the edge of the crop, Remove is trying to match the cropped out pixels. Apply Remove before cropping. See here for more details:
https://www.lightroomqueen.com/generative-remove-replace/
See this article for how to remove objects more reliably:
https://www.lightroomqueen.com/generative-remove-replace/
Most complaints about Remove are addressed in the article. But if it doesn't help, please attach a full-resolution JPEG exported from the unmodified original photo, so we and Adobe can see the issue in detail. With nearly everyone who has posted a problem photo, we've been able to show how to quickly remove the desired objects.

Copy link to clipboard
Copied
Is there a way to select the mask to be used with Generative Remove the same way you select normal masks? For example detecting people, parts of people, subject, sky.
Copy link to clipboard
Copied
@johngregoryfcb: "Is there a way to select the mask to be used with Generative Remove the same way you select normal masks? For example detecting people, parts of people, subject, sky."
No. You could submit a feature request here:
Copy link to clipboard
Copied
@johngregoryfcb no there are no direct Ai Selections to be usable with Remove.
Use Detect Objects Remove and paint over the "item" to remove.
Unfortunately there is no "rectangular" mode for Objects in Remove so is not as fast (and good for performance) todo the selections like it is in Masking using Objects
You can paint around the item to select and Gen Remove will auto fill it to make the selection.
.

Copy link to clipboard
Copied
Copy link to clipboard
Copied
@quinet2000: "I have a dual monitor set up. When I select an object to remove on my main screen, it shows up in red off-centre by about a centimeter."
Please submit a bug report about this:
https://community.adobe.com/t5/lightroom-classic-bugs/how-do-i-write-a-bug-report/idi-p/12386373
which will make it more likely Adobe will set it and respond. Be sure to include screenshots (or better, a full-resolution screen recordings) and copy/paste the entire output from the menu command Help > System Info.

Find more inspiration, events, and resources on the new Adobe Community
Explore Now
 AdChoices