 Adobe Community
- Home
- Lightroom Classic
- Discussions
- Re: Syncing Range Masks in LR Classic 7.3
- Re: Syncing Range Masks in LR Classic 7.3

Copy link to clipboard
Copied
I am really enjoying the range masks, it has reduced the number of times I have to jump to Photoshop to make these changes.
Range masks do not sync very well.
I select three similar images and add a gradient filter (perfectly level holding the shift key). I adjust the filter to my liking and then choose the luminosity range mask and adjust the range sliders. When I go to the next image I notice that the range mask is not applied although the settings do sync. I also notice that the filter is no longer perfectly level, odd.
When I use the colour range mask, the eyedropper appears in the next image, but it has no effect. It does apply the range if I select the eyedropper tool and chose the colour again.
I don't know if I am expecting too much from the range mask but I tried to create a gradient filter preset where the range mask settings are part of the configuration. When I choose the preset, the range mask settings are not applied. It would be really great if the range mask settings could be retained with the preset.
As always, I know that there are enough people that will let Adobe know about issues, I just have to wait for the next update to have many issues go away.
BTW, Apple MacBook Pro, 10.13.4 and Lr Classic CC 7.3.
Thank you, have a great day, Rick.


 1 Correct answer

Range mask settings cannot be stored in a preset, for the following reason. Range mask is not a mask by itself, it is a refinement method for the mask you apply with a local adjustment tool. That means that range mask can only be activated after you applied that mask, and a tool preset can be activated before you apply the tool. Synching should work however.
 10
Replies
10
10
Replies
10
Copy link to clipboard
Copied
Range mask settings cannot be stored in a preset, for the following reason. Range mask is not a mask by itself, it is a refinement method for the mask you apply with a local adjustment tool. That means that range mask can only be activated after you applied that mask, and a tool preset can be activated before you apply the tool. Synching should work however.
Copy link to clipboard
Copied
Upon further testing, these replies correctly describe the way the new (to me) Range Masks and Filters work. Thank you very much, everyone.
I other words, workflow matters when working on one or multiple images. I can't look at a disoriented horizon or aspect for very long and so I typically correct for those first. Then I would normally work on one characteristic image and when I am happy with the settings, sync them with the other images in the series. Filters are usually the same general position, I never really noticed that they were impacted by transform until I started working with Range Masks.
I'm really liking the Range Masks; I can do so much more within Lightroom.

Copy link to clipboard
Copied
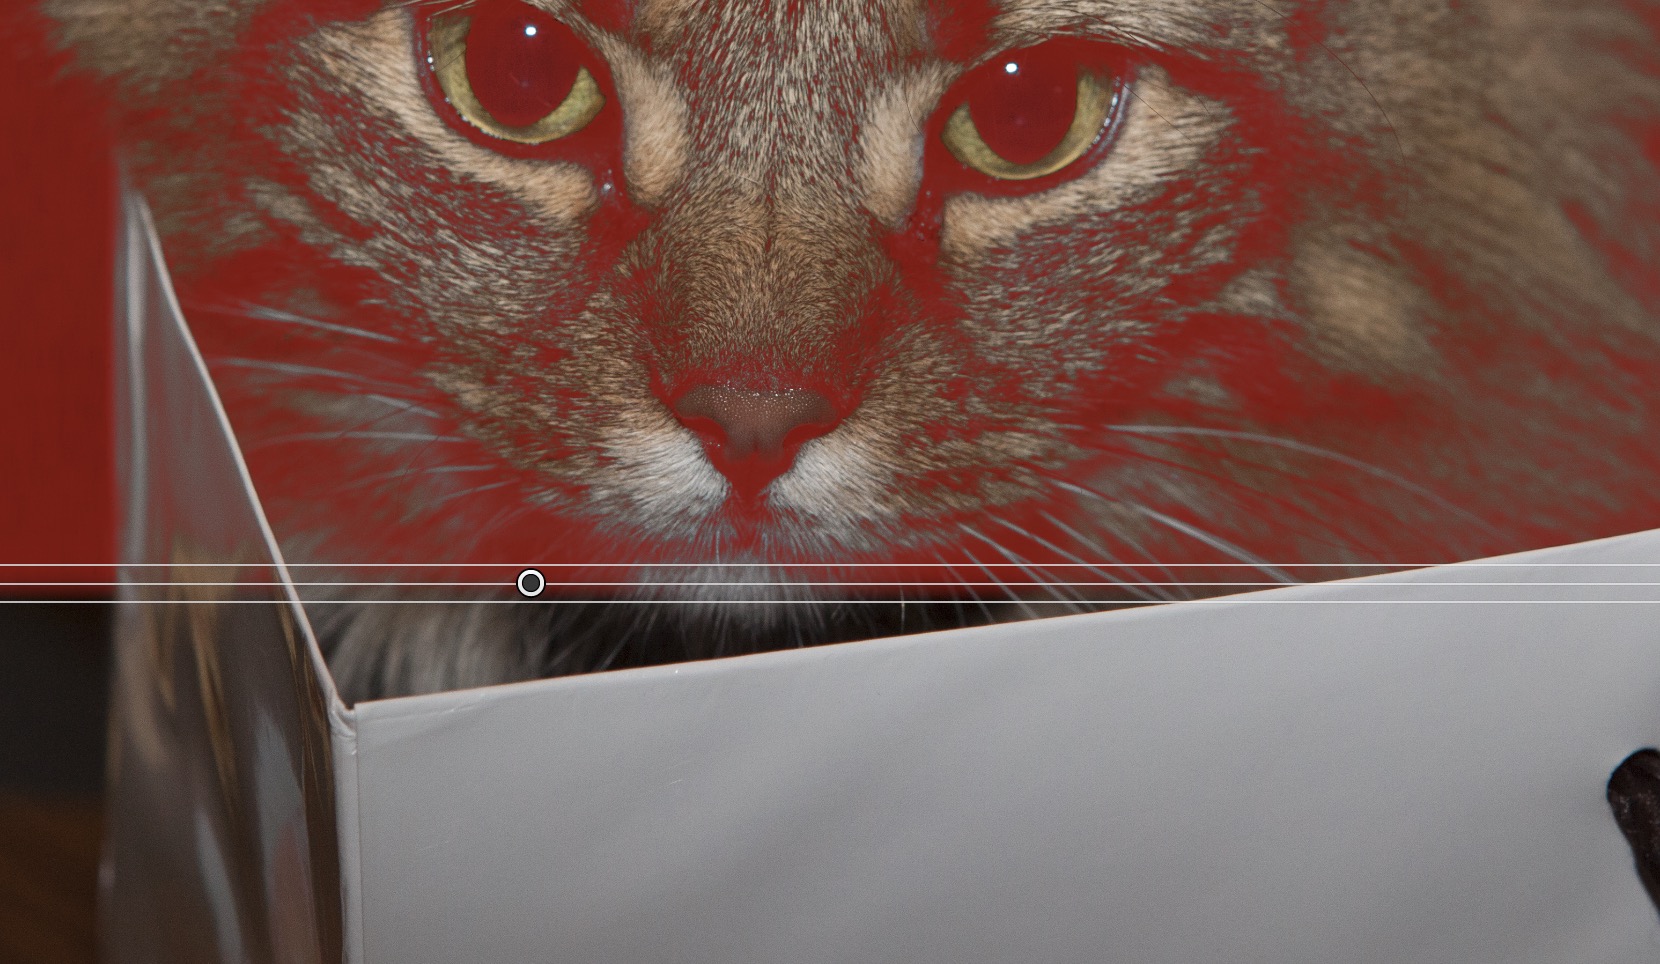
It seems to sync for me with the Color Range mask and gradien with the result I expect for these two very different photos. The gradient is level. I chose the dark area by the horse tail for the color in the source. The synced photo has the similar dark areas in the cat selected so the Range Mask appeared to work with the sync. I would think that trying to sync range masks like this would produce a lot more unwanted results than good results unless the photos were EXTREMELY similar.
Screen clip are from the same area of each photo
Clip from source photo
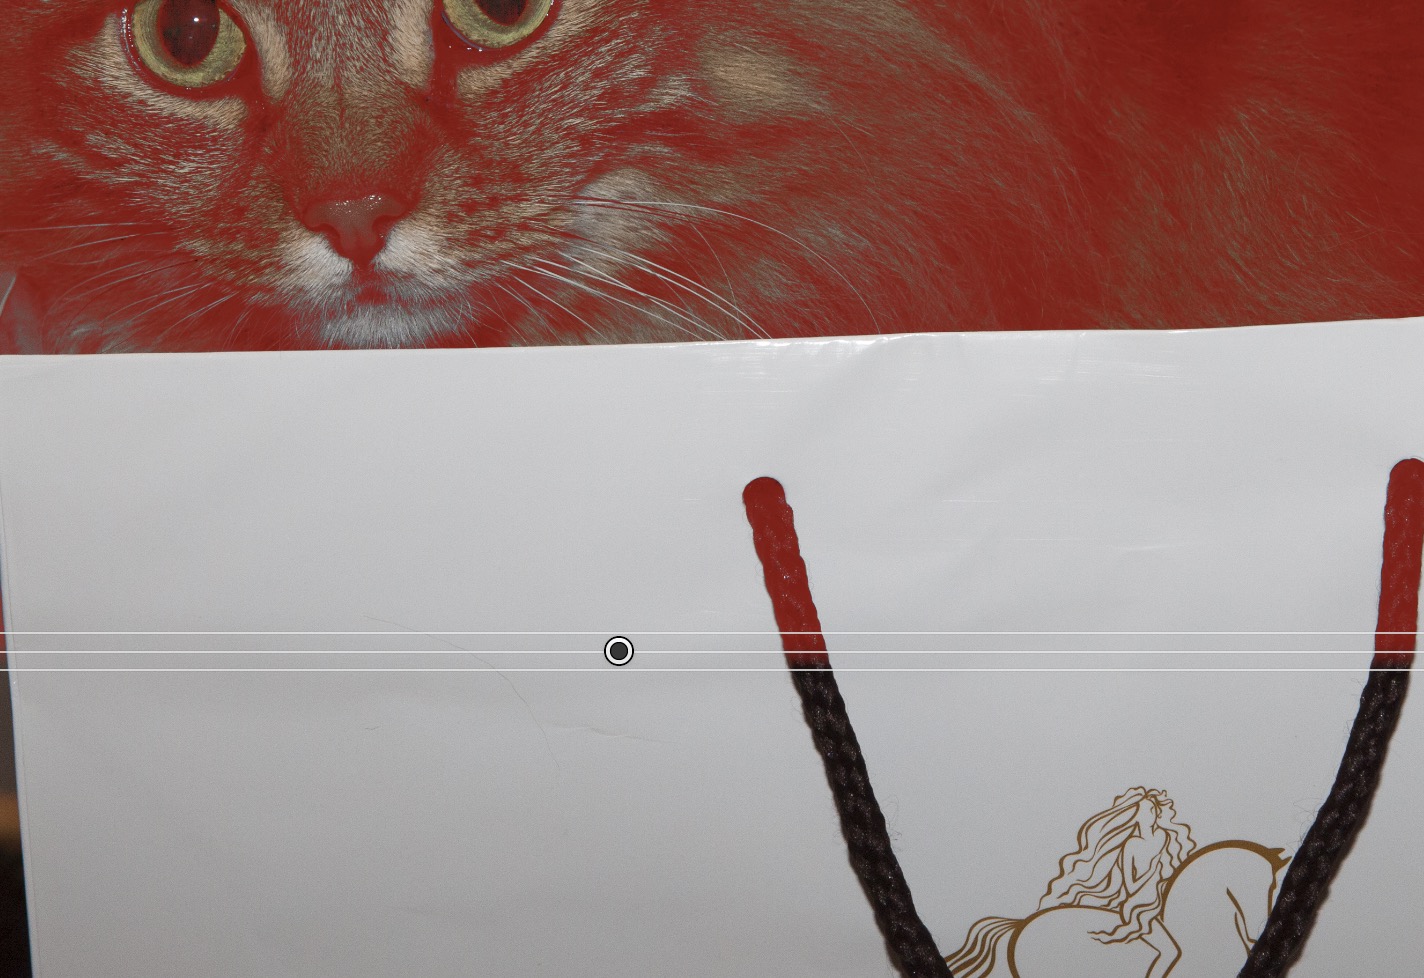
Clip from synced photo

Copy link to clipboard
Copied
Both Sync and a Develop preset with a Graduated filter using a Color or Luminosity Range mask work on Windows 7 with LR 7.2. The Develop preset does contain the Range Mask data. Keep in mind if the image it is being applied to does not contain image data with the eyedropper targeted Luminance level or Color than it may appear that is isn't being Sync'd or applied with using Develop preset. This begs the question if something changed in LR 7.3 that causes this behavior.
Here's a LR 7.2 Graduated Filter Develop preset with Exposure -2.0, Saturation 50, and a Color Range Mask set to Amount 50. All of these settings are visible in the Develop preset:
s = {
id = "E8014D28-92C0-41C6-A7FE-A453118433AD",
internalName = "Graduated Filter Color Range Mask",
title = "Graduated Filter Color Range Mask",
type = "Develop",
value = {
settings = {
EnableGradientBasedCorrections = true,
GradientBasedCorrections = {
{
CorrectionActive = true,
CorrectionAmount = 1,
CorrectionID = "D1B0E56F-2866-4C5F-9D72-C3949415E8FF",
CorrectionMasks = {
{
FullX = 0.533463,
FullY = 0.74269,
MaskID = "7A5DF39B-026D-4FEC-A524-0275D5979E7D",
MaskValue = 1,
What = "Mask/Gradient",
ZeroX = 0.533463,
ZeroY = 0.807992,
},
},
CorrectionRangeMask = {
ColorAmount = 0.5,
LumFeather = 0.5,
LumMax = 1,
LumMin = 0,
PointModels = {
"0.550325 0.962652 0.290837 0.597141 0.380117 0",
},
Type = 1,
Version = 2,
},
CorrectionReferenceX = 0.533463,
CorrectionReferenceY = 0.775341,
LocalBlacks2012 = 0,
LocalBrightness = 0,
LocalClarity = 0,
LocalClarity2012 = 0,
LocalContrast = 0,
LocalContrast2012 = 0,
LocalDefringe = 0,
LocalDehaze = 0,
LocalExposure = 0,
LocalExposure2012 = -0.5,
LocalHighlights2012 = 0,
LocalLuminanceNoise = 0,
LocalMoire = 0,
LocalSaturation = 0.5,
LocalShadows2012 = 0,
LocalSharpness = 0,
LocalTemperature = 0,
LocalTint = 0,
LocalToningHue = 0,
LocalToningSaturation = 0,
LocalWhites2012 = 0,
What = "Correction",
},
},
ProcessVersion = "10.0",
orientation = "AB",
},
uuid = "A702768C-4368-4B0B-A418-F25D7018DBC8",
},
version = 0,
}
Copy link to clipboard
Copied
I think we may be talking about two different things. Yes, you can save a develop preset that contains a specific graduated filter, including a range mask setting. What I meant is that AFAIK you can't save a filter preset with those settings.
Copy link to clipboard
Copied
The OP needs to clear this up but my understanding is the OP was trying using this with Sync and Presets. My testa seen to show that this works as I would expect for Sync and Presets.
You are correct that the RANGE settings are NOT saved with a Filter Preset
Copy link to clipboard
Copied
Todd
My test above was using SYNC on 7.3 Mac 10.13.4 and the results are as expected.
The tests with a preset produced the same result.
Exposure was 2.0 saturation was 70. mask range was 50
<x:xmpmeta xmlns:x="adobe:ns:meta/" x:xmptk="Adobe XMP Core 5.6-c140 79.160451, 2017/05/06-01:08:21 ">
<rdf:RDF xmlns:rdf="http://www.w3.org/1999/02/22-rdf-syntax-ns#">
<rdf:Description rdf:about=""
xmlns:crs="http://ns.adobe.com/camera-raw-settings/1.0/"
crs:PresetType="Normal"
crs:Cluster=""
crs:UUID="9FC3F66402CE49FD9EC6A1CF0D9A22C2"
crs:SupportsAmount="False"
crs:SupportsColor="True"
crs:SupportsMonochrome="True"
crs:SupportsHighDynamicRange="True"
crs:SupportsNormalDynamicRange="True"
crs:SupportsSceneReferred="True"
crs:SupportsOutputReferred="True"
crs:CameraModelRestriction=""
crs:Copyright=""
crs:ContactInfo=""
crs:Version="10.3"
crs:ProcessVersion="10.0"
crs:HasSettings="True">
<crs:Name>
<rdf:Alt>
<rdf:li xml:lang="x-default">test</rdf:li>
</rdf:Alt>
</crs:Name>
<crs:ShortName>
<rdf:Alt>
<rdf:li xml:lang="x-default"/>
</rdf:Alt>
</crs:ShortName>
<crs:SortName>
<rdf:Alt>
<rdf:li xml:lang="x-default">test</rdf:li>
</rdf:Alt>
</crs:SortName>
<crs:Group>
<rdf:Alt>
<rdf:li xml:lang="x-default">User Presets</rdf:li>
</rdf:Alt>
</crs:Group>
<crs:Description>
<rdf:Alt>
<rdf:li xml:lang="x-default"/>
</rdf:Alt>
</crs:Description>
<crs:GradientBasedCorrections>
<rdf:Seq>
<rdf:li>
<rdf:Description
crs:What="Correction"
crs:CorrectionAmount="1.000000"
crs:CorrectionActive="true"
crs:LocalExposure="0.000000"
crs:LocalSaturation="0.701310"
crs:LocalContrast="0.000000"
crs:LocalClarity="0.000000"
crs:LocalSharpness="0.000000"
crs:LocalBrightness="0.000000"
crs:LocalToningHue="0.000000"
crs:LocalToningSaturation="0.000000"
crs:LocalExposure2012="0.500000"
crs:LocalContrast2012="0.000000"
crs:LocalHighlights2012="0.000000"
crs:LocalShadows2012="0.000000"
crs:LocalWhites2012="0.000000"
crs:LocalBlacks2012="0.000000"
crs:LocalClarity2012="0.000000"
crs:LocalDehaze="0.000000"
crs:LocalLuminanceNoise="0.000000"
crs:LocalMoire="0.000000"
crs:LocalDefringe="0.000000"
crs:LocalTemperature="0.000000"
crs:LocalTint="0.000000">
<crs:CorrectionMasks>
<rdf:Seq>
<rdf:li
crs:What="Mask/Gradient"
crs:MaskValue="1.000000"
crs:ZeroX="0.534461"
crs:ZeroY="0.892823"
crs:FullX="0.534422"
crs:FullY="0.785429"/>
</rdf:Seq>
</crs:CorrectionMasks>
<crs:CorrectionRangeMask>
<rdf:Description
crs:Version="+2"
crs:Type="+1"
crs:ColorAmount="0.107500"
crs:LumMin="0.000000"
crs:LumMax="1.000000"
crs:LumFeather="0.500000">
<crs:PointModels>
<rdf:Seq>
<rdf:li>0.916084 0.700527 0.802422 0.513869 0.585541 0</rdf:li>
</rdf:Seq>
</crs:PointModels>
</rdf:Description>
</crs:CorrectionRangeMask>
</rdf:Description>
</rdf:li>
</rdf:Seq>
</crs:GradientBasedCorrections>
</rdf:Description>
</rdf:RDF>
</x:xmpmeta>
Copy link to clipboard
Copied
Hello Everyone
Thank you for your replies.
I understand that the range masks are designed to be applied once the Gradient Filter is added to the image. That was apparent to me when the option is "greyed" out until the filter is applied. I guess that I was optimistically hoping that it could be incorporated into a preset to save the step of going to each synchronised image and adding the luminosity or colour settings. Maybe a feature suggestion for future versions.
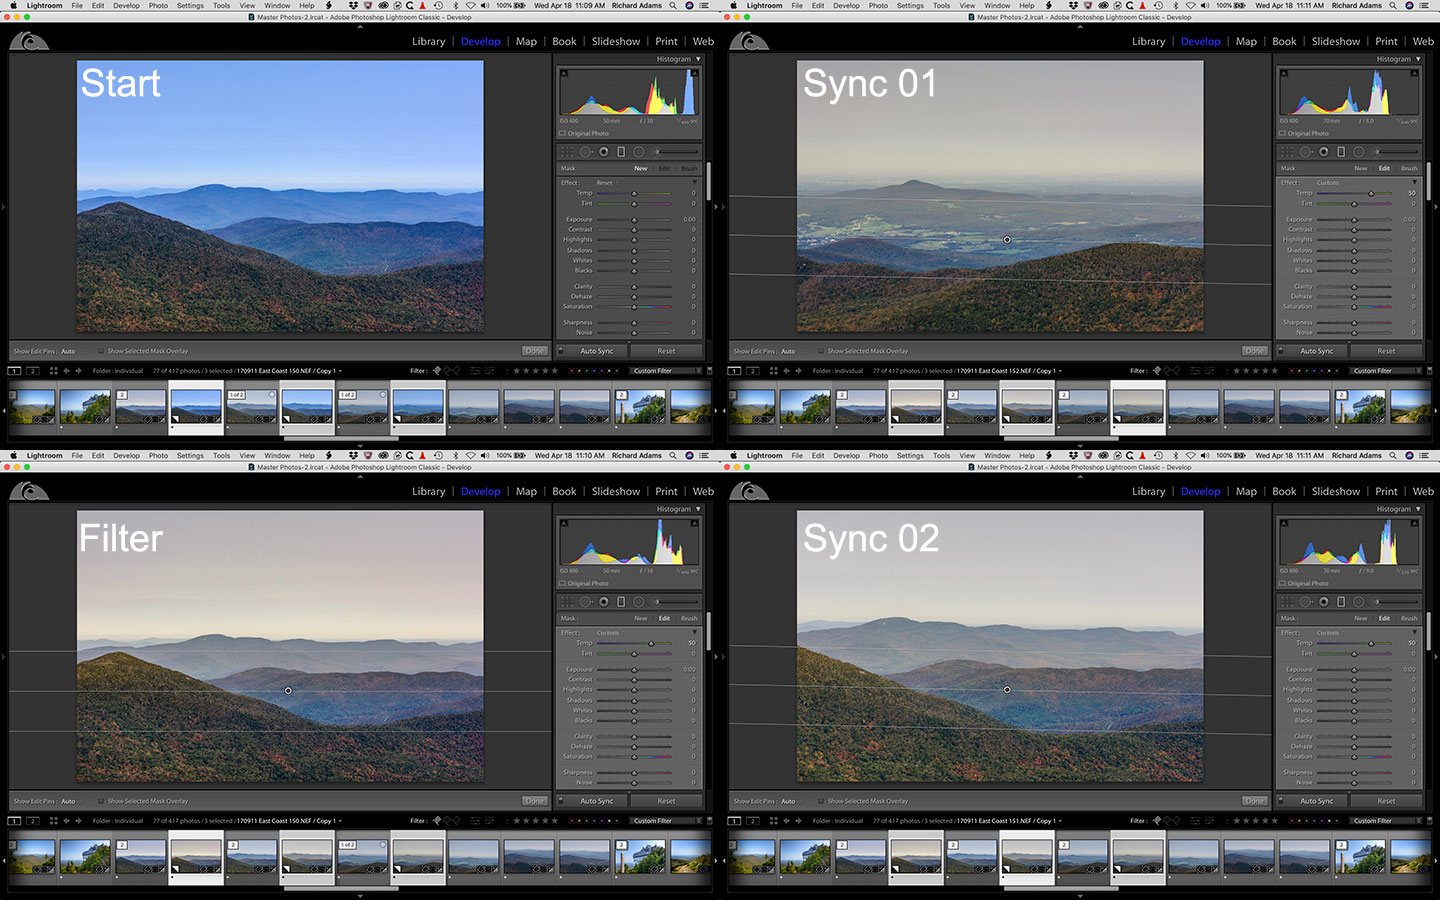
I also mentioned that the Gradient Filter did not hold its orientation in the successive synced images. I did a test and here is the image demonstrating what I was referring to. Top Right, the starting image and you can see that there are three virtual copies selected in the filmstrip.
The bottom Right shows the Gradient Filter applied holding the shift key to keep it level. The following two syncronised images on the left show that the Gradient Filter is skewed in a downward direction, it did not keep the orientation of the original image.
It is not a deal breaker but it may offer some clues to how the Gradient Filter works.
Have a great day, Rick.
Copy link to clipboard
Copied
Is it possible that these images are slightly rotated, but not to the same degree (for example because 'Auto Level' is activated)? I notice you use 'Auto Sync'. I'd never do that because you don't know what gets synched and what doesn't get synched (that depends on the last time you selected the sync dialog). Maybe the difference occurs because one image gets rotated more than another during sync.
Copy link to clipboard
Copied
As Johan said, the gradient tool sync is affected by the rotation of the images. The Sync 1 and 2 probably have been rotated.
Edit: you can see a slight rotation of the FILTER and SYNC 02 images.

 AdChoices