Copy link to clipboard
Copied
I bought LR6 and have thousands of photos on my HDD to import or add into LR6.
Some are various Nikon bodies; some are Sony, some are Panny Lumix - many different lenses were used.
I am not sure how to tell it to do lens corrections and other preset settings to use.
I am also confused about what else to do, but do know I want the files ot stay where they are in the Folder (sub-dir) they are in now and also not get renamed.
Thanks for any help - there is no User manual with this thing!
I am not sure how to tell it to do lens corrections and other preset settings to use.
When you learn more about Lightroom you will come to realize that you can set the options to automatically add a camera profile and Lens corrections when you import your photos by setting the Camera Defaults.
And some links on this topic-
Adobe Lightroom - Customising Camera Defaults
https://digital-photography-school.com/using-camera-color-profiles-lightroom/
...
I want the files ot stay where they are in the Folder
Copy link to clipboard
Copied
Hit the F1 key...lots of online help documents and tutorials are available.
Copy link to clipboard
Copied
I am not sure how to tell it to do lens corrections and other preset settings to use.
When you learn more about Lightroom you will come to realize that you can set the options to automatically add a camera profile and Lens corrections when you import your photos by setting the Camera Defaults.
And some links on this topic-
Adobe Lightroom - Customising Camera Defaults
https://digital-photography-school.com/using-camera-color-profiles-lightroom/
I want the files ot stay where they are in the Folder (sub-dir) they are in now and also not get renamed.
Using the "ADD" option when your import files in your existing hard-drive folders will leave them exactly where they are now.
Copy link to clipboard
Copied
As Wobertc said above, you can create an import Preset I to apply the lens corrections specific to each camera and lens you used, and you can also have it automatically remove Chromatic Aberration, as it imports.
Check this video:
How to specify import options in Lightroom
Once you create the import preset you will see this on the right hand panel in the Import Dialog box
I suggest trying this out on say 5 images. Then look at those images in the Develop Module and check Lens Correction for each image on the right hand panel to see if the lens profile was applied.
When you import selecting "ADD" Lightroom imports all the data about the images into the Lightroom Catalog, but it does not actually move or make copies of the photos files.
Lightroom makes previews of all the images whose data it imports into the catalog.
If you select "Smart Previews" the import will take a little longer, however you will be able to do a bit more to your images even when the external drive is not connected.
In other words, with Smart Previews you can do many editing functions (not all though) in Lightroom without the actual photo files being on line at the time.
Copy link to clipboard
Copied
At import, each "kind" of digital image gets some kind of default processing applied to it, as a starting point.
Camera JPG's processing applied by LR, is initially "do nothing" - though you can introduce something different if you want.
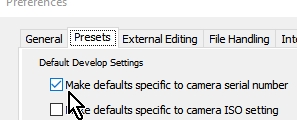
Camera Raw's default processing is necessarily individual, to whichever camera model took the photo. You don't need to turn anything on to make this happen - LR already distinguishes that, regardless of those extra options about camera serial number or ISO - which I personally don't bother with.
So each Raw-supported camera model, has some standard initial Raw treatment, written into LR. Again, you can customise what this treatment is to consist of; plus you can later reset that treatment back to Adobe's built-in default. This Raw treatment recipe includes the application of a camera calibration profile from the available list; whether Adobe Standard, Camera Standard or something else.
That's assuming this image is coming straight from the camera, and does not come labelled with some prior processing that was done in Lightroom or in Adobe Camera Raw. If such prior processing is found, then that is what you will see (default processing is not then called in).
Reset in the Develop module. simply re-applies whatever is your current default Raw processing for the camera model in question (or else, your current default JPG processing), replacing wholesale whatever settings the image has currently got.
So there's all this individual processing happening to newly imported images, referring to a lot of camera-specific templates.
Then you can apply further manual changes or else presets on top, in order to take each image wherever further it needs to go.
Applying a Develop change to an image, whether manually or via a preset, there is no discrimination as to which camera or lens was used.
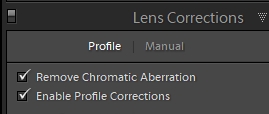
But if what you are doing is turning on lens profile with the selection of "Default" - then that change CAN be implemented appropriately for each image, depending on what equipment took it. Or you might switch on CA correction, or Constrain Crop, or do something else which one might do to any image and which is not much affected by differences between camera models, or between Raw and JPG.
That's the class of change which IMO it makes sense to include in a Develop preset, which you are invoking routinely by name in the Import dialog.
Doing it this way, you don't need to laboriously manage those across-the-board settings within all of the various camera-specific processing defaults; because you can centralise them. And safely re-apply them too, without going to the lengths of fully Resetting an image.
Find more inspiration, events, and resources on the new Adobe Community
Explore Now