

- Home
- Lightroom Classic
- Discussions
- White Balance Issue in Lightroom
- White Balance Issue in Lightroom

Copy link to clipboard
Copied
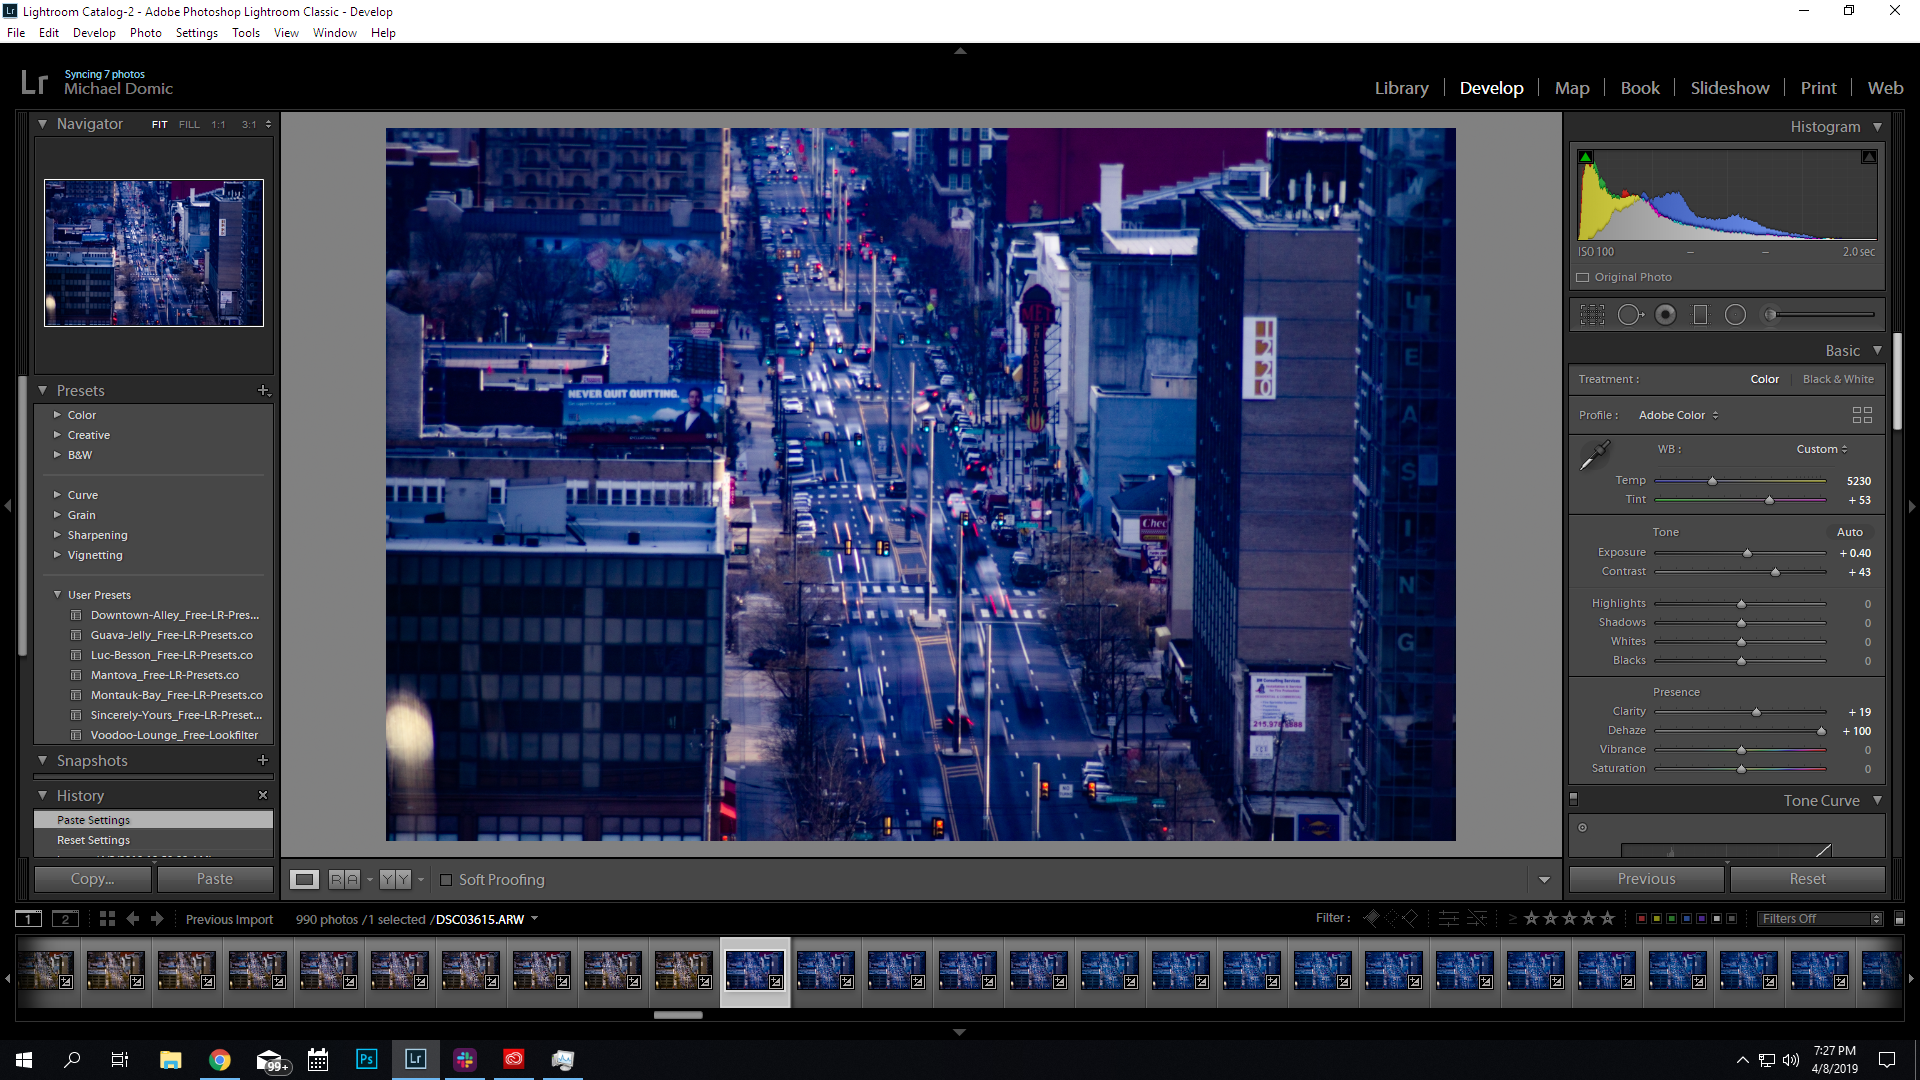
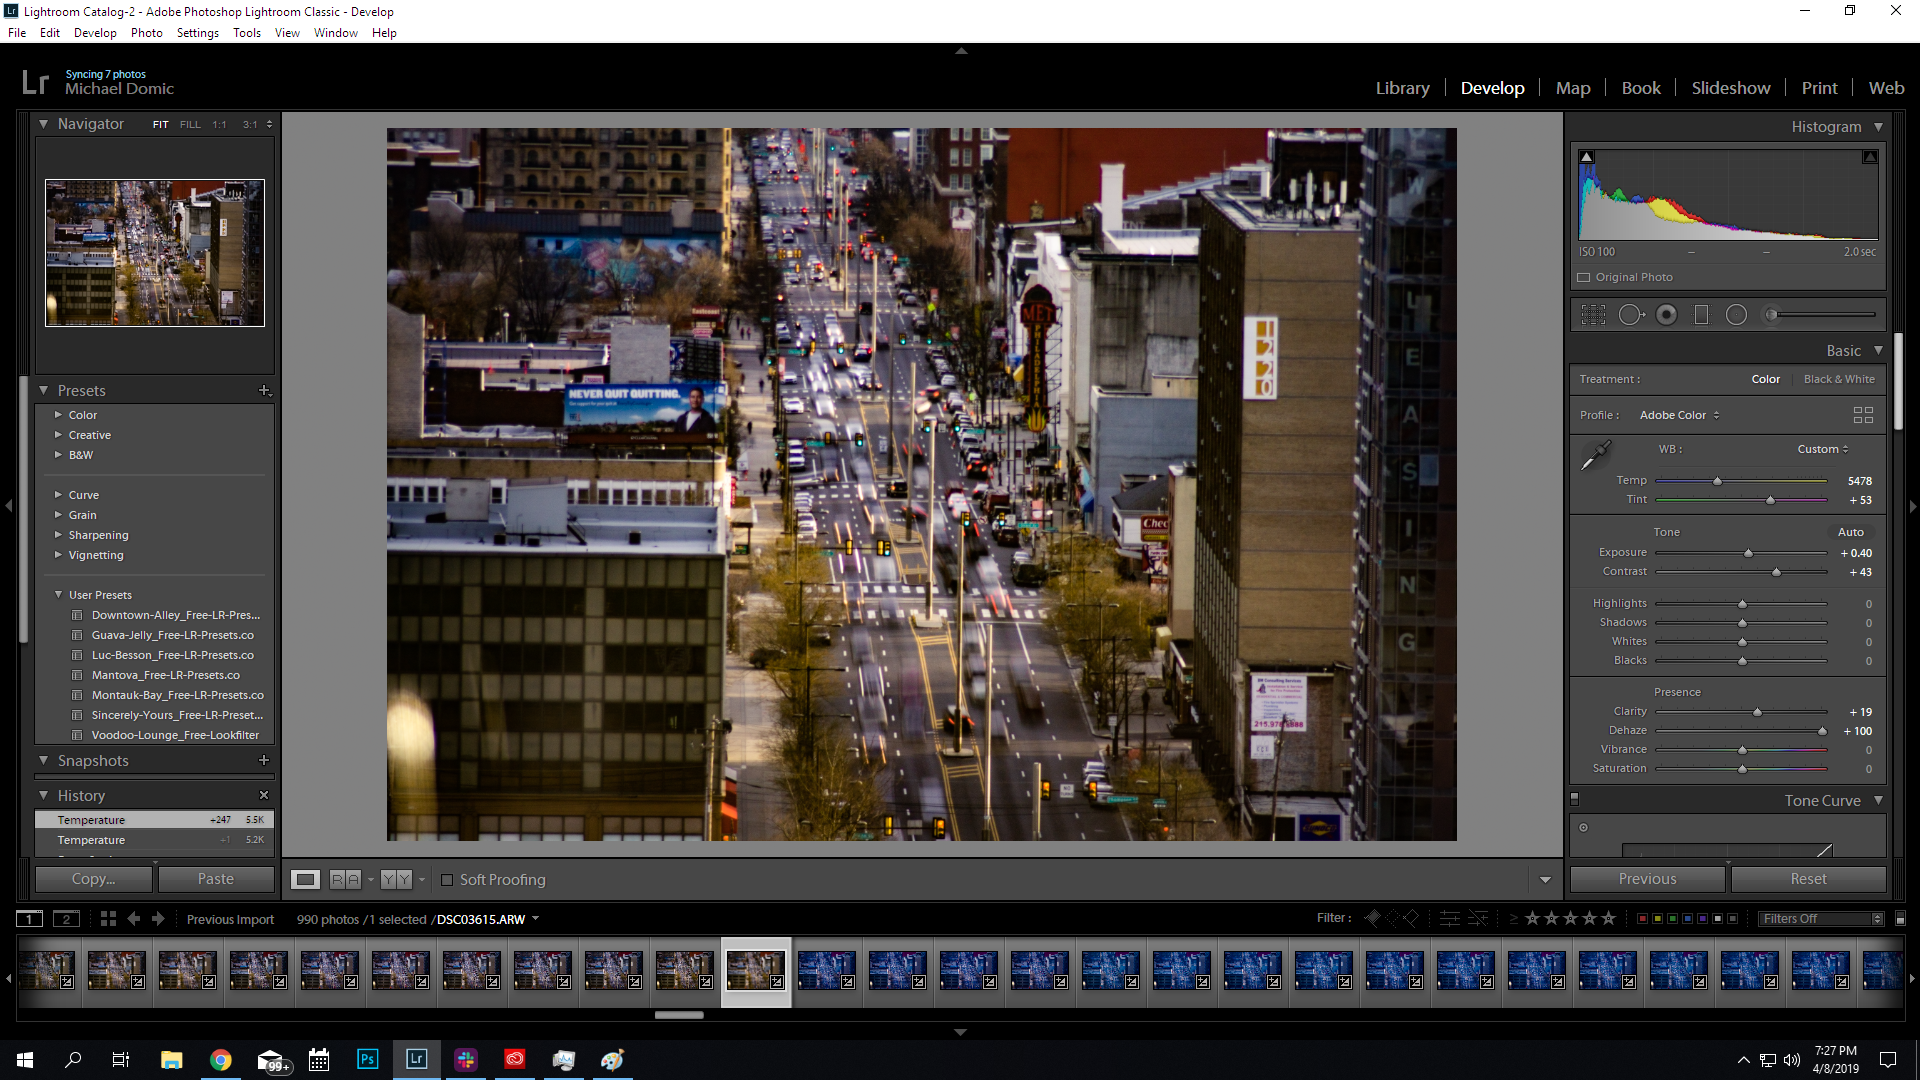
I have come across a very strange glitch in Lightroom Classic, in which the white balance of a certain set of photos seems to have a mind of its own. I recently shot a time lapse that I have to color correct, so I chose to do so in Lightroom. I chose one photo out of 990 to color correct, and pasted the corections to each one. This is normally how I go about editing my time lapses, and have never had an issue. Every picture out of the 990 that I have taken are exactly the same colors and white balance, as I shoot in all manual mode in-camera.
After I applied the corrections, however, I noticed that a set of photos in the middle are tinted extremely blue. At first, I thought that this was maybe an error that happened during the shoot, but after looking at the unedited files they are exactly the same as the unaffected ones. I tried to manually edit the white balance, but even the slightest movement of the slider makes the pictures jump from extremely blue to normal. I figured that it was just a glitch in how it pasted the effects onto each picture, so I tried changing them manually. After changing one photo and clicking away, it jumped back to blue again. No matter what I do, I cannot make the pictured normally colored at all.
Has anyone heard of this issue? Any help would be greatly appreciated. I have tried editing the pictures on both my laptop, and my desktop. No differences on either machine. Attached are screenshots of the issue.


 1 Correct answer
I'm coming from the same angle as Todd. I think Dehaze is amplifying a small color difference across images. Since I also do time lapses, I will also advise that Dehaze is one of the options to avoid applying at high amounts to time lapses; more on that at the end of this post.
Adobe has stated that Dehaze is based on a physical model of haze, which models distance and such. It increases contrast and saturation, and shifts white balance, based on what it thinks the distance layering is. Pushing D
... 23
Replies
23
23
Replies
23
Copy link to clipboard
Copied
Could you try again, but without "Dehaze" pushed all the way up to +100? I suspect this is creating problems.
I personally would never recommend such a strong value for that adjustment - at least, not applied as a blanket default.
Copy link to clipboard
Copied
Thank you for the input, Richard. Unfortunately, this problem does not stem from the Dehaze control. Lowering it to zero still yields the same results. The only reason I have it pushed up to 100 in the first place is because of a problem I encountered shooting through the glass in the building I was in. It was the only way to fix the issue.

Copy link to clipboard
Copied
michaeldomic wrote
Thank you for the input, Richard. Unfortunately, this problem does not stem from the Dehaze control. Lowering it to zero still yields the same results. The only reason I have it pushed up to 100 in the first place is because of a problem I encountered shooting through the glass in the building I was in. It was the only way to fix the issue.
That is not a correct observation! Lowering Dehaze to 0 in both DSC03618.dng and DSC03632.dng image files produces near identical rendering with no blue shift.
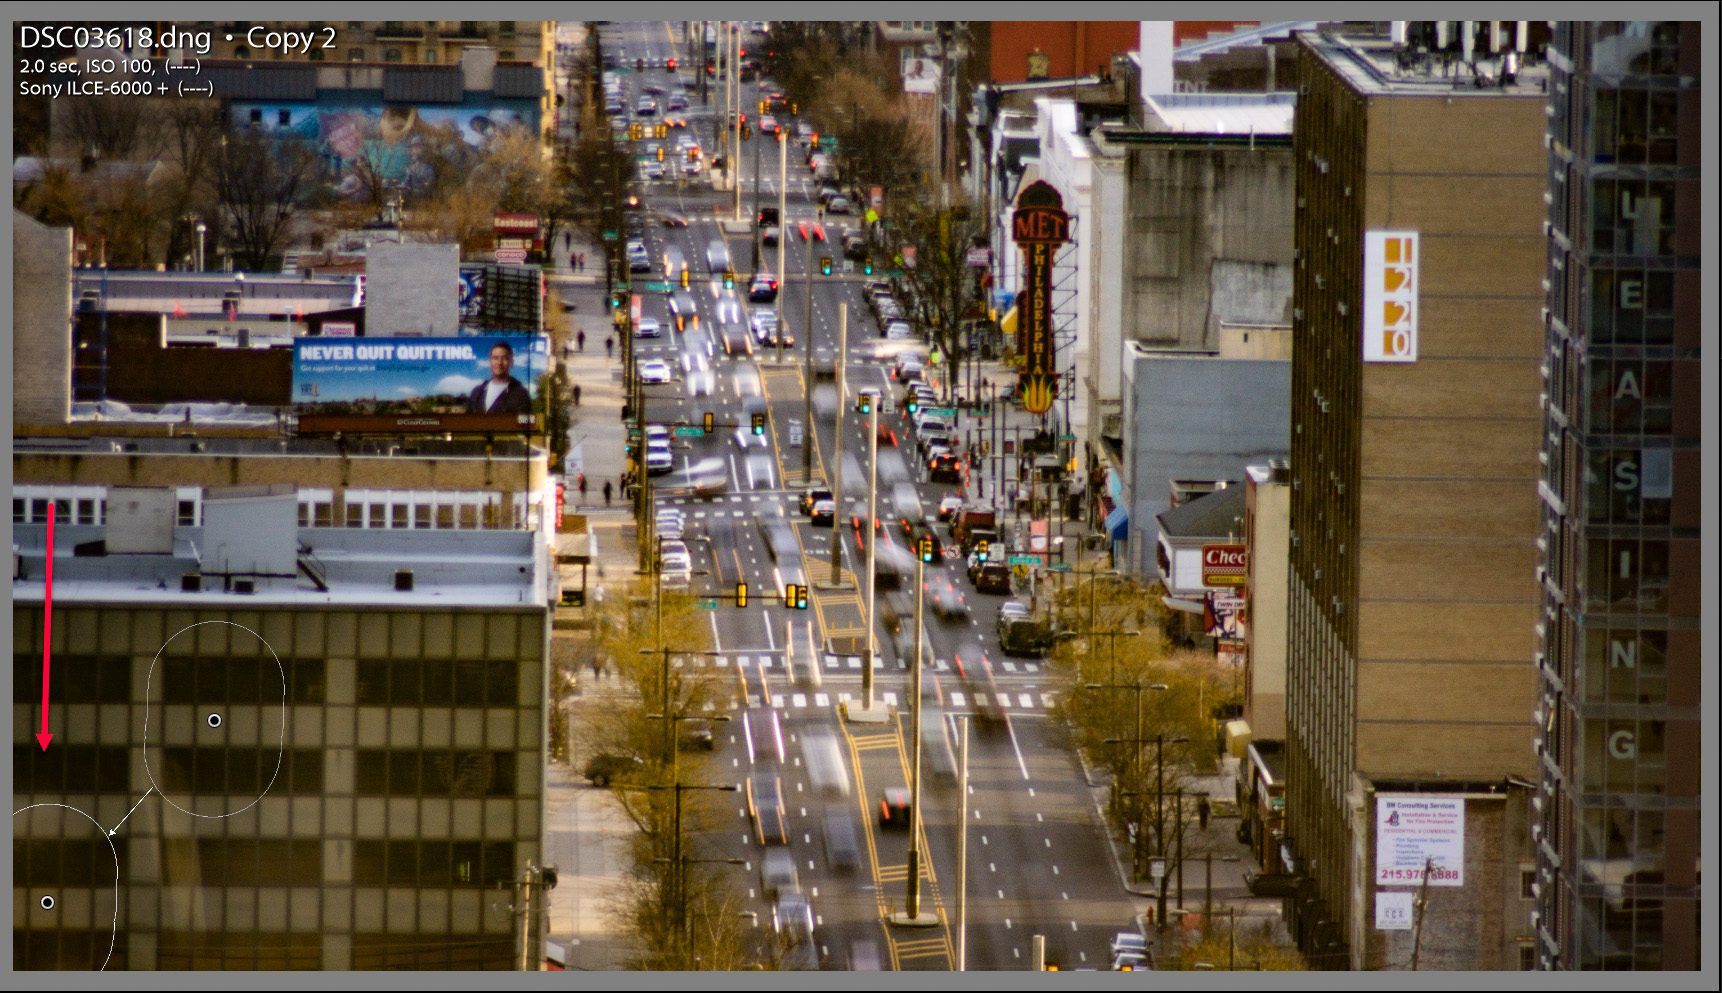
The Dehaze control uses a complex algorithm to calculate the relative dynamic range and gamma of the image data and then applies contrast and brightness enhancements based on that data. In your time lapse shots there is a small round object in the lower-left corner that is reflecting light from the Sun or other light source. In the DSC03632.dng image file it is brighter than in the DSC03618 image file. This is causing the Dehaze control to apply "different" corrections to the image, which also affects white balance.
A workaround is to apply the same Basic panel corrections to all of the image files except Dehaze. Also apply a crop to remove the bright spot form the frame as shown below. Then Export the image files to JPEG or TIFF file format and then apply Dehaze to all of the files.
In the below screenshot the top images have been processed as described above and the bottom images with your settings. Simply removing that one bright spot corrects the Dehaze rendering differences.

As an alternative you can try applying a Tone Curve as shown below along with all of the Basic panel controls except Dehaze.

Copy link to clipboard
Copied
Found one more way to fix this without having to use Export files. Simply apply a Clone Heal Spot to remove the bright spot as shown below. That appears to work as well with +100 Dehaze.
Copy link to clipboard
Copied
I'm coming from the same angle as Todd. I think Dehaze is amplifying a small color difference across images. Since I also do time lapses, I will also advise that Dehaze is one of the options to avoid applying at high amounts to time lapses; more on that at the end of this post.
Adobe has stated that Dehaze is based on a physical model of haze, which models distance and such. It increases contrast and saturation, and shifts white balance, based on what it thinks the distance layering is. Pushing Dehaze to 100 would make it try to reverse the loss of contrast and color from the atmospheric layering assumed for a typical landscape. But the loss of contrast in this time lapse is not from distance haze, it's from window glare at one distance. While Dehaze does improve image contrast, the solution is somewhat distorted here since it's trying to solve a different contrast problem than the one that it was applied to.
A reply said that there was a big change between 5400 to 5350. But I agree with Todd that there is not much visible difference, at 0 Dehaze. (The image below is animated, if you don't notice that, that's the point  )
)

The difference only becomes visible as Dehaze is applied at an extreme level. The following animation shows that ramp up.
In my tests I reduced Clarity to 0 to remove any influence it might have, since it's a similar control in some ways, and that can amplify the distortion further.
There was a reply saying there is a difference in As Shot white balance, but there is not. The camera was set to manual so the As Shot white balance for both shots is Temp 7300, Tint 13. They were manually moved to 5665/51 in both of the sample files.
But the Auto white balance, as calculated by Lightroom, is different.
Image 3618: 6100/30
Image 3632: 6050/30
That tells us that there are differences in the content. Todd figured out that variation in a single bright spot that's different in each image is probably influencing the frame-by-frame image analysis. In another situation it could be something as simple as a car headlight or emergency vehicle light pointed at the lens, or more red tail-lights than in another shot.
I use LRTimelapse to easily ramp changes in Develop adjustments over time across hundreds of images, and to deflicker the results. The developer, Gunther Wegner, thought this issue was important enough to write a blog post about: Use the new “Dehaze” with care on Time Lapses
Here's an excerpt:
First the good news: Adobe introduced a new “Dehaze” feature in Lightroom CC 2015.1 that works quite nice – and it is already supported by LRTimelapse 4.1. But here is the downside: this filter works in a very context sensitive way. This means, that images with different contents will have the filter applied differently, even if the strength of the filter is the same. For normal photography this doesn’t matter – but for time lapse unfortunately it does.
Each image in a time lapse sequence is a bit different from the last. Depending on the changes between images, the Dehaze filter might work stronger or weaker on subsequent images and even deliver different looks with the same settings. Small changes between images might be sufficient to introduce a large change after applying the filter. This means a rather smooth sequence might get some serious flicker introduced when you apply the dehaze filter...
...The more intelligent and context sensitive the tools in Lightroom are or get, the likelier it gets, that for time lapse use they have to be used with care and in small amounts only, because otherwise they might introduce the effects described above.
(He added the bold formatting to that paragraph in his own post.)
So if we are to avoid high Dehaze amounts, what can we do to fix images like this for time lapses? Well, I said earlier that this is not hazy because of the atmospheric haze that Dehaze is designed to reverse. It's largely reduction of contrast due to window glare. Lightroom has multiple ways to adjust contrast without Dehaze. Todd found one way to solve it without Dehaze, using the Tone Curve. The solution I got independently mainly uses the Blacks and Whites sliders to expand the dynamic range and improve contrast, with some color tweaks in the HSL panel, and switching to the Adobe Vivid profile. So you've got choices.

Again…we're not saying Dehaze should not be used. It is brilliant on individual photos, and in modest amounts. And Todd's solution with the Spot Removal tool may have resolved this one. But still, time lapses always present a problem in that multiple frames must play back with minimal flicker, while content-specific options like Dehaze can introduce frame-to-frame variations.
Does this mean Dehaze is bug free? No, for example Adobe recently improved how Dehaze works with negative values. So if you really think Dehaze should have handled those frames without such a dramatic change, submit a bug report at Lightroom Classic Feedback. Maybe there is a legitimate problem there.
But that does not change the fact that the nature of Dehaze (and other content-specific options like Clarity, Shadows, Highlights) means that when we are doing time lapses, best practice is to try to use those options at as low amounts as possible, and use other controls to get the look you want. I personally try to keep those content-sensitive options at 10 or below when applied to time lapse sequences.
Copy link to clipboard
Copied
Thank you for all of the information on the matter! I understand your explanation. I think that understanding what all of the sliders do and how they do what they do is really beneficial in the workflow of any editor.
I usually never set any of the sliders up to 100%, hence why I have never come across these issues before. It makes sense as to why Lightroom treats these photos the way it does.
I will definitely use the information that you have provided toward my future time lapses. Thank you again!
Copy link to clipboard
Copied
michaeldomic wrote
I usually never set any of the sliders up to 100%, hence why I have never come across these issues before. It makes sense as to why Lightroom treats these photos the way it does.
I will definitely use the information that you have provided toward my future time lapses. Thank you again!
Good advice, but keep in mind this time lapse set can be used with no issues following the below suggestion. Apply your settings to the first image file including the Spot Removal tool Heal spot, use 'Sync' to apply them to all of the other files, and you should be good to go!
"Simply apply a Clone Heal Spot to remove the bright spot as shown below. That appears to work as well with +100 Dehaze."
Copy link to clipboard
Copied
It's amazing that such a tiny spot of light on the picture can cause such drastic changes. Thank you again for your input.
Copy link to clipboard
Copied
The image has a very static dynamic range except for this one small spot. Apparently it's enough to cause the Dehaze algorithm to apply different corrections due to increased dynamic range in file DSC03632,dng. As Conrad C mentions it's best not to use Dehaze with time lapse images because of it's unpredictable behavior. You just got lucky with this shoot since that one small area can be easily removed with the Spot Removal tool.
What's interesting is the Basic panel 'Auto' Tone algorithm uses the cropped image area when calculating the Tone settings. I tried applying a crop to exclude the bright spot, but it makes no difference in the Dehaze control rendering. Sounds like a good candidate for an 'Idea' request at the Photoshop Family forum, which is how the Auto Tone behavior got changed in LR 7.1.
Copy link to clipboard
Copied
michaeldomic wrote
At first, I thought that this was maybe an error that happened during the shoot, but after looking at the unedited files they are exactly the same as the unaffected ones.
Did they just look the same, or are their unedited White Balance values also exactly the same as the normal-looking frames? I know you shot manual white balance but just checking.
I'm just wondering if, since they were shot through glass, there was a short period of time when maybe a building light source came on and reflected off of the glass, giving those frames different color values. Just a thought.
Copy link to clipboard
Copied
I just double checked, and the white balance values are the same for both pictures after I reset all of their edits. And for the change of light source in the building, I was next to the camera working for the entirety of the time lapse and did not notice any odd light sources. The unedited pictures themselves look exactly the same as all of the other ones. Thanks for your input.

Copy link to clipboard
Copied
You say the photos in the middle of the set have a blue white balance.
Did the sequence span the whole day? (Sunrise to sunset?)
What was the white balance setting in the camera?
Copy link to clipboard
Copied
The sequence lasted for about an hour and a half during the late afternoon on a sunny day. Which means that there is no light change from the sun or clouds could affect the photos. The in-camera white balance was 7300K. I'm not sure if this issue stems from the white balance, but any adjustment to the white balance slider changes the colors of the images drastically.

Copy link to clipboard
Copied
Quote “The sequence lasted for about an hour and a half during the late afternoon on a sunny day. Which means that there is no light change from the sun or clouds could affect the photos.”
Are you expecting no light change over the hour and a half period???
Copy link to clipboard
Copied
DdeGannes wrote
Are you expecting no light change over the hour and a half period???
I suggest you re-read my initial post so that you can understand the situation more effectively. Of course there will be a light change, but not such a change that will affect the photos in the way that I have described. I have taken time lapses for years(including ones with huge changes in light like a sunset) and have never experienced this kind of behavior from Lightroom.
As I mentioned in my post, a set of photos in the middle of the time lapse suddenly shift blue, meaning that the pictures after this set return to the colors that I initially edited them to be.
Copy link to clipboard
Copied
Very odd. Does a WB dropper applied onto the same point in the scene produce more or less the same resulting correction (by the WB numbers), for a shot from each group - or different WB numbers?
Another thing I'd try would be the same experiment with e.g. Adobe Standard, or with one or another camera matching profile, just in case "Adobe Color" is at fault.
You could clear your Raw cache too...?
Copy link to clipboard
Copied
When using the dropper tool, it does in fact produce more or less the same white balance value. The picture, however, does not look entirely the same. It is a bit darker than normal and still more blue than the unaffected photo. I have also tried changing the color profile, with no difference.
Copy link to clipboard
Copied
michaeldomic wrote
DdeGannes wrote
Are you expecting no light change over the hour and a half period???
I suggest you re-read my initial post so that you can understand the situation more effectively. Of course there will be a light change, but not such a change that will affect the photos in the way that I have described. I have taken time lapses for years(including ones with huge changes in light like a sunset) and have never experienced this kind of behavior from Lightroom.
As I mentioned in my post, a set of photos in the middle of the time lapse suddenly shift blue, meaning that the pictures after this set return to the colors that I initially edited them to be.
Please 1) share a file that exhibits the blue shift and 2) the next closest in time image file that does NOT exhibit the blue shift. Please upload these two raw files to Dropbox or other file sharing site. It would probably help if you Export and upload the two files to DNG file format, which will contain your LR edits.
Copy link to clipboard
Copied
I have uploaded the DNG files as requested.
Copy link to clipboard
Copied
There does seem to be something odd about file 3618.
When adjusting the WB from 5400 to 5350, there is a HUGE change in color.
Copy link to clipboard
Copied
This is exactly what perplexes me. You would normally have to change the white balance by a huge amount to get the same color change.
Perhaps it is due to the fact that the original unedited photos require drastic edits in order to make them normal, and these edits affect the white balance in some way?
Copy link to clipboard
Copied
That is possible. The initial white balance in any photo is actually an interpretation of the white balance data, not a simple set of temp and tint values. I can easily see where large shifts in white balance will cause side effects in the other settings and vice versa.
If I am reading the time stamps correctly, there is only about 30 seconds difference in the time of the two shots, yet the "as shot" white balance is very different in the two images.
Copy link to clipboard
Copied
The shots were all taken in complete manual mode, so I'm not sure why Lightroom would interpret that incorrectly. Unless there was an issue in-camera?

Find more inspiration, events, and resources on the new Adobe Community
Explore Now
 AdChoices