• Global community
    • Language:
      • Deutsch
      • English
      • Español
      • Français
      • Português
  • 日本語コミュニティ
    Dedicated community for Japanese speakers
  • 한국 커뮤니티
    Dedicated community for Korean speakers
Exit
1

Adjustment problem when a selection is added to
Community Beginner ,
Jul 28, 2023 Jul 28, 2023

Copy link to clipboard

Copied

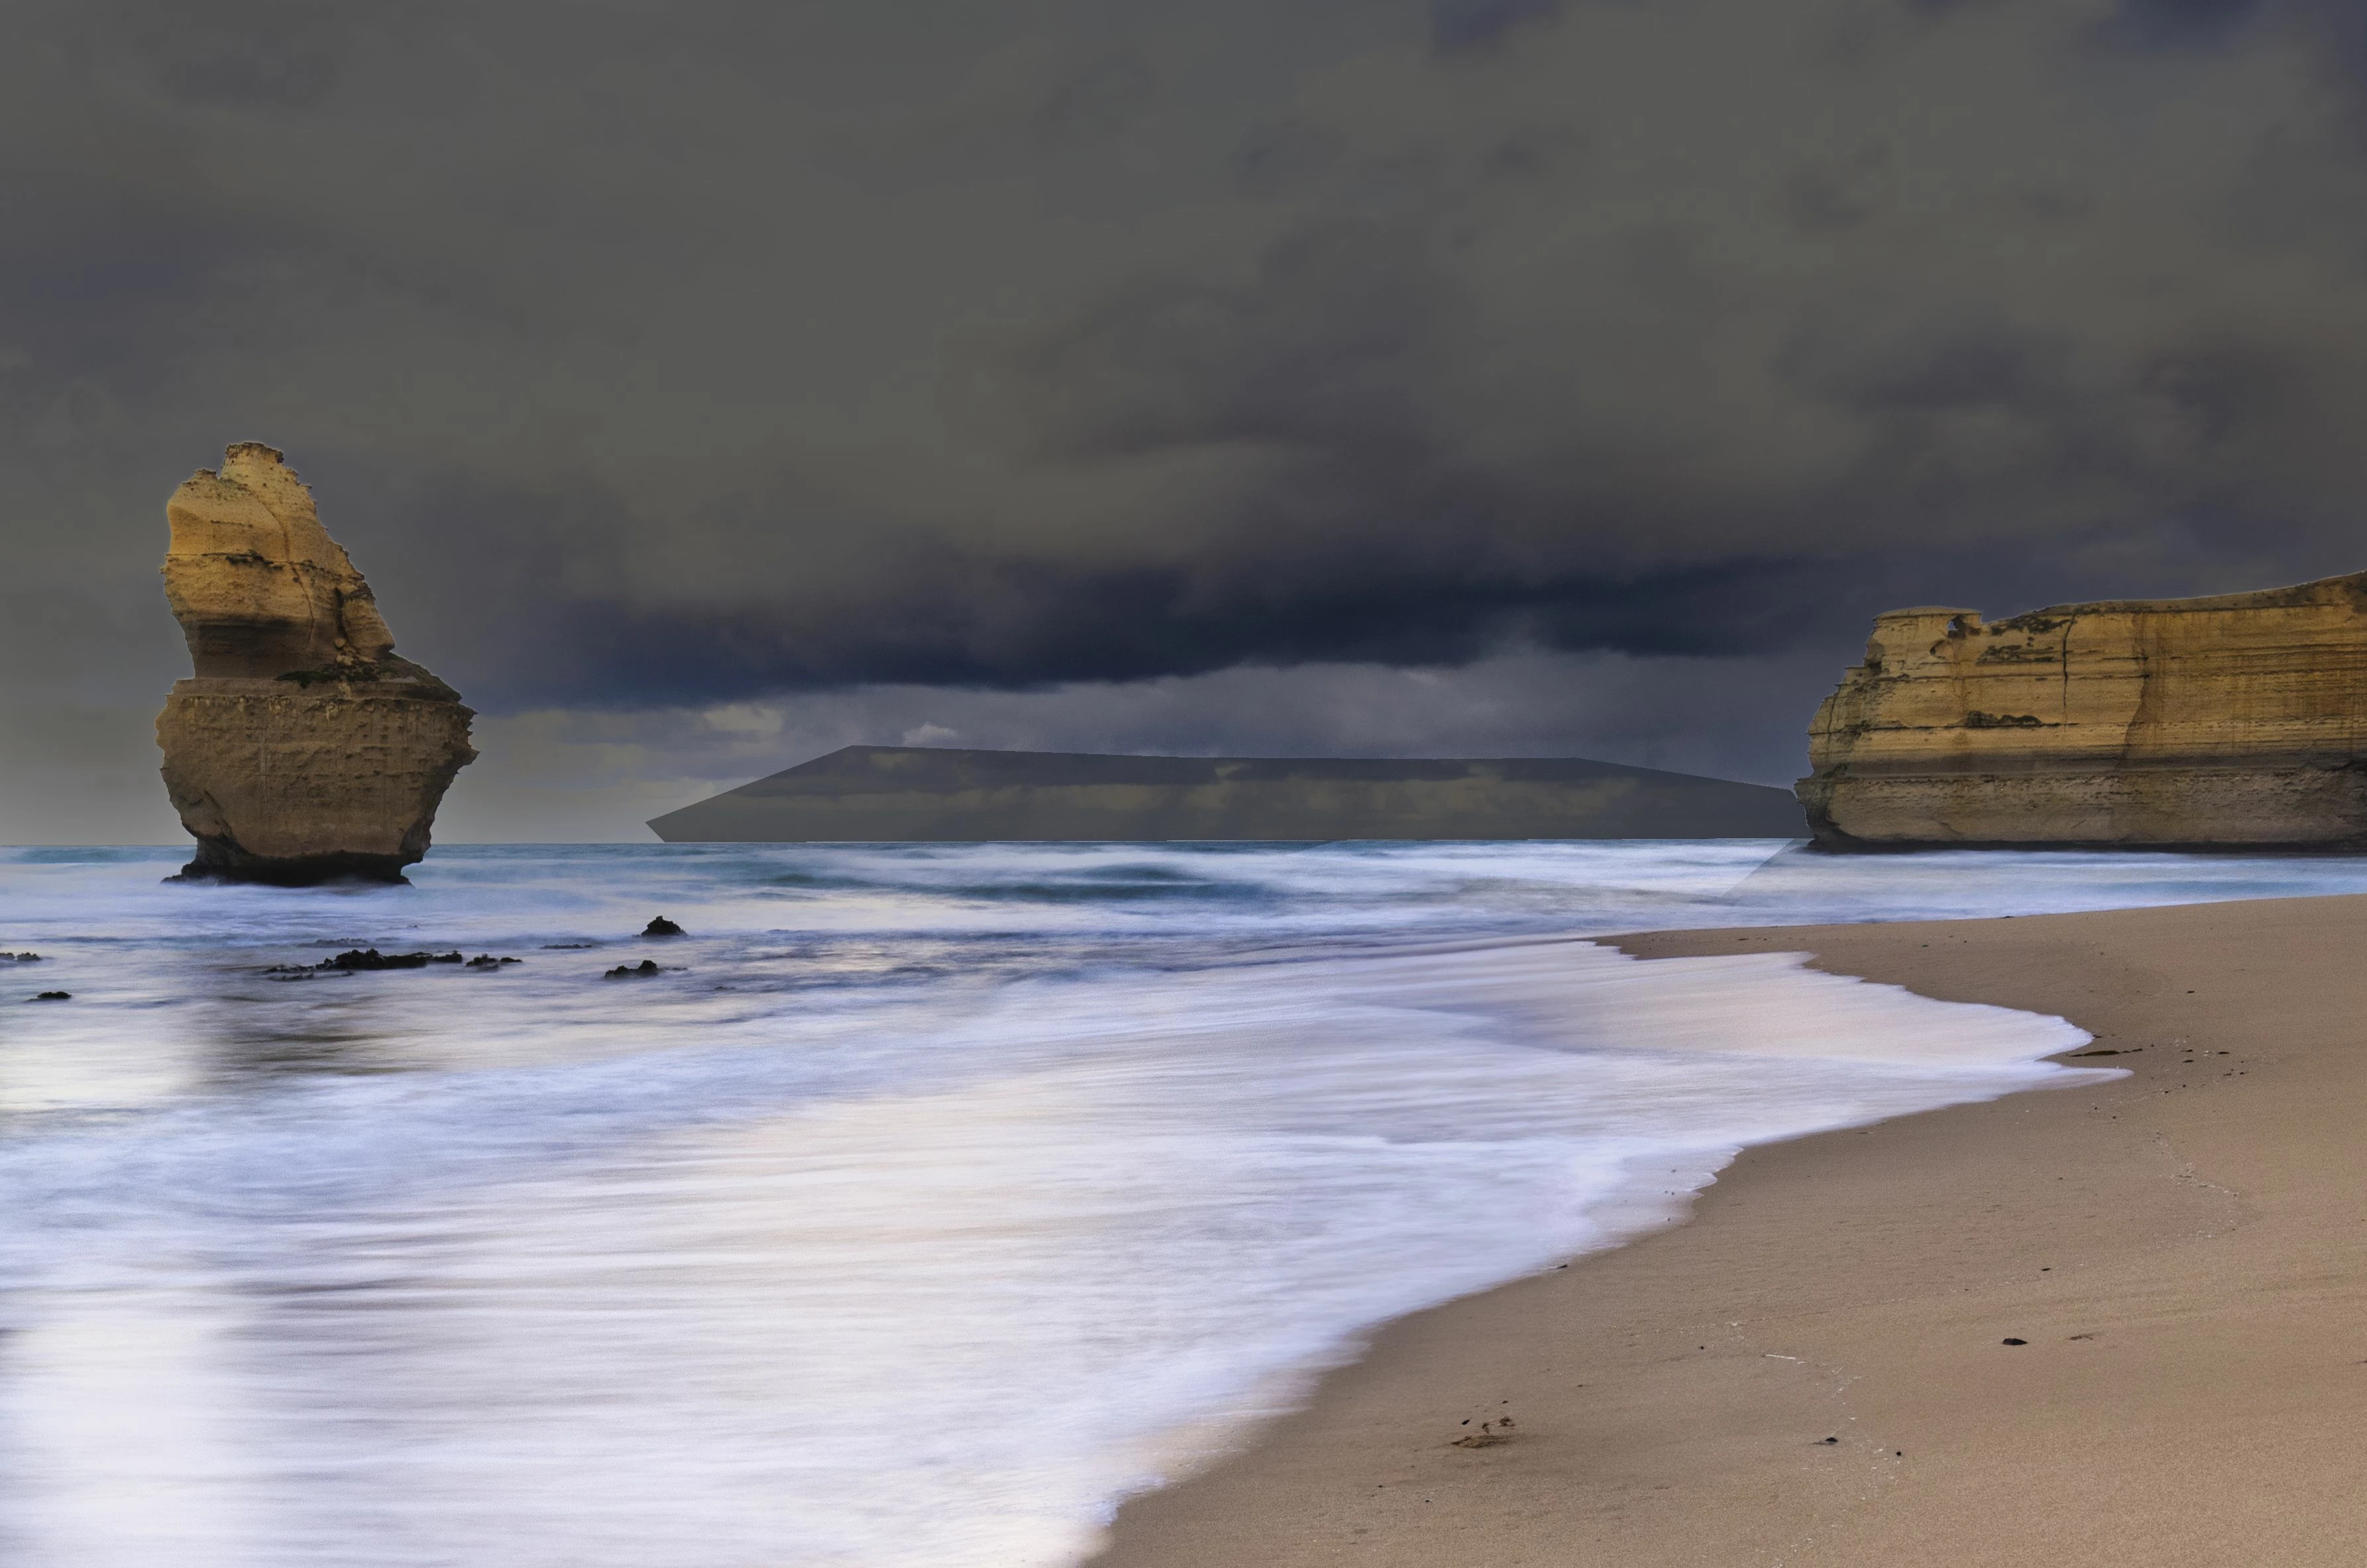
For the attached image I selected the sky then tidied up the selection by adding a small area, just above the horizon, using the polygonal selection tool. Similarly, I removed some incorrectly selected areas below the horizon, once again using the polygonal selection tool. This was done in "select and mask" and I outputed the result as a selection and applied a curves adjustment. Once the adjustment was done I noticed that the area added (and subtracted) using the polygonal selection tool was clearly visible. I have exaggerated the adjustment in the attached image so the effect is more noticeable. I have no idea if this is something I have done wrong or a bug. I am using the current version of Photoshop. The problem also appears in the Beta version. I would be grateful for any suggestions.
PS selection.jpg
TOPICS
Windows

Views

197

Translate

Translate

Report

Report
Community guidelines
Be kind and respectful, give credit to the original source of content, and search for duplicates before posting. Learn more
community guidelines

correct answers 1 Correct answer

Community Expert , Jul 28, 2023 Jul 28, 2023

"I still can't understand why a selection is treated differently with adjustments depending on the selection method used. Still feels like a bug to me."

There are different selection methods like selection based on color or based on detected edges or hand selection or selection based on transparency... Sometimes pixels are partially selected and that is visible on mask itself. Black color will hide, white reveals while all other variations of grey will partialy hide/reveal. 

When using Polygonal

...

Votes

Translate

Translate
Adobe
Community Expert ,
Jul 28, 2023 Jul 28, 2023

Copy link to clipboard

Copied

If you made the selection and then applied Curves by going to Image > Adjustments > Curves..., then the modification was destructive--meaning it permanently changed the pixels.


Instead, I would recommend making the selecting and adding an adjustment layer (either by clicking the middle icon at the bottom of the Layers panel and selecting Curves... or by going to Layer > New Adjustment Layer > Curves...). The selection will be converted into a Layer Mask where white is where the adjustment will be applied, black won't change, and grays will show a partial adjustment.


What's great about the Layer Mask is that you modify it. So, in your case, when you made the selection with the Polygonal Lasso and the selection's edges were abrupt, you could use the Blur tool to smooth out the selection so that it blends more naturally.

Votes

Translate

Translate

Report

Report
Community guidelines
Be kind and respectful, give credit to the original source of content, and search for duplicates before posting. Learn more
community guidelines
Community Beginner ,
Jul 28, 2023 Jul 28, 2023

Copy link to clipboard

Copied

Thank you very much Myra Fereguson for your helpful suggestion. I will try the Layer Mask solution and see how that goes. I have used my current method (make a rough selection, go to Select and Mask to refine the selection, output to a selection then apply a curves adjustment to the refined selection) on numerous occasions when doing B&W conversion and I have never noticed this issue previously. Viewing the B&W final images at 300% I can see no sharp differentiation between the original selection and the additions made with the polygonal lasso tool. This is the first time I have used this method for a colour image. So, it appears that not all selections are the same. I still can't understand why a selection is treated differently with adjustments depending on the selection method used. Still feels like a bug to me.

Votes

Translate

Translate

Report

Report
Community guidelines
Be kind and respectful, give credit to the original source of content, and search for duplicates before posting. Learn more
community guidelines
Community Expert ,
Jul 28, 2023 Jul 28, 2023

Copy link to clipboard

Copied

"I still can't understand why a selection is treated differently with adjustments depending on the selection method used. Still feels like a bug to me."

There are different selection methods like selection based on color or based on detected edges or hand selection or selection based on transparency... Sometimes pixels are partially selected and that is visible on mask itself. Black color will hide, white reveals while all other variations of grey will partialy hide/reveal. 

When using Polygonal Lasso Tool everything inside is 100% selected, no partialy selected pixels, if you fill that area it will be either white or black, if you paint then it depends...

Votes

Translate

Translate

Report

Report
Community guidelines
Be kind and respectful, give credit to the original source of content, and search for duplicates before posting. Learn more
community guidelines
Community Beginner ,
Jul 29, 2023 Jul 29, 2023

Copy link to clipboard

Copied

LATEST

Thank you Bojan. That explains it perfectly. I did not realise that the sky selection does not select 100% of the pixels in the selected area, whereas the polygonal lasso tool does. Looking at the layer mask the difference is clear. I now know how to resolve this issue for the photo I am editing. 

Votes

Translate

Translate

Report

Report
Community guidelines
Be kind and respectful, give credit to the original source of content, and search for duplicates before posting. Learn more
community guidelines
Community Expert ,
Jul 28, 2023 Jul 28, 2023

Copy link to clipboard

Copied

quote
I have no idea if this is something I have done wrong or a bug.

By @mastamakgrant


Definitely the former, not the latter. Your approach here seems very heavy handed.


As Myra says, do this with layer masks. You can select areas and fill the mask, but ultimately, in a photograph, you will need to paint in the mask, using soft brushes alt low opacity. Hit the X key to switch between black and white, to add to the mask or remove from it. This way it's easy to reverse if you overdo it.


Your selection edges here, quite aside from the two added areas you mention, are not very credible. There is a lighter halo around the rocks that immediately gives it away as an added effect.


Making a good mask is not easy - but it's a lot easier than making a single one-off selection that is supposed to work right off.

Votes

Translate

Translate

Report

Report
Community guidelines
Be kind and respectful, give credit to the original source of content, and search for duplicates before posting. Learn more
community guidelines
Community Beginner ,
Jul 28, 2023 Jul 28, 2023

Copy link to clipboard

Copied

Thank you very much, D Fosse, for your helpful suggestion. I will apply your method in future. I am aware of the halo that you refer to, but this was a very quick selection with no refinement, simply to illustrate the issue. Please see my reply to Myra, above.

Votes

Translate

Translate

Report

Report
Community guidelines
Be kind and respectful, give credit to the original source of content, and search for duplicates before posting. Learn more
community guidelines