 Adobe Community
- Home
- Photoshop ecosystem
- Discussions
- Another question about perspective
- Another question about perspective

Copy link to clipboard
Copied
I’ve asked several questions about perspective. Hope it’s OK if I ask another.
This little graphic representation (https://www.youtube.com/watch?v=lKbFQb8zDm8) illustrates that when we tilt our camera up, the horizon line goes lower; and when we tilt it down, the horizon line goes higher. This is further explained as follows (from https://www.bhphotovideo.com/explora/photography/tips-and-solutions/perspective-distortion-photograp... ) If you are photographing a vertical structure (building, home, factory, statue, etc.) and you tilt the camera up to capture the top, you will see the structure decidedly narrow as it extends higher in the frame—this effect is called “keystoning.” Similarly, if the camera is angled right or left off the perpendicular from the building, you will get the same distortion on the horizontal axis.
From Google Images, I grabbed an example of keystoning and drew center lines and horizon lines, as indicated below:
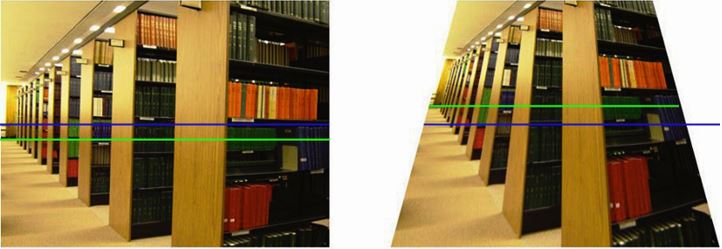
I’m at a loss to explain why the keystone example (camera tilted up) shows the horizon line above the center line. I expected it would drop lower. I see the same in this outdoor example:

The photo at R appears to be shot from a lower angle; however, the horizon appears to be slightly higher.


 1 Correct answer

Doc, you are still not getting it.  An image's centre line has no relationship to the horizon or any vanishing points, even if the camera was perfectly vertical. What if the image has been cropped for instance?
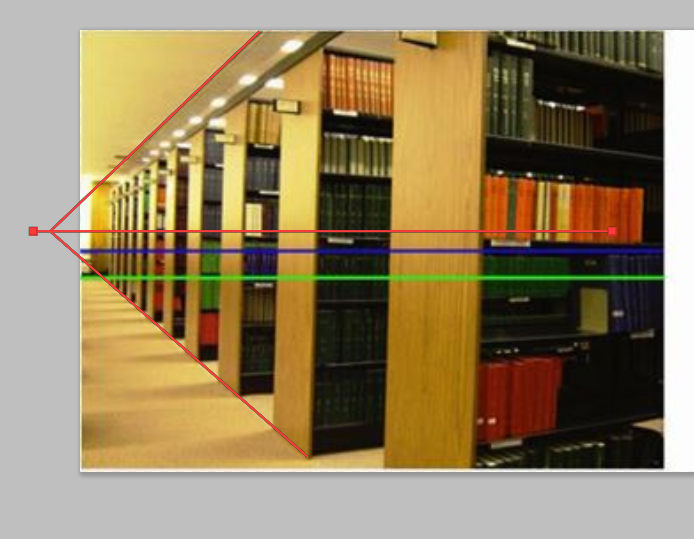
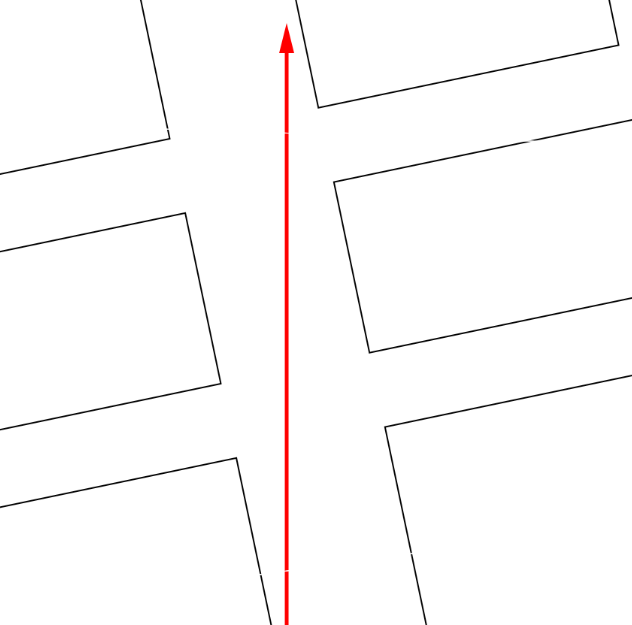
It looks like the library shelves on the right have been distorted using Photoshop FT > Perspective, so they are now useless as an aid. The image on the left looks untouched however, and we can work out the horizon and vanishing point as shown by my red paths.
This is not single po
...Explore related tutorials & articles
 15
Replies
15
15
Replies
15

Copy link to clipboard
Copied
It looks like the viewpoint has changed in both examples. So it not just a camera tilt comparison.
As I mentioned in the previous thread, I would recommend you create a simple cube in Photoshop 3D and with the groundplane grid switched on move the 3D camera around up and down and also tilt it. You will quickly see the effect of tilting, and different viewpoints, on the subject and horizon.
Dave
Copy link to clipboard
Copied
Dave, I'm doing just that, and it's very helpful. When I do that, I confirm what I see in that little graphical tutorial I referenced. But I'm still interested in probing my understanding by analyzing photos and addressing situations like this one that I can't explain.
Copy link to clipboard
Copied
Doc, you are still not getting it.  An image's centre line has no relationship to the horizon or any vanishing points, even if the camera was perfectly vertical. What if the image has been cropped for instance?
It looks like the library shelves on the right have been distorted using Photoshop FT > Perspective, so they are now useless as an aid. The image on the left looks untouched however, and we can work out the horizon and vanishing point as shown by my red paths.

This is not single point perspective, as evidenced by the end of the shelves not being vertical. If the camera had been pointed on a line exactly parallel to the end of the shelves, then the ends would have been vertical, and the shelves horizontal. That's a fact of single point perspective.
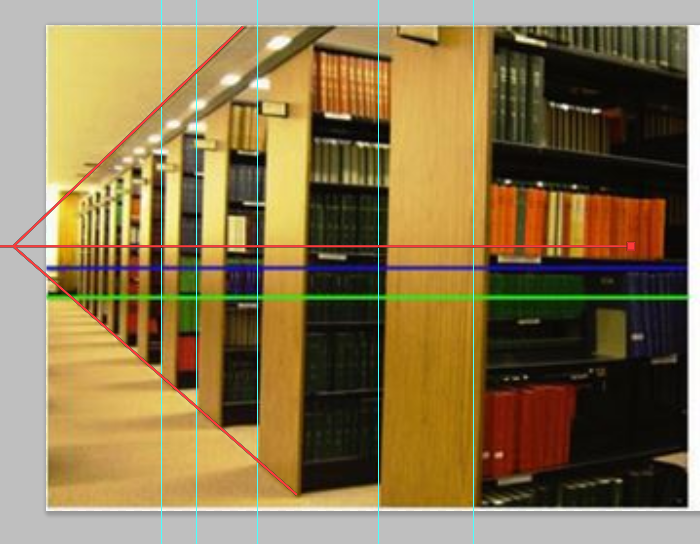
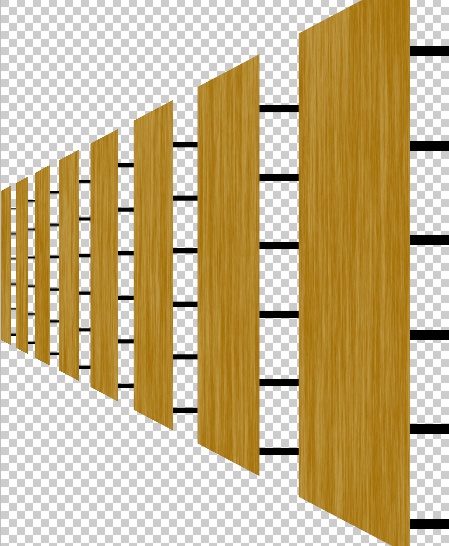
It's useful to practice drawing this sort of perspective, whether you plan to make a drawing from scratch, or add to an existing photograph. This took me about ten minutes, for instance. Photoshop's FT > Perspective is very useful for this exercise because it doesn't just make the lines converge. It also, and much more importantly elongates the near field end, and squashes the far end, which is how perspective works. So to make the shelves I arranged eight identical rectangles and used Move > Align to space them equally. Then merged the layers and used FT > perspective.
I did the same thing with the wood texture using Render Fibres. Can you see how the texture scales down with distance?
It's an interesting subject, and crucial for drawing and compositing. So please keep asking specific questions. Go back to the old threads, and watch the linked videos (Students online, or something like that).
Copy link to clipboard
Copied
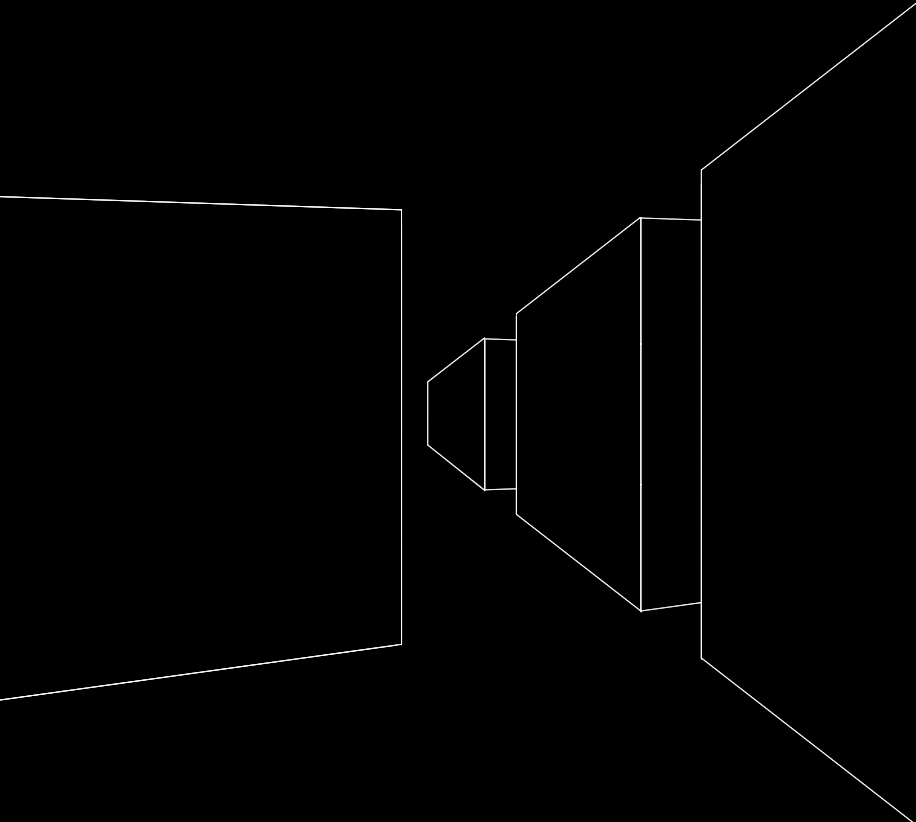
See examples below using Photoshop 3D which may help :
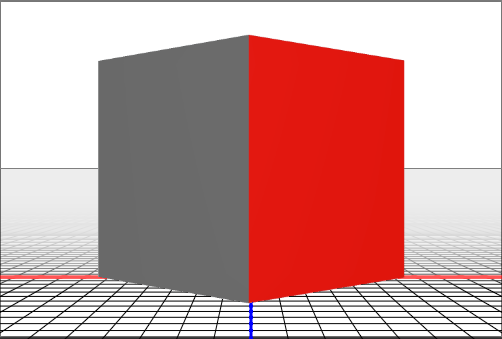
1. Camera level at exactly half height of the cube. The camera is pointing parallel to the ground so the horizon is half way up image. There is no keystoning :
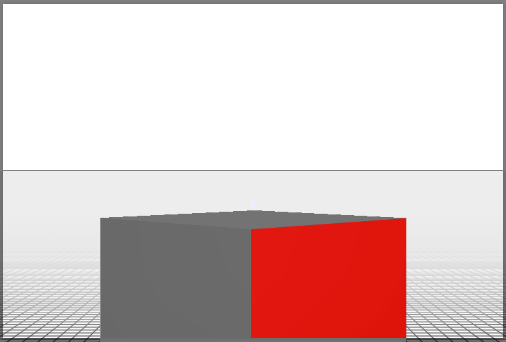
2. The camera is still parallel with the ground but is moved up to a higher position. The horizon line does not change (as there is no tilt). The model (still on the ground) looks lower in the viewfinder :
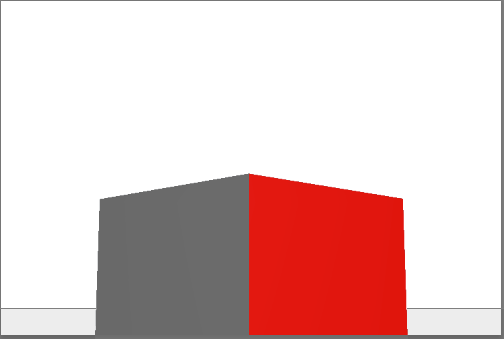
3. The camera is moved down closer to, but still parallel to, the ground. The horizon remains in the centre of the viewfinder (no tilt), but the model looks higher in the viewfinder :

4. This time the camera back in its original position (as in first example) but tilted up by 10 degrees
Now the horizon has moved down in the viewfinder and some keystoning is introduced in the model
5. Keeping the 10 degree tilt I have moved the camera down toward the ground.The horizon remains in the same place as the last image (due to the 10 degree tilt being the same) but the new viewpoint shows the whole model cube and again the keystoning effect
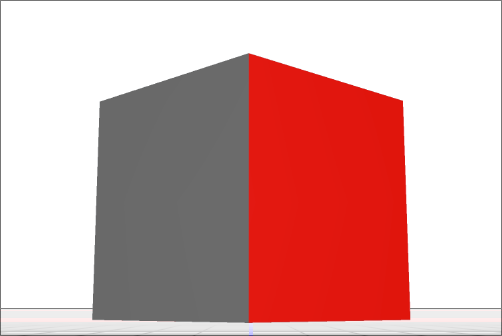
I hope this helps
Dave
Copy link to clipboard
Copied
Super helpful. Thanks.
Copy link to clipboard
Copied
When photographing a building or similar rectangular object, then ideally the camera will be parallel to the ground. You can see that might be a problem if it is a tall building. If there is another building opposite the subject building, and it has a convenient window half the height of the subject building, then you are good to go.

In reality we can use technical cameras on which the lens can be moved relative to the film, sensor plane.
So long as the lens axis and film/sensor axis are parallel to each other, the photographed building will have no convergence.

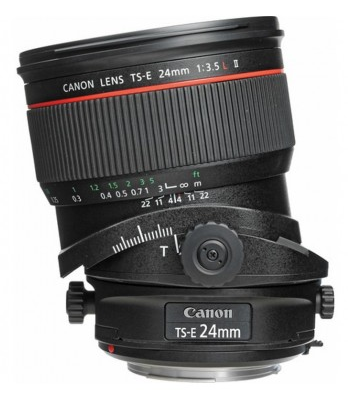
The major camera manufacturers make 'Tilt Shift' lenses, but while they have a useful amount of tilt, their shift ability is limited. I've used technical cameras, but not a tilt shift lens, but I suspect that the latter might be limited when it comes to architectural photography.
Photoshop is very good at fixing these problems though, and I can't actually think why using Photoshop would have any disadvantage over doing it in-camera.
Copy link to clipboard
Copied
Trevor, many thanks. I never even saw that the perspective was not one-point. I'm learning to look, but I still haven't learned to see. I'm working on it.
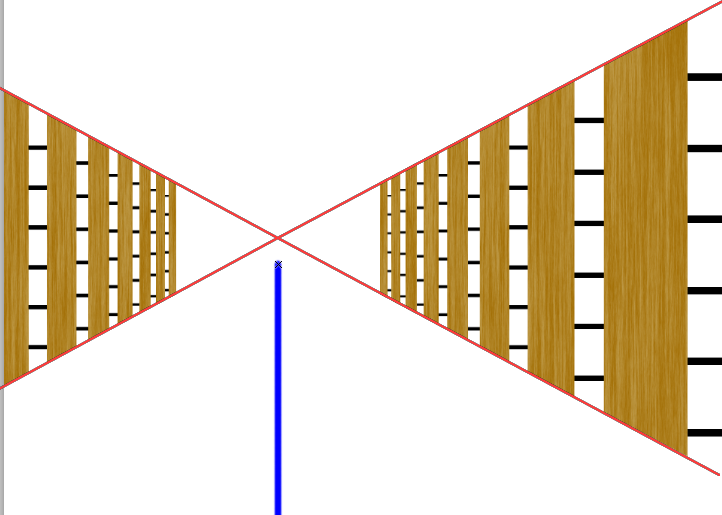
I'm a little puzzled by your statement "An image's centre line has no relationship to the horizon or any vanishing points, even if the camera was perfectly vertical." Does that apply to 1-point as well as to 2- or 3- point? I've been reading Perspective Made Easy by Robbie Lee, in which he states: "The vanishing point has to stay in the middle of the picture with one point perspective...Otherwise, you wouldn't truly be square to the subject and would need to use two- or three- point perspective."
I tried to explain that to myself on this basis: If I'm on a level ground plane, perpendicular to the picture plane, my cone of vision would be projected as a circle on that plane. My line of sight (eye level) would be exactly at the center of that circle. The horizon line would be the point where any distant plane (the earth's surface) would be at eye level. So, horizon line = eye level = center line. You're not buying that? [At various times, I found that I had a very imperfect understanding of what I was supposed to be teaching to others. So, I developed a compulsion for trying to explain things to myself in excruciating detail. I realize that not everyone can relate to that.]
I still have to follow-up on some of those other references you gave me. By the time I get a handle on this, I'll probably keel over  Seriously, many thanks.
Copy link to clipboard
Copied
Doc_Pit wrote
I'm a little puzzled by your statement "An image's centre line has no relationship to the horizon or any vanishing points, even if the camera was perfectly vertical." Does that apply to 1-point as well as to 2- or 3- point? I've been reading Perspective Made Easy by Robbie Lee, in which he states: "The vanishing point has to stay in the middle of the picture with one point perspective...Otherwise, you wouldn't truly be square to the subject and would need to use two- or three- point perspective."
Ahhh... I was actually thinking about the horizontal horizon line, and not an imaginary vertical line. I am not at home right now, and we have to strip out our computer room for our decorators either this evening, and if not, definitely tomorrow, so I can't provide diagrams. The links I referred to earlier are the Student Art Guide (I think I might have said 'Students online'). Read it all, and watch the videos. It's (collectively) as good a guide to perspective as I have come across.
https://www.studentartguide.com/articles/one-point-perspective-drawing
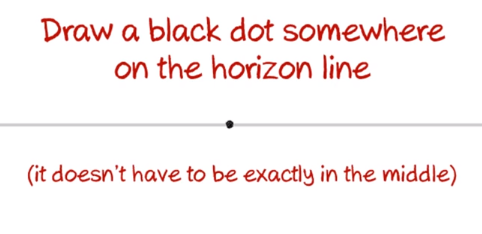
This PDF contains this diagram, and while the height of the horizon is random, the vanishing point is near, but not exactly, on centre.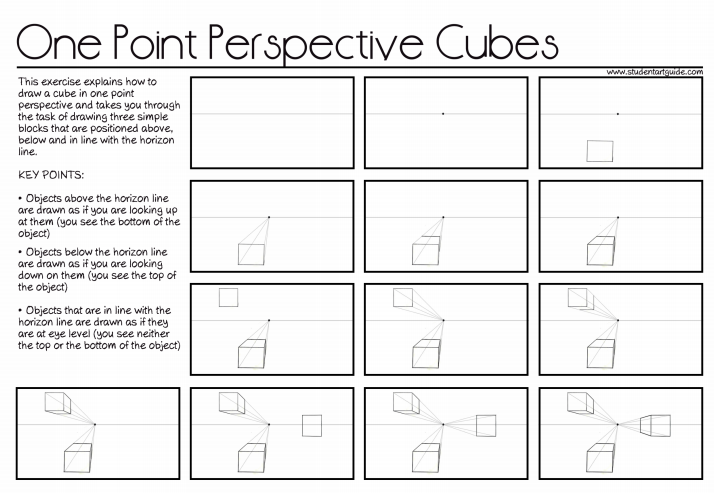
I think they are wrong, and this is my reasoning. It is hard to describe this with Photoshop, but imagine a birds eye view of several city blocks, and that you are standing on one side the street, and photographing a building on the other side of the street, but several blocks down the road. You would be at an angle to the street's centre line, and any side streets (assuming they are square to the street you are on) would be at the same angle. The side streets would therefore converge, which means you are looking at a two point perspective. If your camera was also tilted slightly up or down, it would become three point perspective
So I think that the vanishing point for single point perspective does need to be in the centre of an uncropped image. Otherwise it becomes two point perspective. Easily checked with an existing image, and especially in Photoshop where you simply need to turn on the grid, or drag out some guides check for converging lines.
The video goes on to say. This is only valid when drawing because we don't need to allow for a camera's point of view being symetical around the lens axis.
I mentioned using Lazy Nezumi Pro's perspective tools, namely Vanishing Lines (for existing images) and Perspective Lines (for creating a drawing from scratch). I strongly recommend that if you use the latter, you copy the perspective from existing photographs. At least until you get used to using it. This is because it is so easy to try and produce wildly unlikely perspectives. In fact it is quite hard to lay down a believable perspective without some practice.
Copy link to clipboard
Copied
OK I am home now, so will clarify what I was talking about in the last post:
This is a plan view of the viewpoint I was referring to. The lens axis is not parallel to thew buildings each side of the street, so it can't be one point perspective. The buildings in the side streets on thew right will converge with distance, and the buildings on the left will grow taller towards the left. The perspective will be less pronounced though. The right hand vanishing point much further away
A camera's eye view of the above scene. You can't see the side streets on the left because you are looking straight down across the faces of those buildings. The horizontal perspective is less pronounced, but still apparent.
Copy link to clipboard
Copied
Actually 2 point and even 3 point perspective is just a simplification.
If you remember it this way it may help:
1. When faces are parallel to the camera film plane (or drawing paper) then the edge lines on those faces (left&right top&bottom) will not converge
2. When faces are angled in relation to the camera then the edge lines will converge.
3. When a face is perpendicular (exactly 90 degrees) to the camera film plane then the edges of that face converge at a point half way up (or across) the image
4. All edges that are parallel in the scene will converge on the same point.
5.The ground, if flat, is just another face so follows those same rules.
That is why when drawing cuboids, with faces that are parallel to each other we end up with one, two or three point perspective, depending on the angle of each face to the camera film plane.
In the real world, even with cuboid shaped objects (such as buildings) every building face is not parallel to every other. Rarely, outside of some US cities, do we build on a perfect grid. So if we introduce a new cuboid with it's three faces at different angles to the others then we have a new set of three points.
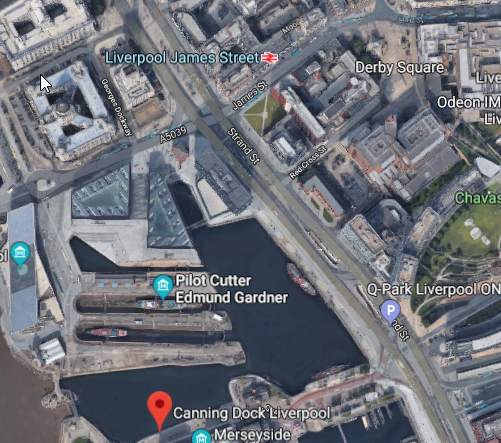
A real world example of non parallel faces is below. In this image we could mistakenly assume the buildings on the right are parallel to the buildings in the distance (they are not). We could assume the left and right side of the dock are parallel (they are not). We could assume that the black building is built conventionally with it's faces and edges at 90 degrees (it is not). All this gives multiple vanishing points. All that before we take into account the distortions of a wide angle lens!

Dave
Copy link to clipboard
Copied
We are happy that when the lens axis is perpendicular to the building faces, then the aspects facing the camera/drawer will also be square on with parallel sides and top and bottom (the little red arrows). This will remain true whether the lens axis on the large red or green arrow.
It seems to me that the vanishing point will be directly in line with (in front of) the large arrows in each case, which seems to be at odds with this slide from the Student Art Guide video.

I'm going to have to thank Doc because Perspective Made Easy has always meant the Earnest Norling book to me, so I have only just discovered the Robbie Lee book with the same title. Like the other two books, it is also available for free as a PDF file and it looks like a lot more fun to read. So I am going to sit back and read it cover to cover, and see if I can get a better handle on the subject.
Copy link to clipboard
Copied
Trevor.Dennis wrote
It seems to me that the vanishing point will be directly in line with (in front of) the large arrows in each case, which seems to be at odds with this slide from the Student Art Guide video.
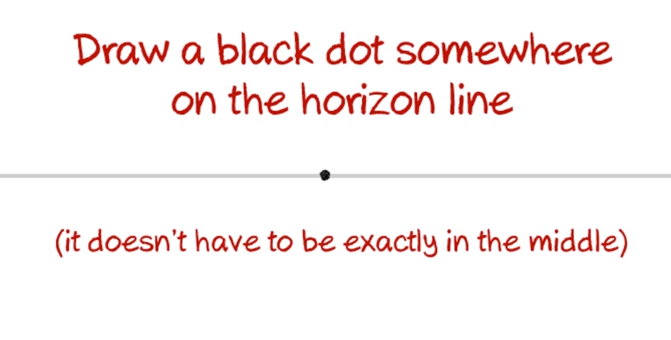
The dot will be exactly in the middle if the faces and edge lines to be drawn are at 90 degrees to the camera /paper plane. If they are not then the dot will move to the left or right depending on the angle.
That said - if you then cropped the image the dot would no longer be in the middle so from that point of view they are correct
Dave
Copy link to clipboard
Copied
Well I have read the Robbie Lee book. It is not very long, and is reasonably interesting, dealing more about putting perspective into use with your art, than explaining how it works, It is nothing like as full a source on the subject as the Earnest Norling, or Joseph D Amelio's Perspective Drawing Handbook. Where it does score is advice about setting up two point perspective for a new drawing, but it is mostly common sense... Move your vanishing points further out with tall objects, and generally try not to start out with your vanishing points too close in, as that will give the effect of a distorted perspective. A bit like getting too close with an ultra wide angle lens.
http://www.storytellerartist.com/documents/Perspective_Made_Easy.pdf
http://www.floobynooby.com/pdfs/Perspective_Drawing_Handbook-JosephDAmelio.pdf
I am going to carry on with Lazy Nezumi Pro and paths. The big advantage of using paths is that they can exist outside the canvas, so you don't need to create crazy wide canvas to keep the vanishing points visible. We have surely done this to death now, and it is time to practice practice practice.
Copy link to clipboard
Copied
I can't tell you guys how much I appreciate your insights. Only problem is, I probably won't live long enough to assimilate all of this and then apply it. Thanks, again.
Copy link to clipboard
Copied
Doc_Pit wrote
I can't tell you guys how much I appreciate your insights. Only problem is, I probably won't live long enough to assimilate all of this and then apply it. Thanks, again.
I'd got the impression that you were a young fella Doc?
I think Dave and I have both posted to Steve Caplin's 'How To Cheat at Photoshop' forum where he has a Friday Challenge. The best thing about that challenge is that Steve critiques every image, so you get feedback from one of the industry's greatest illustrators. He used to tell me off for my perspective errors, and I struggled to understand what he was telling me. This car was one of my uploads, and like I said, I couldn't see what was wrong with it. I can now immediately see that the door would still exactly fit its opening, but I should have made it much larger because it is closer. The same applies to the mechanism which I made the same size end to end. All this is on top of the fact that the door couldn't actually close because the mechanism is in the wrong place. The EXIF on the image tells me this happened just four years ago! I wouldn't make those mistakes now, although I'd still seriously struggle to work out the vanishing points for the car. We all keep on learning Doc. That's what makes it so interesting.

[EDIT] Just to clarify. The car image was provided, and the challenge was how to get into it. I can't find the thread, despite looking at the forum for several months before I loaded the image to flickr. I can now see other perspective problem Steve would have picked up on. I had to fake the door stops and the car's interior, and while the door stops are OK, the driver's seat is miles out.
The forum software makes our Jive look flash, which is really saying something. If you do not post for a while, the only way to get your password back is to email Steve. Having done at least once already, I am too embarrassed to ask again.

 AdChoices