Copy link to clipboard
Copied
I am coming from Adobe Fireworks world (like 10 years old discontinued app!!!) where this kind of operation is quite simple and very easy (I create vector rectangle, apply gradient to it, copy it, select my image I want to mask and "paste as mask" [CTR+ALT+V] - voila, that's it with the gradient editable all the way even after closing and reopening my document!).
Is there a way how to have my vector rectangle (shape drawn by the Rectangle Tool in the palette) with black and white gradient as its color used as a nice blending layer mask so that the editing would be such and easy yet exact nondestructive task to do (just change gradient values of the rectangle) compared to destructive (definitive) lame way of using Gradient Fill Tool where you just draw "by the eye" kind of hokus-pokus "guess and try" approach (not editable once done: you have to redo it all the time with new strike-thru)?
And, BTW, technique of clipping the image to the gradient as clipping mask does not work for images with transparency, like image of rain where only drops are visible, cos you do not have any underlaying bg color for the gradient to set as bg is normally some sort of image (thus not one single color to chose that would be set as opaque for the gradient)
I spent like half a day searching internet but to no use...
Ok, now I understand. Sorry, I thought you meant the bottom layer was transparent.
Put your layers in this order
Lowest - the background image
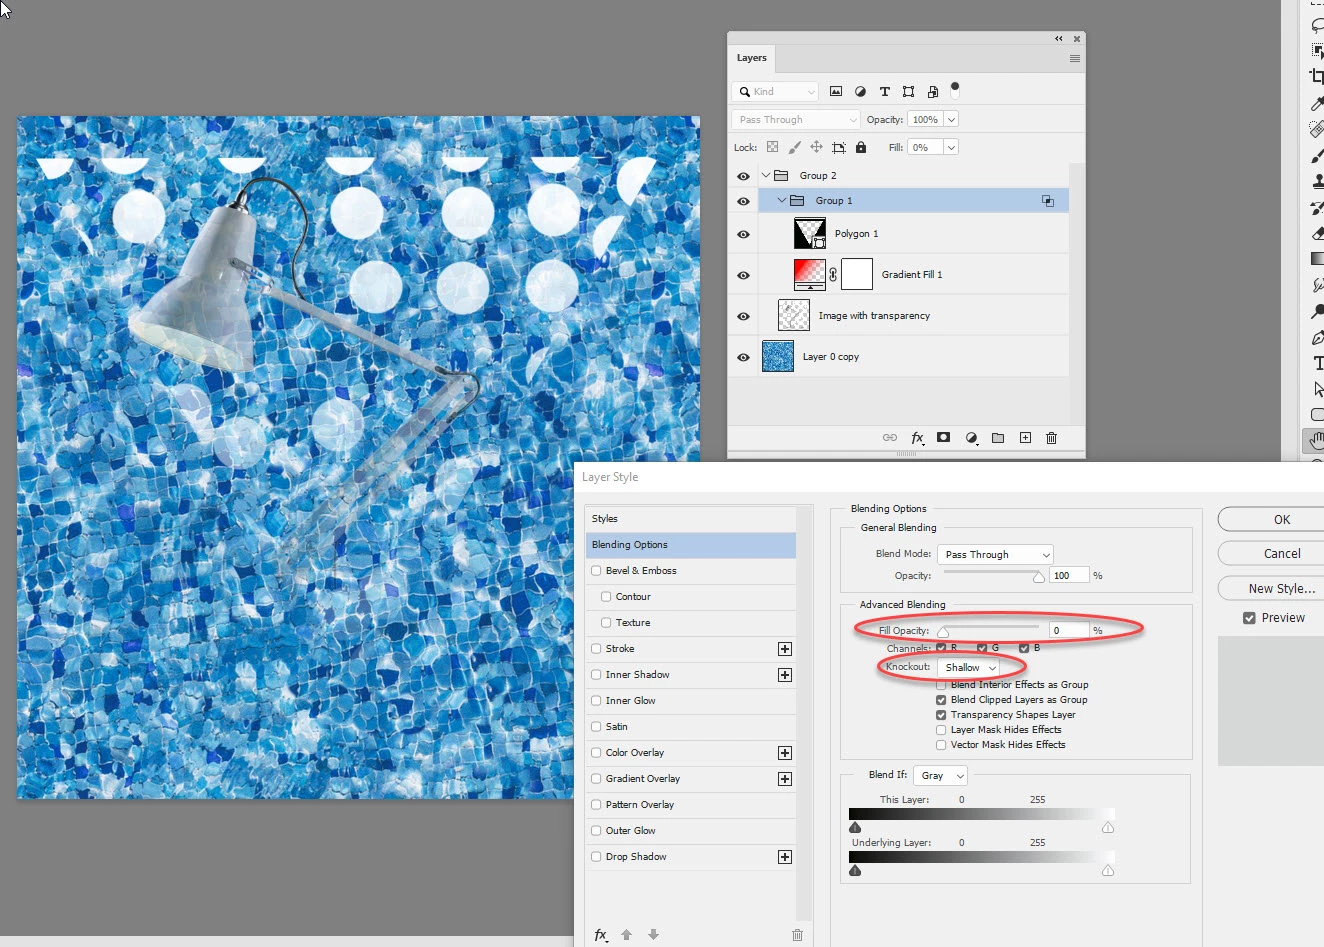
Next up The image with transparency (I've used a desk lamp with random white spots against transparency)
Next a group containing your vector triangle but reversed (using Path operations and solid color) and a gradient fill layer running solid to transparent
Now go to Blending modes for the group and set knockout to shallow and fill to 0%
Put that group
...Copy link to clipboard
Copied
Hi
Can you show (screenshot) or tell us more about the effect you are trying to achieve so we can help with the best approach?
~Jane
Copy link to clipboard
Copied
Hi there
I want gradient layer mask with non-destructive edit option, that is to be able change gradient values/settings which is not possible with standard way of doing gradient mask (that is by using Gradient Tool: once applied it is done: you would have to do another Gradient fill over the existing one and yet there is no option to set actual values for the applied gradient - the only thing you have is how long you draw the initial line when starting doing Gradient Fill Tool = not good at all, I want exact re-editable gradient values like with gradient fill in rectangle after gradient was applied to mask).
Therefore I was asking if there is a way how to make layer mask out of drawn vector rectangle that would have gradient fill thus still editable once applied as mask. Something like mix of vector and pixel mask worlds: with pixel mask white reveals/black hides, but with vector mask the outline makes the mask.
What I want is vector mask with actual gradient fill so that the fill color (white/black) would set what is revealed (white) and what is hidden (black) inside the vector outline making nice gradient blend/wipe yet it would stay still editable (that is non-destructive) after it was applied.
And I think something like that can be done considering someone already done that (or at least it looks to me like that) according to this article title (unfortunatelly, the video in there we normally cannot see unless we pay):
Copy link to clipboard
Copied
Hi
I watched the video on LinkedIn Learning (formerly lynda.com) and don't think it applies to what you are trying to do. Deke has photos of his two sons partially overlapped and uses a vector mask to blend the images into one composite. It's still unclear to me what you are trying to do, though, so I tried in Illustrator. It may or may not be what you are looking for.
This is what you asked for:
Photo credit: Davescm
Are either of these close? If neither of us has guessed right, please clarify.
~ Jane
Copy link to clipboard
Copied
No, this is not what I want - see davescm response: he is doing what I want but I have troubles reproducing his approach as he does not explain enough how he did what he did, but I am getting quite close...
Still it is so much unbelievably complicated compared to Fireworks, this is unbelievable to me considering IT IS ADOBE'S OWN OTHER PRODUCT so the code is already there which should be very easy to implement (a smal portion of code around it that needs to be changed or written cannot be excuse for not having this already)!
In Fireworks I would just do this (simple and easy as saying "Hallo"):
It is quite beyond me why Photoshop develop team has to have this so unbelievably complicated to do...bah.
Copy link to clipboard
Copied
Add a shape layer with no stroke but a gradient fill.
Make the gradient go from transparent to solid
Clip an image layer to the shape layer (Alt click on the border between the two in the layers panel) so a little down arrow appears and the image is now masked by the shape layer below it. The shape and the gradient fill remain editable
Dave
Copy link to clipboard
Copied
Thanks, but did you actualy read ALL THE TEXT IN MY POST?
Cos I specifically said there that THIS APPROACH DOES NOT WORK if you have a picture instead of solid color as background...your approach only works if the solid color in the gradient is the same as the bg color = not usable.
EDIT: as you already updated your answer and I see you are now using a picture as bg then I still do not know how you did that cos when I do what you wrote it does not work here. I have transparent PNG image of rain (rain drops on transparent bg), so when I use your example it does not work - it goes from transparent to the solid color we set in the gradient. It looks like it does not like images with transparency, so I need approach to that now.
Copy link to clipboard
Copied
It works if you set the gradient from transparent to solid, not necessarily black to white - actually the colour is irrelevant, but opacity 0% through to opacity 100% (see the circles in my first screenshot) If you click on the top squares above the gradient you can adjust the opacity at each point.
See screenshot below against transparency
Dave
Copy link to clipboard
Copied
As I told you: this does not work with images having transparency. When I use standard opaque image it works nicely, if I use any image that has transparent alpha chanel then happens what I described above.
+ it looks like we do not understand each other, so I explain it step by step:
1st (top) layer: image of rain with TRANSPARENT ALPHA CHANEL (that is background behind the actual rain drops is transparent in this image) I want to be masked - I am clipping it to the layer below...
2nd layer (middle): vector rectangle with gradient applied exactly as you wrote
3rd layer (bottom): any opaque image
With setup like that your approach does not work if the image being masked (that is being clipped as mask to the rectangle below it) contains ANY ALPHA CHANEL TRANSPARENCY: in such case the portion of the gradient fill from the rectangle where it is opaque gives the color of that gradient color to the masked image transparent alpha chanel, which is in this case white color (if I change the color to black it would give black color to alpha chanel of masked/clipped image and so on).
Copy link to clipboard
Copied
Ok, now I understand. Sorry, I thought you meant the bottom layer was transparent.
Put your layers in this order
Lowest - the background image
Next up The image with transparency (I've used a desk lamp with random white spots against transparency)
Next a group containing your vector triangle but reversed (using Path operations and solid color) and a gradient fill layer running solid to transparent
Now go to Blending modes for the group and set knockout to shallow and fill to 0%
Put that group and the image with transparency in a second group (only needed if the bottom layer is not a background layer)
The triangle and the gradient remain editable
Dave
Copy link to clipboard
Copied
Dave, please, could you write what exactly are you doing in detail?
I mean showing me a picture is very nice and I do appreciate it but I am unable to see/know from the picture and your quick description what exactly did you do there in those groups (like saying "group containing your vector triangle but reversed using Path operations and solid color and a gradient fill layer running solid to transparent" does tell nothing to me, sorry - my head goes rounds trying to understand you with no success).
I see there is new element under the triangle with somehting red accros it and I do not know what setings it has nor what exactly that object/layer is, so could you be more specific, please? Cos this way I seem to be unable reproducing your steps and I would very like to as it seems you did great job succeeding in what I want to achieve...
Could you please write it somethingl ike this:
1. top layer: details of what is there, what blend mode, what values
2. second layer: sduisah asas f
3. 3rd layer: group with cjksncsa
Also I have absolutelly no clue how did you make that triangle being transparent with everything else around it black - it would be great if you could tell me how you did it step-by-step too (of course I know how to make the triangle transparent but how to make everything around it solid color is beyond me).
EDIT:
OK,after some fiddling around it seems I was able reproducing all but somehow still have no clue how to do that transparent triangle with solid black everywhere around it...
Nevermind, I finally understand what you did and now it does exactly what I want - thank you so much, Dave!
Anyway, as I wrote elsewhere: I still really do not understand why in Photoshop it has to be this complicated - such a rather simple task, when in Fireworks I would just do this (simple and easy as saying "Hallo"):
Copy link to clipboard
Copied
Hi
I've just come back on line and seen your post. Sometimes it is hard to pitch a "how to" as you don't always know the level of knowledge of the other person. So it's a balance of showing how without spelling out unnecessary detail that makes the post too lengthy. I don't always get that right 🙂
I'm glad you managed to make sense of my post and that it worked out for you.
The complexity comes from Photoshop's history. It is primarily a pixel editor with some vector features added, whilst Illustrator is the opposite. If you wish, you can make a feature request to add an editable gradient to a vector mask at the link below where it will be seen by Adobe staff.:
https://feedback.photoshop.com/photoshop_family
Dave